To repair weld burn-through, you should follow these steps for the best results:
- Adjust your welder settings so you do not create more holes.
- Attach a backing plate behind the damaged area for support.
- Fill the hole until it disappears.
- Grind the surface flat so it matches the base metal.
- Weld over the spot to restore strength.
Check your work at each stage. You avoid common mistakes and ensure a strong repair when you use the right technique.
Key Takeaways
- Change your welder settings to stop making more holes. The right settings keep the metal strong.
- Always clean the area near the burn-through before welding. Take away rust, oil, and dirt. This makes the weld strong and stops weak spots.
- Use a backing plate for bigger holes to give support. This helps control the weld and lowers the chance of more burn-through.
- Practice the whipping motion to control heat when welding. This helps fill holes better and keeps the metal from getting too hot.
- Check if the metal pieces line up before welding. Good fit-up stops stress on the weld. It also lowers the chance of new burn-through or cracks.
Identifying Weld Burn-Through
Visual Signs
You can spot weld burn-through by looking for certain clues on the metal. The most obvious sign is a hole or gap where the weld melted through the base material. Sometimes, you see rough edges or a misshapen bead around the hole. The area may look thin or warped, and you might notice discoloration from overheating. If you see metal sagging or a shiny spot that looks different from the rest, you likely have burn-through.
Tip: Always check both sides of the weld. Burn-through often shows up as a hole on the back side, even if the front looks smooth.
Common causes of weld burn-through include:
- High welding current.
- Extreme gap to the root.
- Not enough root face metal.
- Powerful welding machines with incorrect adjustments.
- Improper technique on thin sheets.
- Too high welder settings for thick metal.
- Large gaps between metal pieces.
- Slow torch movement.
- Incorrect wire sizes.
If you notice any of these issues, you should inspect the weld closely before starting repairs.
Assessing Damage
You need to figure out how deep and wide the burn-through goes before you fix it. Start by cleaning the area so you can see the damage clearly. Use a flashlight to check for thin spots or cracks around the hole. If the metal looks weak or brittle, you may need a bigger repair.
For a more accurate assessment, you can use special tools and methods. Here is a table showing two recommended ways to check weld burn-through damage:
| Method | Description |
|---|---|
| Noncontact, Air-Coupled Ultrasonics | This tool lets you inspect welds without touching them. It works well in hot or dirty environments. It finds burn-through by measuring how sound waves move through the metal. |
| Ultrasonic Testing Parameters | By changing the settings on an ultrasonic tester, you can see how much damage there is. This helps you decide how to fix the weld. |
If the damage is small, you can patch it. If the area is large or the metal is weak, you may need to cut out and replace the section. Always choose the repair method that gives you the strongest result.
Common Mistakes in Repair
Wrong Filler or Rod
You need to choose the right filler or rod for your repair. If you use the wrong type, the weld may not bond well with the base metal. This mistake can cause weak spots or cracks. Always match the filler material to the metal you are welding. Check the manufacturer’s recommendations before you start. Using the correct rod helps you avoid more weld burn-through and ensures a strong, lasting repair.
Poor Area Prep
Proper preparation is key to a good repair. If you skip cleaning or do not remove rust, oil, or paint, your weld will not stick well. Dirt and debris can cause porosity or weak welds. Use a wire brush or grinder to clean the area around the burn-through. Make sure the surface is smooth and free of contaminants. Good prep work gives you a solid foundation for your weld.
Overheating
Overheating is a common mistake when repairing weld burn-through. High temperatures can damage the metal and weaken the joint. Watch for these problems if you let the area get too hot:
- Overheating compromises the structural integrity of welding projects.
- It can create weak points that may not be visible, leading to long-term structural failures.
- Overheating can lead to the loss of properties in adjoining metal, causing it to distort.
- The new weld must then handle additional stress from this distorted metal, which can lead to premature weakening or cracking.
- High temperatures can cause uneven heat distribution and cooling rates, resulting in weak points in the weld.
- Imperfections may exist below the surface, leading to potential catastrophic failures over time.
Let the area cool between passes. Adjust your welder settings to avoid excess heat. This step helps you prevent more weld burn-through and keeps your repair strong.
Ignoring Alignment
Alignment matters when you repair weld burn-through. If you do not line up the metal pieces correctly, you can create new problems. Poor alignment can cause stress on the weld and lead to more burn-through or cracks later. Here is a table showing how alignment issues can affect your repair:
| Alignment Angle | Effect on Weld | Description |
|---|---|---|
| Camber | Uneven Strength | Excessive positive or negative camber can cause one side of the weld to carry more load. |
| Caster | Joint Stability | Misalignment can lead to a weak or wandering joint. |
| Toe | Weld Direction | Even small toe misalignment can pull the weld out of place, leading to weak spots. |
Always check your fit-up before you start welding. Proper alignment helps you avoid repeat repairs and keeps your weld burn-through fix strong.
Weld Burn-Through Solutions

Cleaning and Prep
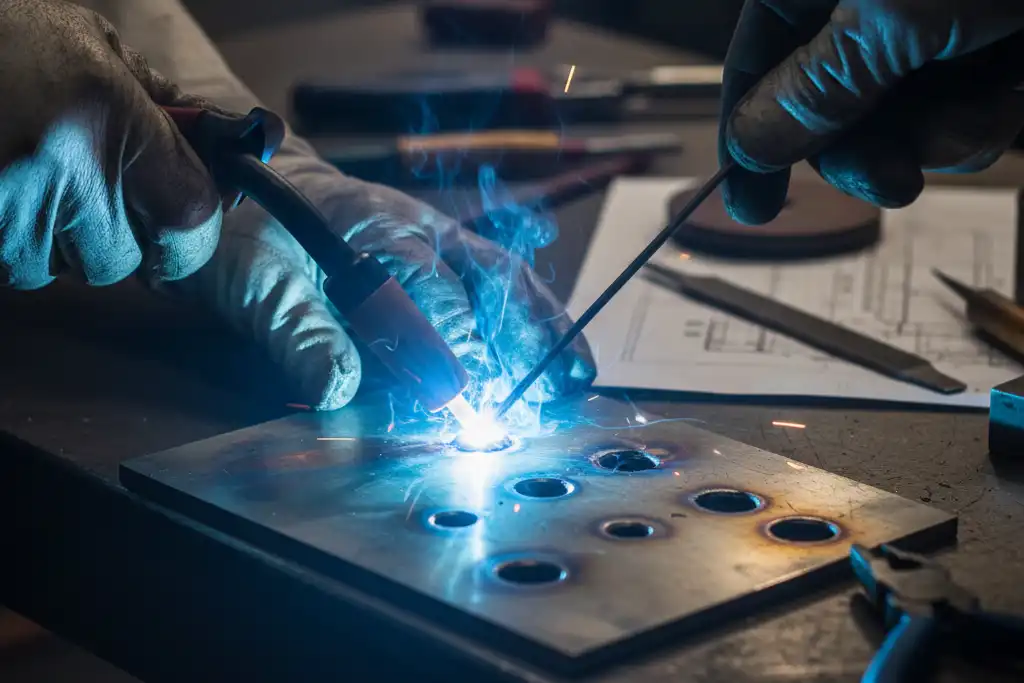
Start your repair by cleaning the area around the burn-through. Remove any rust, paint, or oil with a wire brush or grinder. Make sure the metal is smooth and free of debris. Good prep work helps your weld stick and prevents new problems. You should always inspect your equipment for damage before you begin. Keep your workspace clean to avoid accidents.
Tip: Wear a welding helmet, safety glasses, and flame-resistant gloves. Proper gear protects you from sparks and heat.
Whipping Motion Technique
Use a whipping motion with your welding rod or torch to control heat and fill the hole. Move the rod back and forth quickly over the gap. This technique helps you avoid overheating the metal. You can build up the weld slowly and prevent more burn-through. Practice this motion on scrap metal before you repair the actual part.
Multi-Pass Welding
Multi-pass welding works well for repairing weld burn-through. You lay down several layers of weld, letting each pass cool before starting the next. This method gives you better control over heat and helps you join thicker materials. You also reduce the risk of heat-related problems.
- Multi-pass welding lets you join thick materials and ensures a strong joint.
- Each pass cools before the next, which lowers the chance of burn-through.
- Operators with different skill levels find multi-pass methods easier and safer.
Adjusting Settings
Set your welder to the correct wire feed speed, voltage, and amperage for the job. If you use too much power, you risk melting through the metal again. Many modern welders have Auto-Set technology. This feature adjusts settings based on material thickness and wire size. You get consistent welds and avoid common problems like poor wire feed or splatter.
- Use the right settings for your material and wire.
- Auto-Set technology helps you avoid burn-through by adjusting speed and power.
- Consistent settings lead to better weld quality.
Cooling Between Passes
Let the area cool between weld passes. Fast cooling lowers peak temperatures and reduces the risk of burn-through. Cooling also affects the stress in the weld area and helps keep the joint strong. The hardness of the heat-affected zone depends on cooling, which prevents cracking and ensures a good repair.
- Cooling between passes keeps the metal from getting too hot.
- Lower temperatures help you avoid new holes or weak spots.
- Proper cooling improves the quality and strength of your weld.
Patch vs. Full Repair
Decide if you need a patch or a full repair. Use a patch when the damage is small or in a spot where you can overlap metal. Full repairs work best for single panels or large areas. Many shops prefer flange welding for speed and strength. Tack weld every few inches, then weld in sections to control heat. Always use weld-through primer and seam sealer to prevent rust.
| Situation | Description |
|---|---|
| Single Panel Repairs | Full welds are best for single panel repairs. Patch repairs may not be ideal. |
| Use of Flanges | Overlapping with a flange gives you a thicker area to weld and reduces burn-through. |
| Tack Welding | Tack every few inches, then weld in sections to control heat. |
| Moisture Prevention | Use weld-through primer and seam sealer to stop rust in overlaps. |
| Professional Preference | Many shops choose flange welding for speed and strength. |
Note: Always inspect your repair with visual checks, ultrasonic testing, or other methods to make sure the weld is solid.
You can avoid common post-repair issues like expulsion or new burn-through by following these steps. Watch for molten metal ejection during welding and check for holes or burrs after you finish.
Preventing Burn-Through
Power and Feed Settings
You can prevent weld burn-through by setting your welder to the right power and feed rates. If you use too much amperage or wire feed speed, you risk melting through thin metal. Many welders find that even small changes in these settings make a big difference. Some users report that basic MIG welders do not have low enough settings for thin sheet metal, which often leads to burn-through. You can also hold the welder a bit farther from the metal to help cool the weld and reduce the risk of holes.
- Lower power settings help you avoid burning through thin materials.
- Adjust wire feed speed to match the thickness of your metal.
- Use a welder with fine control for best results.
Travel Speed
Travel speed is another key factor. If you move too slowly, you add too much heat and increase the chance of burn-through. Moving at the right speed helps you lay down a strong bead without overheating the metal. The table below shows recommended travel speeds for different material thicknesses:
| Material Thickness | Wire Diameter | Current (Amps) | Voltage (Volts) | Travel Speed (ipm) | Wire Feed Speed (ipm) |
|---|---|---|---|---|---|
| 24-gauge | 0.024-inch | 30 to 50 | 13 to 15 | 10 to 20 | 130 to 160 |
| 24-gauge | 0.30-inch | 30 to 50 | 15 to 17 | 10 to 20 | 75 to 100 |
| 3/16-inch | 0.035-inch | 140 to 175 | 19 to 22 | 14 to 19 | 240 to 290 |
Tip: Practice on scrap metal to find the best travel speed for your project.
Preheating
Preheating the base metal can help you control the cooling rate. This step is important, especially for thicker or brittle materials. When you preheat, you lower the risk of cracking, which can lead to weld burn-through. Preheating also lets hydrogen escape from the weld, which helps prevent cracks and holes.
- Preheat to control cooling and avoid sudden temperature changes.
- Use a temperature stick or infrared thermometer to check the metal.
- Preheating helps you make stronger, cleaner welds.
Proper Fit-Up
Proper fit-up means making sure your metal pieces line up well before you start welding. Gaps or misalignment can cause uneven heating and increase the risk of burn-through. Always check your fit-up and clamp the pieces tightly. Good fit-up gives you a solid base for your weld and helps you avoid weak spots.
- Align metal pieces carefully.
- Use clamps to hold everything in place.
- Check for gaps before you start welding.
By following these steps, you can prevent weld burn-through and create strong, lasting repairs.
You can fix weld burn-through by doing a few steps. First, check how bad the damage is. Next, clean the area well. Change your welder settings so you do not make it worse. Weld slowly and carefully over the spot. Look at your work when you finish. If you skip cleaning or use too much heat, the weld will be weak. Cleaning the metal, using the right heat, and lining up the pieces help your repair last longer.
| Aspect | Numerical Results | Experimental Results | Difference (%) |
|---|---|---|---|
| Maximum Temperature Difference | 5.09 | N/A | 5.09 |
| Perimeter Deformation | Similar behavior | N/A | N/A |
| Relevant Plastic Strain | No relevant strain | N/A | N/A |
Try using digital tools and simulators to learn more. Practice a lot so you get better and make safe repairs that last.
FAQ
What causes weld burn-through most often?
You usually get weld burn-through from using too much heat or welding too slowly. Thin metal and large gaps also make burn-through more likely. Always check your welder settings and fit-up before you start.
Can you repair burn-through without a backing plate?
You can repair small holes without a backing plate by using a whipping motion and low heat. For larger holes, you should use a copper backing plate. This gives support and helps you control the weld.
How do you know if your repair is strong enough?
Check your repair by looking for smooth, even welds with no holes or cracks. You can tap the area with a hammer to test strength. For critical jobs, use ultrasonic testing or ask a professional.
What is the best way to avoid burn-through on thin metal?
Set your welder to low power and move quickly. Use short welds and let the area cool between passes. Practice on scrap metal first. Good fit-up and clean surfaces help prevent burn-through.
Top Challenges in Laser Welding Copper and How to Overcome Them
What Is Laser Welding of Thin Plates and How to Prevent Burn-Through
What Are the Effects of Power Density on Laser Welding Quality
What You Need to Know About Energy Density in Laser Welding


