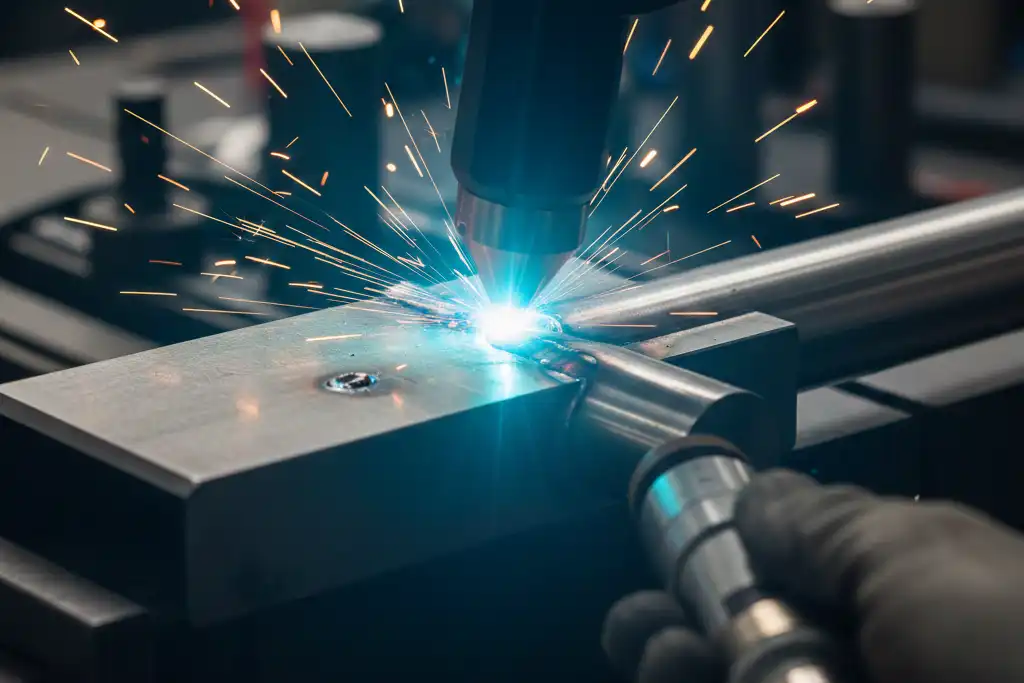
You can have many problems in laser welding. Some common problems are welding spatter, cracks, and porosity. These problems can make the surface look bad or break equipment. If you fix defects fast, you make welds better and work faster. Watching the process as it happens helps you find problems early and keeps things running well. You can stop expensive delays if you act before problems get worse. Checking often and changing how you work will help you get good results each time.
Key Takeaways
- Find common laser welding defects like cracks, porosity, and spatter. Seeing these problems early can stop expensive repairs.
- Always clean the metal before welding. Take away dirt, oil, and water to lower the chance of defects. This also makes the weld better.
- Change welding settings for each material. Pick the right laser power and speed. This helps the weld go deep enough and join well.
- Watch the shielding gas flow rates carefully. Good gas flow stops oxidation and porosity. This makes the welds stronger.
- Use filler materials and pre-heat methods to make welds stronger. These ways help control stress and lower the chance of cracks.
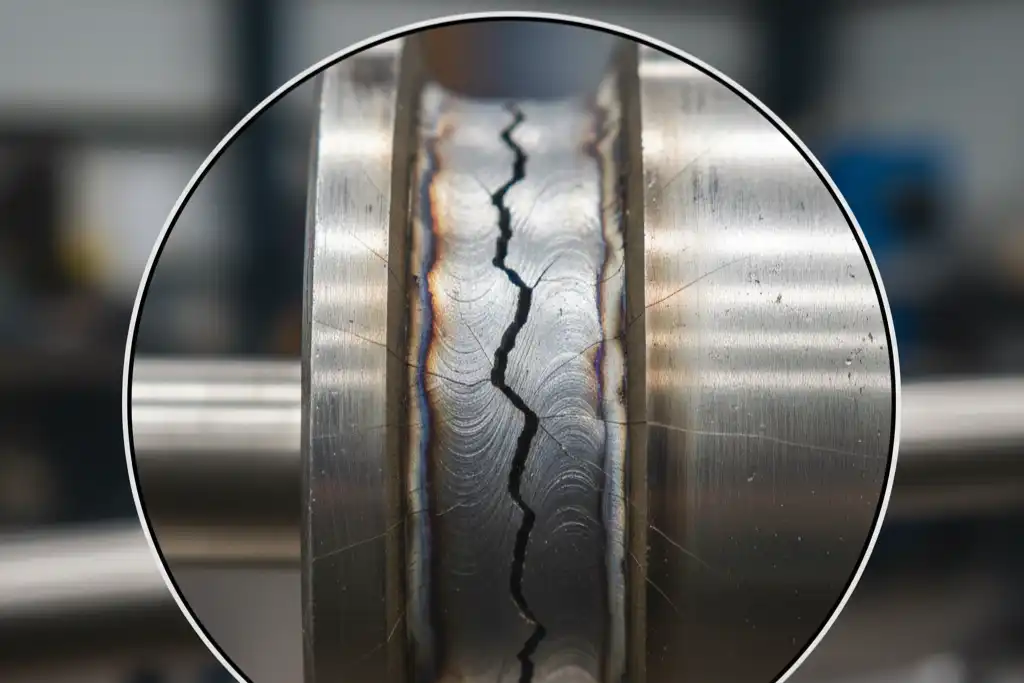
Laser Welding Cracks
Causes
Cracks can show up in laser welding for different reasons. There are two main types: thermal cracks and liquefaction cracks. Thermal cracks happen when the weld cools down too fast. The metal gets smaller and pulls apart, which makes a crack. Liquefaction cracks happen when some materials melt at the edges of the grains. These melted parts cannot handle the stress as the weld cools.
When welding, heat and force change the metal. As the weld cools, the melted metal gets smaller. This happens because of shrinkage and cooling. Hot cracking happens when too much pulling force builds up in a thin liquid layer between grains.
Small cracks in the HAZ happen because the metal shrinks as it cools. Some parts melt at the grain edges and cannot handle the stress. When welding, low melting point parts form at the grain edges. The heat from welding causes the metal to stretch. If the melted layer cannot handle the stress, small cracks will form between grains.
Cracks are a problem in laser welding. Two main things cause cracks: the way the metal is made and the forces on it. Laser welding heats and cools the metal very fast. This puts a lot of stress on the weld and can cause cracks.
Cracks can also happen if you use too much laser power, move too fast, or use too little powder. These things can make the weld cool too quickly or cause too much stress.
- High laser power
- High scanning speed
- Low powder-feeding rate
- Powder focus
Solutions
You can stop or fix cracks in laser welding by changing what you do. Try these ideas:
- Use filler wire to add more metal and make the weld stronger.
- Heat the metal before welding. This helps it cool slower and lowers stress.
- Choose filler that matches your main metal. This helps stop cracks.
- Do not weld too fast, especially with metals that crack easily.
- Watch how much heat you use. Too much heat causes stress, but too little makes weak welds.
- Change the powder-feeding rate and powder focus to get better welds.
Tip: Always check your welding settings before you start. Small changes can help make your welds better.
If you use these tips, you can have fewer cracks and stronger welds.
Porosity
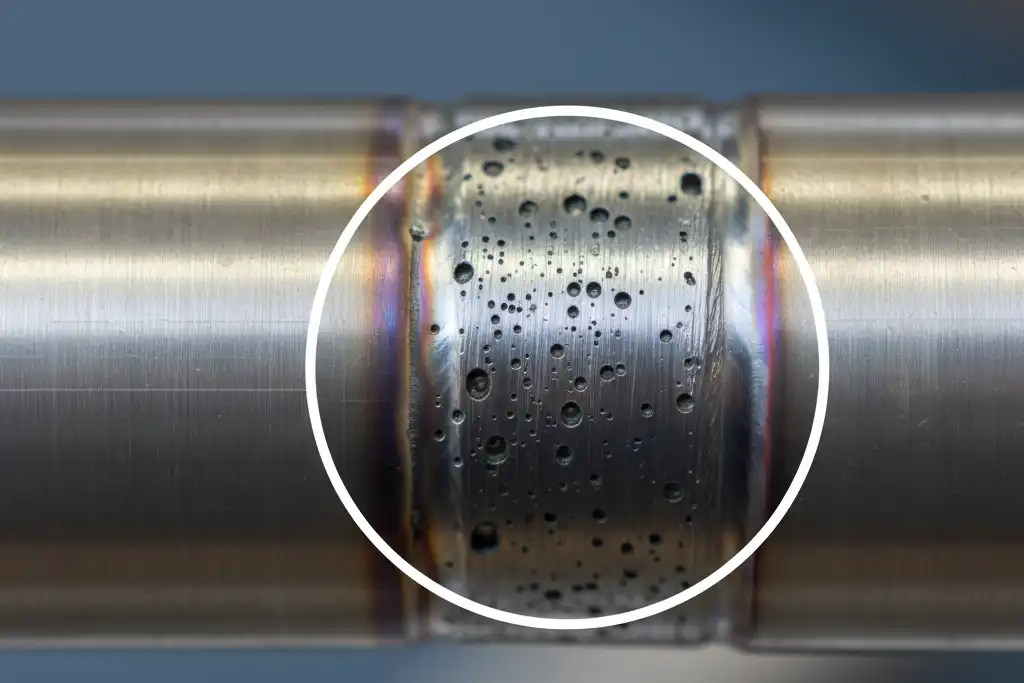
Causes
Porosity makes welds weak. It can also cause leaks. You might see small holes or bubbles in the weld. These holes form when gas gets stuck in the melted metal. Porosity can happen in many materials. It is more common in aluminum and magnesium alloys.
Here is a table that shows what causes porosity in different materials:
| Material Type | Contributing Factors |
|---|---|
| Aluminum Alloys | Welding speed, laser focus position, filler wire cleanliness, shielding gas flow rates |
| Magnesium Alloys | Stability of the keyhole, interaction of gas with the molten pool, turbulent flow of molten metal |
Shielding gas is very important for porosity. If you use too little gas, air can get in and cause oxidation. If you use too much gas, the weld pool can become unstable. The kind of gas you use also matters. Inert gases like argon and helium help stop oxidation. Active gases can make more porosity if you use them too much.
Here is a table that explains how shielding gas affects porosity:
| Factor | Description |
|---|---|
| Flow Rate | Insufficient flow leads to oxidation and porosity; excessive flow causes turbulence and instability. |
| Shielding Gas Type | Inert gases prevent oxidation; active gases can cause porosity if used excessively. |
| Material Specifics | Different materials require tailored flow rates to minimize porosity (e.g., 10-15 L/min for thin steel). |
| Thermal Conductivity | Higher thermal conductivity gases (like helium) can improve cooling but require higher flow rates. |
| Nitrogen Effects | Nitrogen can enhance strength but may also lead to porosity in certain alloys. |
Dirty metal, wet filler wire, and welding too fast can also cause porosity. You should watch these things carefully.
Solutions
You can lower porosity in laser welding by doing these things:
- Clean the metal before you weld. Use chemicals to remove oil, dirt, and water.
- Change welding settings. Go slower and set the laser focus right.
- Pick the best shielding gas. Use argon or helium and set the flow for your metal.
- Make sure the filler wire is dry and clean.
- Control the back width ratio. This helps keep porosity low.
Tip: Always check your shielding gas flow rate. For thin steel, use 10-15 L/min. Too much or too little gas can cause problems.
If you do these things, you will have fewer pores and stronger welds. Clean metal and the right gas help a lot. You can get better welds and avoid repairs.
Spatter

Causes
Spatter happens when small droplets of molten metal fly out of the weld pool. You may see these droplets land around the weld, making the surface rough and messy. Spatter can weaken the weld and make cleanup harder.
Many things can cause spatter during laser welding. The table below shows the main factors:
| Factor | Description |
|---|---|
| Material Properties | Some materials gasify easily at high heat, making bigger bubbles and more spatter. |
| Welding Parameters | Wrong amperage or voltage settings can cause spatter if they do not match the wire and gas. |
| Weld Design | The shape, width, and angle of the weld can make the weld pool unstable, leading to spatter. |
| Equipment Status | Poor optics or a low-quality laser beam can make the weld pool unstable and cause spatter. |
You should also know that materials with high vapor pressure or volatile parts will spatter more. The way heat moves through the metal and how much energy the metal absorbs also change how much spatter you get.
Here are some key points to remember:
- Materials with high vapor pressure spatter more.
- Volatile parts in the metal increase spatter.
- The way heat and energy move in the metal changes spatter.
The chemical makeup and physical properties of the metal matter a lot. When these mix with your welding settings, you can get different amounts of spatter.
Solutions
You can reduce spatter by making smart changes to your process. Try these steps:
- Adjust the laser power and welding speed. Use the right settings for your material.
- Control the focus position. A well-focused beam makes a stable weld pool.
- Use pulsed lasers if you can. Pulsed lasers help control heat and lower spatter.
- Clean the metal surface before welding. Dirt and oil can make spatter worse.
- Prepare the edges of your workpieces. Good edges help the weld pool stay stable.
- Pick the right shielding gas. Make sure the gas is pure and the flow rate is correct.
- Check your joint design. Small gaps and good fit-up help reduce spatter.
- Keep your equipment in good shape. Clean the optics, check the nozzle, and calibrate the laser often.
Tip: Always check your equipment before you start. Clean optics and a steady laser beam help you get a smooth weld with less spatter.
If you follow these steps, you will see less spatter and get cleaner, stronger welds.
Undercut
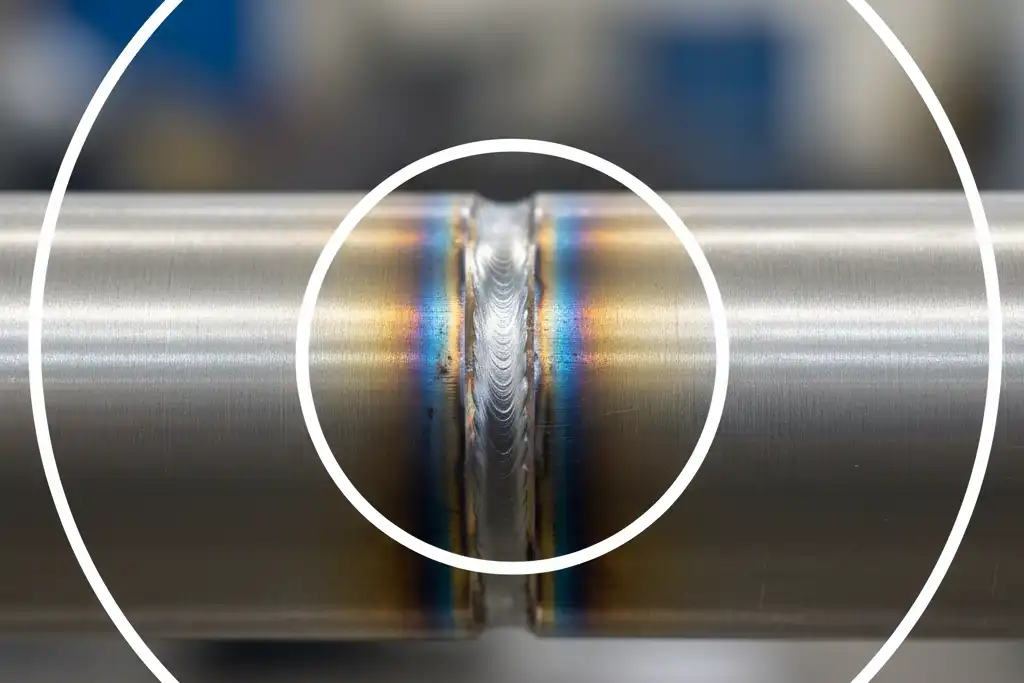
Causes
Undercut is a common problem you might see in laser welding. It looks like a groove or notch along the edge of the weld bead. This groove can make the weld weak and cause cracks later. You need to know what causes undercut so you can fix it.
Here is a table that shows the main reasons undercut happens:
| Operational Factor | Description |
|---|---|
| Excessive Travel Speed | If you move the laser head too fast, the molten pool does not stay long enough to wet the edges. This can leave gaps or grooves. |
| Low Laser Power or Poor Beam Position | If you use too little heat or the beam is not centered, the metal does not melt well at the sides. This can cause fusion problems. |
| Joint Misalignment | If the joint is not lined up under the laser, the molten metal cannot reach both sides. This leaves part of the edge unfused. |
| Material Coatings or Oxides | Some metals, like aluminum, form oxide layers quickly. These layers stop the metal from melting and fusing at the edges. |
You might also see undercut if you use dirty metal or if the joint design is poor. Always check your setup before you start welding.
Solutions
You can fix undercut by changing how you weld and by preparing your materials. Try these steps to get a smooth, strong weld:
TIG welding gives you more control. You can add filler metal exactly where you need it. This helps you avoid undercut and get a better finish.
Before you start, clean the metal well. Remove dirt, rust, paint, and oil. Clean surfaces help the molten metal fuse to the edges.
- Use the right current. Lower the current to avoid overheating and get good fusion.
- Pick the correct voltage. The best voltage helps you avoid grooves and get a smooth weld.
- Keep a stable arc. Adjust the arc length so you do not get too much spatter or uneven movement.
Here are three steps you can follow:
- Dial in the heat. Test different heat settings until you find the best one for your metal.
- Master the travel speed. Start slow and speed up only when the weld bead looks smooth.
- Maintain the perfect torch angle. Point the heat and filler metal at the bottom of the joint.
If you follow these tips, you will see fewer undercuts and stronger welds. Laser welding works best when you pay attention to speed, heat, and joint alignment.
Lack of Penetration
Causes
You may notice that your weld does not go all the way through the joint. This problem is called lack of penetration. It makes the weld weak and can cause failure when the part is under stress. You need to find out why this happens before you can fix it.
Here are some common reasons for lack of penetration:
- You set the laser power too low. The beam does not have enough energy to melt the metal deep enough.
- You move the laser head too fast. The metal does not have time to heat up and melt through.
- The joint design is not right. Thick materials or tight fit-ups can block the beam.
- The optics are dirty or misaligned. The laser cannot focus well and loses power.
- The cooling system has leaks or low coolant. The machine may not work at full strength.
- The power supply is not connected right. The laser may not reach the needed output.
- You use the wrong settings for the material. Each metal needs its own power and speed.
- Error codes on the control panel can show problems with the machine.
Tip: Always check the control panel for error messages before you start welding. This can help you spot issues early.
Solutions
You can fix lack of penetration by making changes to your process and equipment. Try these steps to get a stronger weld:
- Increase the laser power. More energy helps the beam melt deeper into the joint.
- Slow down the welding speed. This gives the metal more time to absorb heat.
- Clean and align the optics. A focused beam works better and goes deeper.
- Check the cooling system. Make sure there are no leaks and the coolant level is good.
- Inspect the power supply. Make sure all connections are tight and working.
- Adjust your settings for the material. Use the right power and speed for each type of metal.
- Use closed-loop control systems. These help keep the welding process stable and improve penetration.
- Watch the shape of the weld pool at the start. Managing the capillary geometry can help reduce pores and improve depth.
You can solve lack of penetration in laser welding by following these steps. Strong welds need enough energy, good equipment, and the right settings.
Lack of Fusion
Causes
You may see lack of fusion when the weld does not join the metal pieces completely. This problem can hide inside the weld and cause trouble later. You might hear people call these hidden defects “false friends.” They can make the weld weak, cause leaks, or lower electrical flow. You often find these defects at the spot where two sheets meet. The weld looks fine on the outside, but inside, the metals did not melt together.
Here are some reasons why lack of fusion happens in laser welding:
- You leave a gap between the sheets. The laser cannot reach both sides.
- The molten metal does not flow well. Viscosity and surface tension stop the metal from spreading.
- You move the laser too fast. The metal does not have time to melt and join.
- You use too little heat. The laser does not melt the metal deep enough.
- The surface is dirty or has oil. Contamination blocks the weld.
Tip: Always check the joint fit-up and clean the surfaces before you start welding. Good preparation helps you avoid hidden defects.
Solutions
You can fix lack of fusion by changing how you weld and prepare your materials. The table below shows common causes and ways to solve them:
| Causes of Lack of Fusion | Solutions to Lack of Fusion |
|---|---|
| Insufficient Heat Input | Increase Heat Input |
| Improper Joint Preparation | Improve Joint Fit-Up |
| Contamination | Surface Cleaning |
Try these steps to get a strong weld:
- Use more heat. Raise the laser power so the metal melts and joins well.
- Prepare the joint carefully. Make sure the pieces fit tightly with no gaps.
- Clean the metal before welding. Remove dirt, oil, and rust.
- Slow down the welding speed. Give the metal time to melt and fuse.
- Watch the weld pool. Make sure the molten metal covers both sides.
If you follow these tips, you will see fewer hidden defects and get stronger welds. Laser welding works best when you control the heat, clean the surfaces, and fit the joints well.
Burn-Through
Causes
Burn-through happens when the laser melts right through the metal. You often see this problem with thin materials. If you use too much heat, the metal cannot handle it and forms a hole. You need to watch out for several main causes:
- Excessive laser power puts too much energy into the metal. The material melts and cannot hold its shape.
- Slow welding speed lets heat build up. The metal gets hotter and softer, which makes burn-through more likely.
- Improper joint fit-up creates gaps. These gaps make it easier for the laser to melt through the metal.
Burn-through can ruin your weld and waste material. You should always check your settings before you start.
Thin metals need special care. If you use the same settings as thick metals, you will get holes instead of strong welds. Always look at the thickness of your workpiece before you begin.
Solutions
You can prevent burn-through by making smart changes to your process. Try these steps to keep your welds strong:
- Reduce laser power. Lower energy means less risk of melting through the metal.
- Increase welding speed. Moving faster helps spread the heat and keeps the metal solid.
- Clamp the workpiece tightly. Good clamping stops the metal from moving and keeps the joint stable.
- Use heat-dissipating fixtures. These tools pull heat away from the weld area and protect thin sections.
- Check the joint fit-up. Make sure there are no gaps that could cause problems.
Tip: Always test your settings on scrap material first. This helps you find the best power and speed for your metal.
If you follow these steps, you will see fewer burn-through defects. You will get cleaner welds and save time on repairs. Laser welding works best when you control the heat and keep the metal stable.
Distortion
Causes
Distortion changes the shape of your welded parts. You may see bending, twisting, or warping after you finish welding. This problem happens because heat makes the metal expand and then shrink as it cools. If you do not control the heat, the metal moves in ways you do not want.
You can see distortion more often in thin sheets or large workpieces. The metal heats up fast and cools unevenly. The way you set your welding speed also matters. If you weld too fast, the weld does not go deep enough. You may get undercuts or a thick weld face. If you weld too slow, the weld gets wide and the root may sag. Both problems can change the shape of your part.
Here are some main factors that cause distortion:
- High heat input makes the metal expand and shrink more.
- Fast welding speed lowers penetration and can cause surface defects.
- Slow welding speed increases weld width and root sagging.
- Thin or large workpieces bend more easily.
- Poor fixturing lets the metal move during welding.
Note: You should always watch how your part looks during and after welding. Early signs of distortion help you fix problems before they get worse.
Solutions
You can lower distortion by using smart techniques. Try these steps to keep your parts straight and strong:
- Manage heat flow. Use backside cooling to pull heat away from the weld area. This keeps the temperature even and lowers warping.
- Control residual stresses. Heat the metal before and after welding. Pre- and post-weld heat treatments help the metal relax and stay flat.
- Use proper fixturing. Hold your parts tight with mechanical fixtures. Good alignment stops movement and keeps the shape.
- Adjust welding speed. Test different speeds to find the best balance between penetration and width.
- Plan your weld sequence. Weld from the center out or use staggered welds to spread heat evenly.
| Technique | Benefit |
|---|---|
| Backside Cooling | Reduces thermal gradients |
| Heat Treatments | Lowers residual stresses |
| Mechanical Fixtures | Prevents movement and warping |
| Speed Adjustment | Balances penetration and width |
| Weld Sequence Planning | Spreads heat evenly |
Tip: Always clamp your workpieces before you start. Good fixturing is one of the best ways to stop distortion in laser welding.
If you use these solutions, you will see less bending and warping. Your welded parts will look better and last longer.
Surface Irregularities
Causes
Surface irregularities make the weld look rough or uneven. You might see cracks, bumps, or small holes on the weld bead. These problems happen when you do not control welding or prepare the metal well. There are different types of surface irregularities. Each type has its own cause. The table below shows common types and what causes them:
| Type of Surface Irregularity | Typical Causes |
|---|---|
| Solidification Cracking | Chemical composition (sulphur, phosphorous), weld profile shape, high thermal stress, mid-section bulging, weld penetration depth |
| Porosity | Plate/surface contamination, inadequate pre-cleaning, laser keyhole instability, inadequate inert gas shielding, hydrogen evolution from moisture or surface oxide |
Solidification cracking can happen if the metal has too much sulphur or phosphorous. High thermal stress and deep welds also make cracks more likely. Porosity shows up when the surface is dirty or you do not use enough shielding gas. Moisture and unstable keyholes can trap gas bubbles in the weld.
Tip: Always clean your metal before welding. Good cleaning helps you avoid many surface problems.
Solutions
You can fix surface irregularities by changing your process and using special techniques. Try these steps for smoother welds:
- Change the chemical makeup of your metal. Use metal with less sulphur and phosphorous.
- Control the weld profile and penetration depth. Test settings to find the best shape.
- Clean the surface before welding. Remove oil, rust, and moisture.
- Use the right shielding gas and flow rate. Keep the weld pool stable.
The table below lists some good ways to fix surface irregularities:
| Technique | Description |
|---|---|
| Pre- and Post-Weld Heat Treatment | Balances thermal input, relieves residual stress, and stabilizes microstructure to prevent warpage. |
| Backside Cooling | Accelerates heat dissipation to minimize distortion, especially in thin or heat-sensitive materials. |
| Fixtures and Supports | Maintains joint alignment and counters distortion during welding through proper mechanical support. |
Pre- and post-weld heat treatment helps keep the metal stable. Backside cooling helps thin materials cool evenly. Fixtures and supports hold your workpiece in place and stop movement during welding.
Laser welding lets you control the process well, but you must watch for surface defects. If you follow these steps, you will get smoother welds and have fewer problems.
Gas Pockets (Stoma)
Causes
Gas pockets are small bubbles that get stuck in the weld. These bubbles make the weld weak and can cause leaks. Gas pockets form when gases stay in the melted metal and cannot get out before it hardens.
You can get gas pockets in laser welding for a few reasons:
- Gases get trapped from dirty surfaces or filler materials.
- Oil, grease, or water on the metal can cause contamination.
- Using the wrong shielding gas or wrong flow rate can cause problems.
- Oxide layers on metals, like aluminum alloys, can trap gas.
- Cooling the weld too fast does not let gas escape.
The shielding gas protects the weld from air. If you use the wrong gas or set the flow wrong, air can mix in. This can cause surface problems and porosity, which means there are gas pockets.
Solutions
You can stop gas pockets by cleaning and using the right welding steps. Try these ideas:
- Clean all surfaces and filler materials before welding. Use acetone or isopropyl alcohol to remove oil and grease. For thick oxides, use a stainless steel wire brush or carbide burr.
- Choose the right shielding gas. Argon works for most metals. Use nitrogen for steels to stop nitrogen porosity. Pick helium for metals with high thermal conductivity.
- Set the correct gas flow rate. Too little gas lets air in. Too much gas makes the weld pool messy. Both can cause gas pockets.
- Grind the surface of aluminum alloys. This takes off the oxide layer and lowers hydrogen, which helps stop porosity.
- Adjust welding settings. Raise the pulse current to help gas leave the weld pool.
| Pulse Current (A) | Porosity (%) | Description |
|---|---|---|
| 100 | 1.82 | High porosity with large and many pores |
| 120 | 1.13 | Less porosity but still significant |
| 140 | 0.15 | Low porosity, fewer and smaller pores |
| 160 | 0.1 | Very low porosity, gas escapes effectively |
Tip: Always clean your metal and set your shielding gas before you start. Good preparation helps you avoid gas pockets and get stronger welds.
If you use these steps, you will see fewer gas pockets and better welds in laser welding.
You can make welds better if you fix problems early. Clean the metal before welding. Heat the metal before you start. Use heat treatments after welding to stop defects. Learn how to weld and keep your tools in good shape. Watch the welding as it happens. You might have trouble with spatter or cracks. You need to set the welding settings right. Look at this list of defects often. Ask questions or share your stories below. This helps everyone learn and fix problems.
FAQ
What is the most common defect in laser welding?
Porosity is the most common defect. You see small holes or bubbles in the weld. These make the weld weak. You can prevent porosity by cleaning the metal and using the right shielding gas.
How can you quickly spot a welding crack?
You can look for thin lines or breaks along the weld bead. Cracks often appear right after welding. Use a bright light and magnifier to check the weld surface.
Why does spatter happen during laser welding?
Spatter happens when molten metal jumps out of the weld pool. High laser power or dirty surfaces cause this. You can reduce spatter by cleaning the metal and adjusting the laser settings.
What should you do if you see undercut?
Lower the welding speed and check the laser power. Clean the joint edges. Make sure the beam is centered. These steps help you avoid grooves and get a stronger weld.
What problems will arise from laser welding of galvanized sheet?
Repairing Weld Burn-Through Common Mistakes and Solutions
Top Challenges in Laser Welding Copper and How to Overcome Them
What Is Laser Welding of Thin Plates and How to Prevent Burn-Through


