If you run a small foundry or fabrication shop, you don’t just need the number for the copper melting point—you need to know what that number means on the floor. It determines whether your furnace can make heat fast enough, which crucible lasts more than a few runs, how you control oxygen pickup, and how much superheat you carry before pouring. In this guide, we anchor the exact value to international standards and translate it into practical decisions you can trust.
Key takeaways
- The canonical copper melting point is 1084.62 °C (1984.32 °F), defined by the ITS‑90 copper fixed point; many tables round to 1083–1085 °C.
- For shop work, treat the fixed point as your reference for calibration and QA, then pick process‑appropriate superheat based on alloy and casting method.
- Induction and high‑spec electric crucible furnaces handle demanding copper alloys more consistently than basic gas‑fired units; match furnace and crucible to batch size and target temperature.
- Clay‑graphite or silicon carbide crucibles, properly pre‑dried and staged, provide good life for copper and common copper alloys.
- Oxygen control matters: use covers, inert or reducing atmospheres, and deoxidation practices appropriate for your alloy and cycle time.
- Safety is non‑negotiable: respect OSHA PELs for copper fumes and manage zinc oxide fume risk when melting brasses with ventilation and PPE.
The canonical copper melting point and why sources differ
The internationally recognized value for pure copper’s phase change temperature is the ITS‑90 copper fixed point: 1357.77 K, which equals 1084.62 °C and 1984.32 °F. This is a metrology anchor used to calibrate thermometry at high temperatures, documented in the Bureau International des Poids et Mesures guidance for the International Temperature Scale of 1990. See the official treatment in the BIPM’s Guide to the Realization of the ITS‑90 for radiation thermometry, which lists copper alongside silver and gold as defining high‑temperature fixed points in 2018 publications: the copper point is explicitly 1084.62 °C (1357.77 K) according to the BIPM guide for radiation thermometry fixed points.
So why do many reference pages show 1083 °C or 1981 °F? Trade and property tables often round for readability, landing anywhere from 1083 to 1085 °C. For example, a widely used industry fact sheet lists copper’s melting point as 1,981 °F (1,083 °C, 1356 K). That rounding is conventional, but it’s not the metrology exactitude shops should use for calibration. See the rounded presentation in the Copper Development Association copper facts page.
Here’s the deal: use 1084.62 °C when you’re aligning instruments or documenting QA, and allow your shop tables to show a rounded number if that’s how your operators are trained—just make sure your measurement devices are calibrated against the canonical value.
From number to practice in the shop
A number alone won’t produce a sound casting. The copper melting point must inform your furnace choice, crucible, and how you shield the melt from oxygen.
Furnace, crucible, and atmosphere decision matrix
Below is a compact matrix to guide typical small‑shop scenarios. Treat it as a starting point; adjust to your alloys, throughput, and local controls.
| Batch size | Alloy family | Furnace type guidance | Crucible choice | Cover or flux guidance |
|---|---|---|---|---|
| 5–15 kg | Pure copper or low‑tin bronze | Induction or high‑spec electric crucible; gas‑fired possible with tight control | Clay‑graphite or SiC, pre‑dried and staged | Charcoal cover or inert blanket to limit oxidation |
| 20–50 kg | Brasses (Cu‑Zn) | Induction preferred for fast, even heating; gas‑fired workable with good burners | Clay‑graphite; inspect for zinc attack over time | Flux cover to limit dross and zinc loss; strong local exhaust |
| 50–100 kg | High‑tin or aluminum bronze | Induction or electric crucible rated to ≥1200–1250 °C bath | SiC favored for thermal shock resistance | Inert or mildly reducing atmosphere; deoxidation per alloy practice |
For furnace capability examples and temperature ceilings for copper alloys, review an industrial catalog describing foundry furnaces that target melt temperatures for copper alloys up to roughly 1320 °C depending on model and heating elements. This helps validate whether a unit can deliver adequate superheat and hold. See the Nabertherm foundry catalog overview.
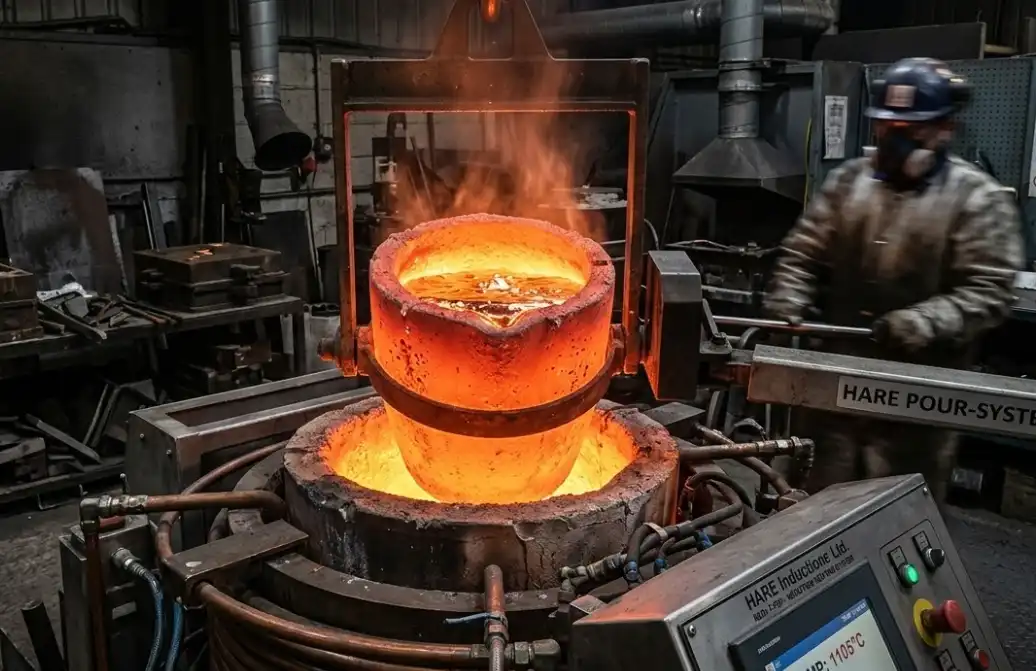
For crucible handling and preheating, follow OEM instructions that emphasize staged drying to remove absorbed moisture, correct seating, and thermal ramp rates to avoid spalling. A concise example of staging and handling steps is provided in an induction crucible installation document from a major crucible manufacturer: crucible installation and preheating guidance.
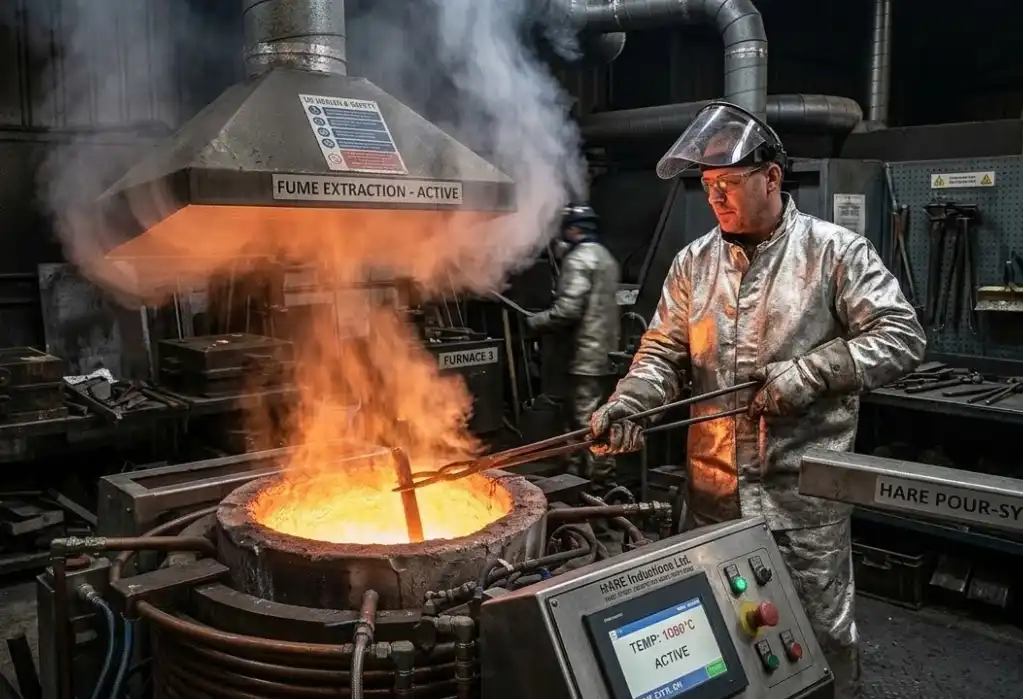
Measuring temperature and holding it steady
Accurate temperature measurement is the difference between smooth pours and a night of chasing defects. In non‑ferrous shops you’ll typically choose between protected thermocouples and optical pyrometers. Think of the instrument as your alternator on a truck: if it’s out of spec, everything downstream struggles.
- Thermocouples: Type K is common and economical up to around 1200–1260 °C, while Type N offers better stability at high temperature and in harsh atmospheres. For molten copper, use adequate wire gauge and protect the junction in a ceramic or graphite sheath; avoid sulfurous or strongly reducing atmospheres that can poison some thermocouple alloys. A technical overview comparing Type K and Type N for high‑temperature use is provided here: thermocouple selection guidance.
- Optical pyrometers: Useful for non‑contact readings, but you must set emissivity correctly and understand viewpath issues. Oxidized copper surfaces can skew readings; use a consistent target and verify against a contact probe periodically.
- Calibration and practice: Establish a calibration interval based on hours at temperature, and document uncertainty. For lance readings, immerse to a consistent depth away from cold walls, allow the reading to stabilize, and avoid splashing or rapid quenching of the junction.
Aim to verify the melt near the end of holding, and again just before the first pour, especially if the furnace is slow to recover after skimming or alloy additions.
Copper vs brass vs bronze melting behavior
Copper’s fixed point is a single value. Most brasses and bronzes melt over a range between solidus and liquidus. Your pouring temperature target should sit above liquidus by a superheat margin that balances fluidity against oxidation or vaporization risks.
The following reference values are common in small‑shop work. Use them to set initial targets and then fine‑tune based on your mold media and section thickness.
| Alloy or grade | Solidus °C (°F) | Liquidus °C (°F) | Typical pour band over liquidus | Notes and cautions |
|---|---|---|---|---|
| Pure copper | 1084.62 (1984.32) | N/A | Process‑dependent, often 40–120 °C superheat | Use as calibration anchor; oxygen pickup is rapid at high superheat |
| C26000 cartridge brass | 915 (1680) | 955 (1750) | 40–90 °C | Manage zinc fume; avoid prolonged holding above liquidus |
| C36000 free‑cutting brass | 885 (1630) | 900 (1650) | 30–70 °C | Lead‑containing brass; control fumes and dross formation |
| C52100 phosphor bronze | 880 (1620) | 1027 (1880) | 60–120 °C | Wider freezing range; deoxidation practices improve soundness |
| C83600 tin bronze | 854 (1570) | 1010 (1850) | 50–110 °C | Common cast bronze; limit overheating to reduce oxidation |
Authoritative sources for these figures include alloy datasheets from the Copper Development Association for brasses and bronzes and a high‑temperature compendium summarizing phosphor bronze melting ranges. See the CDA pages for C26000 cartridge brass and C36000 free‑cutting brass, the CDA page for C83600 tin bronze, and the phosphor bronze range in the Solar Manufacturing compendium critical melting points summary.
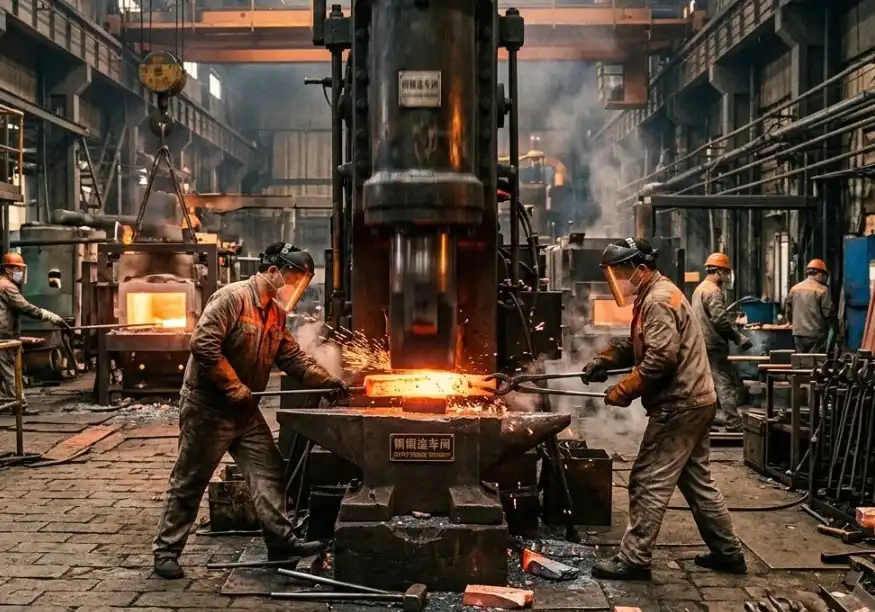
Practical melting workflow for small shops
Use this field‑tested sequence as a baseline for 5–50 kg melts. Adjust for your furnace dynamics and casting process.
- Preheat and dry the crucible
- Inspect for cracks and erosion. Stage preheat per the crucible OEM to drive off moisture. Seat correctly to avoid point loads. Warm the charging tools.
- Prepare the charge
- Use clean, dry feedstock. For alloying, charge high‑melting components first. Keep zinc‑bearing additions late to limit vaporization.
- Establish the cover and atmosphere
- For copper and many bronzes, a charcoal cover or inert blanket limits oxidation. For brasses, a light flux cover helps reduce dross and zinc loss; pair with strong local exhaust.
- Heat to above liquidus and skim
- Ramp at a rate your furnace can sustain without overshooting. Skim dross gently; don’t whip air into the bath.
- Measure, adjust, and deoxidize if required
- Verify with a protected thermocouple or calibrated pyrometer. Make small alloying or deoxidizer additions with adequate mixing time and observe the bath’s response before re‑measuring.
- Hold and pour
- Avoid excessive hold time at high superheat. Pour smoothly with consistent gating practice. Re‑measure between successive pours if the furnace recovery is slow.
Pro tip: Small process tweaks compound. A 20 °C reduction in unnecessary superheat can measurably reduce oxidation in copper and zinc loss in brass, improving yield and surface finish.
Safety and compliance essentials
Copper and copper‑alloy melting generates heat, radiant energy, and in some cases hazardous fumes. Set your controls to standards, not instincts.
- Exposure limits: OSHA’s Table Z‑1 sets the permissible exposure limit (PEL) for copper fume (as Cu) at 0.1 mg/m³ TWA and for copper dusts and mists at 1 mg/m³ TWA. Review the current PELs in the OSHA annotated Table Z‑1.
- Zinc oxide fume: When melting or overheating brasses, zinc oxide fume can trigger metal fume fever. The NIOSH Pocket Guide lists RELs and short‑term limits and describes hazard characteristics; use it to inform ventilation and respirator selection as part of a compliant program. See the NIOSH Pocket Guide zinc oxide entry.
- Controls and PPE: Engineer local exhaust at the melt station, use heat‑rated gloves, face shields, and garments, and implement an OSHA‑compliant respiratory protection program when exposures may exceed limits. Train on hot‑metal splash hazards and maintain eyewash/shower access.
Think of it this way: fumes don’t ask whether you’re doing a short run. Ventilation and PPE should scale with risk, not batch size.
Troubleshooting quick reference
| Symptom | Likely causes | Corrective actions |
|---|---|---|
| Heavy surface dross on copper | Excess superheat, air exposure, weak cover | Reduce superheat, improve cover or inert blanket, skim gently |
| Zinc loss in brass and strong white fume | Overheating above target superheat, long hold, poor exhaust | Lower pour temp band, shorten hold, add or renew flux cover, increase local exhaust |
| Gas porosity in bronze | Oxidation and hydrogen pickup, inadequate deoxidation | Improve cover, add deoxidizer per practice, dry molds and tools |
| Hot tearing in lead‑free brasses | Excess superheat and slow solidification | Reduce superheat, adjust gating and chills, review alloy selection |
| Inconsistent temperature readings | Emissivity set wrong or damaged thermocouple | Verify with a protected contact probe, reset emissivity, replace worn probes |
FAQs for quick decisions
What is the exact copper melting point in °C and °F?
1084.62 °C and 1984.32 °F, defined by the ITS‑90 copper fixed point. Use this for calibration; rounded tables may show 1083–1085 °C.
How far above the melting point should I pour copper or bronze?
There’s no single number. Many shops start 40–120 °C above liquidus depending on alloy, section size, and mold media. Reduce superheat where oxidation or hot tearing risks grow.
Is brass easier to melt than copper?
The melting ranges for common brasses are well below pure copper’s fixed point, but brasses introduce zinc fume and dross management challenges. They’re “easier” thermally, but not necessarily easier operationally.
Closing notes and next steps
Use the canonical number to calibrate, then run a disciplined workflow: dry your crucible, protect the bath, verify temperature with the right instrument, and keep superheat purposeful. Document your bands by alloy and process, and schedule regular instrument calibration and safety reviews. That’s how you turn the copper melting point from a property in a table into consistent castings on your floor.


