An injection mold can last anywhere from a few hundred cycles to well over one million — and the gap between those extremes comes down to five controllable factors: mold classification, tool steel selection, resin abrasiveness, design complexity, and maintenance discipline. If you’re trying to pin down a number, SPI Class 101 molds built from hardened H13 steel routinely exceed 1,000,000 shots, while a Class 105 prototype tool in aluminum might not survive 500. The rest of this article breaks down exactly where your mold falls on that spectrum and what you can do to push it toward the upper end.
How Many Cycles Does an Injection Mold Actually Last
The short answer: 10,000 to 1,000,000+ cycles. But that range is almost useless without context, so here’s a tighter breakdown.
A production-grade mold machined from hardened tool steel and maintained on a disciplined schedule will deliver between 500,000 and 1,000,000+ shots before it needs major refurbishment. A mid-range mold — the kind most contract molders run for consumer products — typically lands in the 100,000 to 500,000 cycle window. Prototype and short-run tools? Expect 500 to 10,000 cycles at best.
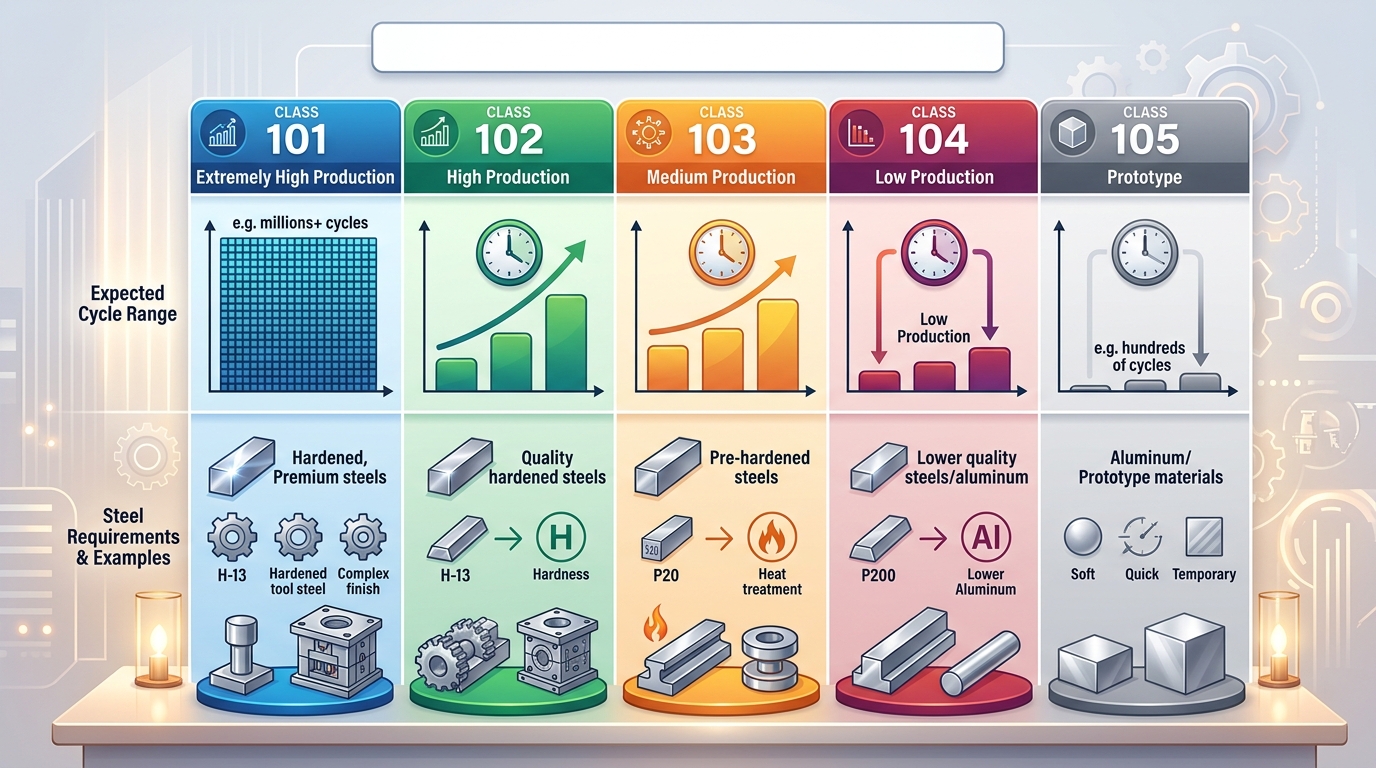
The industry uses the SPI (Society of the Plastics Industry) mold classification system as the universal benchmark for setting these expectations. Each class defines a target shot capacity, the minimum steel hardness required, and the construction standards the mold must meet. We’ll dig into each class in the next section, but here’s the quick reference:
| Mold Class | Expected Cycle Life | Typical Application |
|---|---|---|
| Class 101 | 1,000,000+ | High-volume automotive, medical, consumer goods |
| Class 102 | Up to 1,000,000 | Medium-to-high production, durable goods |
| Class 103 | Up to 500,000 | Moderate production runs |
| Class 104 | Up to 100,000 | Low production, soft metals acceptable |
| Class 105 | Under 500 | Prototype only |
One thing most sourcing guides won’t tell you: these numbers assume you’re running an unfilled commodity resin like polypropylene or ABS. Throw glass-filled nylon into that same Class 103 mold and your realistic cycle count drops by 30-50%. The SPI number is a ceiling, not a guarantee.
SPI mold classification chart comparing Class 101 through Class 105 expected shot capacities and steel requirements
SPI Mold Classifications and Their Expected Shot Capacities
The SPI classification system — now maintained under the Plastics Industry Association — has been the standard language between mold buyers and mold builders for decades. It eliminates ambiguity. When you spec a Class 102 mold on a purchase order, both parties know exactly what steel, what construction standards, and what cycle life that tool needs to deliver.
Class 101 — The Million-Cycle Workhorse
This is the highest grade. Class 101 molds are built to run 1,000,000 cycles or more without major repair. The cavity and core must be machined from hardened tool steel — typically H13 or S7 heat-treated to 48 HRC minimum. All plates are through-hardened or case-hardened. Guided ejection, temperature-controlled cooling circuits, and corrosion-resistant plating on critical surfaces are standard.
You pay a premium. A Class 101 mold can cost 2-3x more than a Class 103 tool for the same part geometry. But when your production forecast calls for 5 million parts over the program’s lifetime, the per-part tooling cost becomes negligible.
Class 102 — High Production, Slightly Relaxed Specs
Class 102 molds target up to 1,000,000 cycles. The steel requirements are nearly identical to Class 101, but the construction tolerances are marginally looser. These molds still use hardened cavity steel, guided ejection, and proper cooling — they just don’t carry the same over-engineering margin that a Class 101 tool does.
Most high-volume consumer product molds fall here. The practical difference between 102 and 101 often comes down to how much redundancy is built into the cooling and ejection systems.
Class 103 — The Sweet Spot for Mid-Volume
Designed for up to 500,000 cycles, Class 103 molds represent where the majority of custom injection molding projects land. Cavity steel can be pre-hardened (P20 at 28-34 HRC) rather than through-hardened. This dramatically reduces machining time and cost.
The trade-off is wear resistance. P20 is a solid steel, but it doesn’t handle abrasive resins or high injection pressures as gracefully as H13. For unfilled resins at moderate volumes, though, Class 103 delivers excellent value.
Class 104 — Low-Volume and Bridge Tooling
Class 104 molds are rated for up to 100,000 cycles. Soft metals like aluminum or mild steel are acceptable for cavity construction. These molds work well for bridge production — filling demand while a higher-class tool is being built — or for products with genuinely limited lifetime volume.
Class 105 — Prototype Only
Under 500 cycles. Class 105 molds exist solely to validate part design and material selection before committing to production tooling. They can be cast, 3D-printed, or machined from soft aluminum. Dimensional accuracy degrades rapidly, so don’t plan on shipping parts from these tools.
Steel mold blocks with different surface finishes representing SPI Class 101 through Class 104 mold construction
Class 101 vs Class 103 — When to Invest in a Higher-Grade Mold
This is the decision that trips up most product managers. A Class 101 mold might cost $80,000-$150,000 for a moderately complex part, while a Class 103 version of the same tool comes in at $30,000-$60,000. The instinct is to save money upfront. Sometimes that’s the right call. Sometimes it’s a disaster.
Here’s how to think about it.
Run the Cost-Per-Part Math
Divide the mold cost by the total expected production volume. A $120,000 Class 101 mold running 2,000,000 parts costs $0.06 per part in tooling amortization. A $45,000 Class 103 mold running 500,000 parts costs $0.09 per part — and you’ll need a second tool to hit 2,000,000 units, bringing total tooling spend to $90,000 and per-part cost to $0.045 if both molds survive. But if the second mold also needs replacing before you hit target volume, the economics flip.
The break-even point typically falls around 600,000-800,000 total lifetime parts. Below that, Class 103 wins on cost. Above it, Class 101 wins on reliability and total cost of ownership.
Factor In Downtime Cost
Every time a mold goes down for repair, you lose production days. If your line runs 24/7 and a single day of downtime costs $15,000-$30,000 in lost output, even one unplanned mold failure can wipe out the savings from choosing the cheaper tool. Class 101 molds aren’t just about cycle count — they’re about predictability.
When Class 103 Is the Smarter Choice
Not every part needs a million-cycle mold. Products with a 2-3 year market window, seasonal items, or parts where you expect a design revision within 18 months are poor candidates for Class 101 investment. You’d be paying for durability you’ll never use. Match the mold class to the production forecast, not to some aspirational volume target.
Hardened H13 steel mold cavity compared to pre-hardened P20 steel cavity showing surface quality and wear resistance differences
How Tool Steel Hardness Directly Impacts Total Shot Capacity
Steel selection is the single biggest determinant of how many cycles your mold will survive. Everything else — maintenance, resin choice, cycle time — modifies the baseline that the steel sets. Pick the wrong steel and no amount of maintenance will save you.
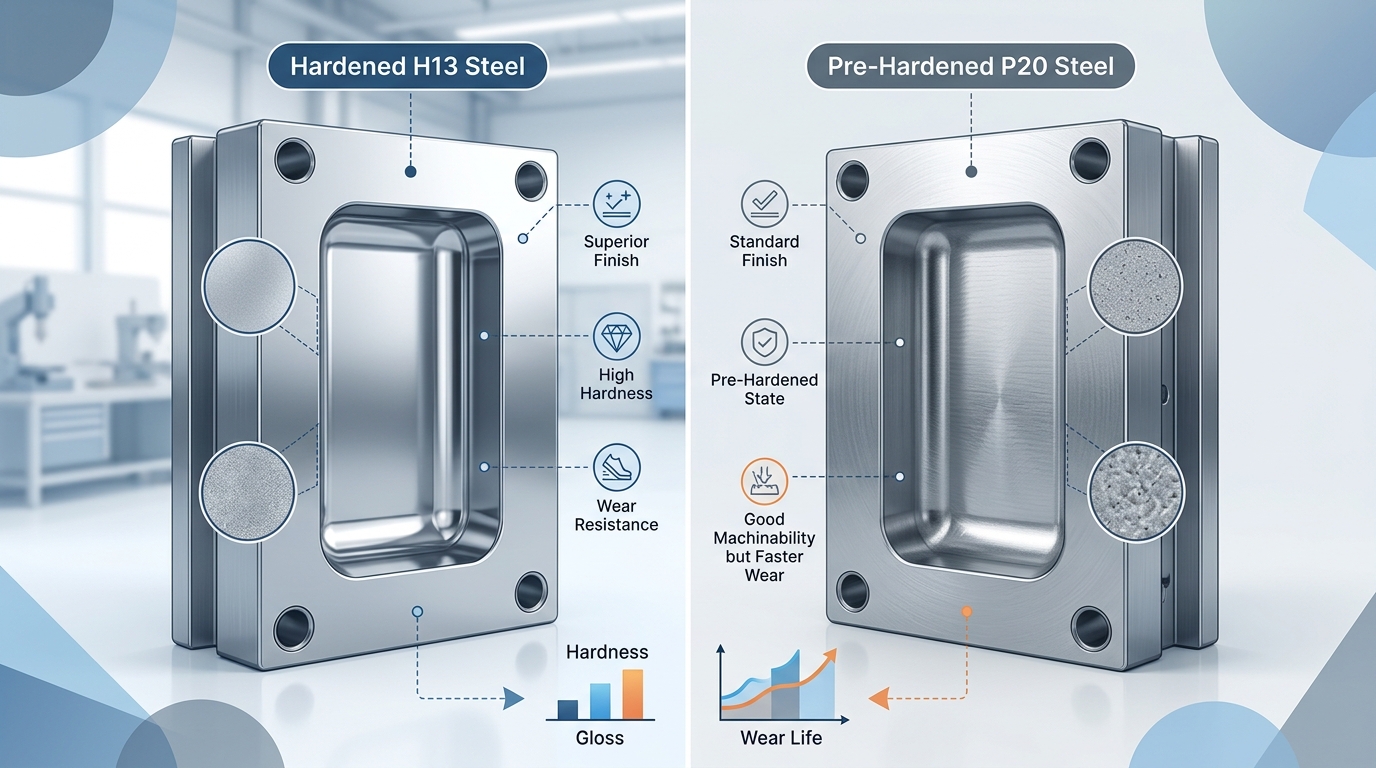
P20 Pre-Hardened Steel (28-34 HRC)
P20 is the default choice for Class 103 and many Class 104 molds. It machines easily, polishes well, and costs significantly less than hardened alternatives. At 28-34 on the Rockwell C scale, it handles unfilled thermoplastics without excessive wear for several hundred thousand cycles.
Where P20 falls short: abrasive resins chew through it. Glass-filled materials, in particular, erode gate areas and parting line surfaces much faster than they would on a harder steel. If your resin contains more than 15% glass fiber, P20 is a compromise you’ll feel by cycle 100,000.
H13 Air-Hardened Steel (48-52 HRC)
H13 is the go-to for Class 101 and Class 102 molds. Heat-treated to 48-52 HRC, it offers excellent thermal fatigue resistance — critical for molds running fast cycles where the cavity surface temperature swings 50-100 degrees every few seconds. That thermal cycling is what causes surface checking (micro-cracks) over time, and H13 resists it far better than softer steels.
H13 also holds up well against moderately abrasive resins. For glass-filled nylons at high volumes, it’s the minimum steel you should consider. The downside is cost and machining difficulty — H13 requires EDM or hard milling for complex features, and any post-heat-treatment modifications are expensive.
S136 / 420 Stainless (48-52 HRC, Corrosion Resistant)
S136 (the European designation) and its AISI 420 equivalent add corrosion resistance to the hardness equation. This matters enormously when you’re molding PVC, which off-gasses hydrochloric acid during processing, or flame-retardant materials that release corrosive byproducts.
Running PVC in a non-stainless mold is a recipe for pitting corrosion on cavity surfaces within tens of thousands of cycles. S136 solves that problem. It’s more expensive than H13, but for corrosive resin applications, the cost is justified by the dramatic lifespan extension.
A practical rule of thumb: Every 10 HRC points of additional hardness roughly doubles the mold’s resistance to abrasive wear. Moving from P20 (30 HRC) to H13 (50 HRC) doesn’t just add a few percent more cycles — it fundamentally changes the wear curve.
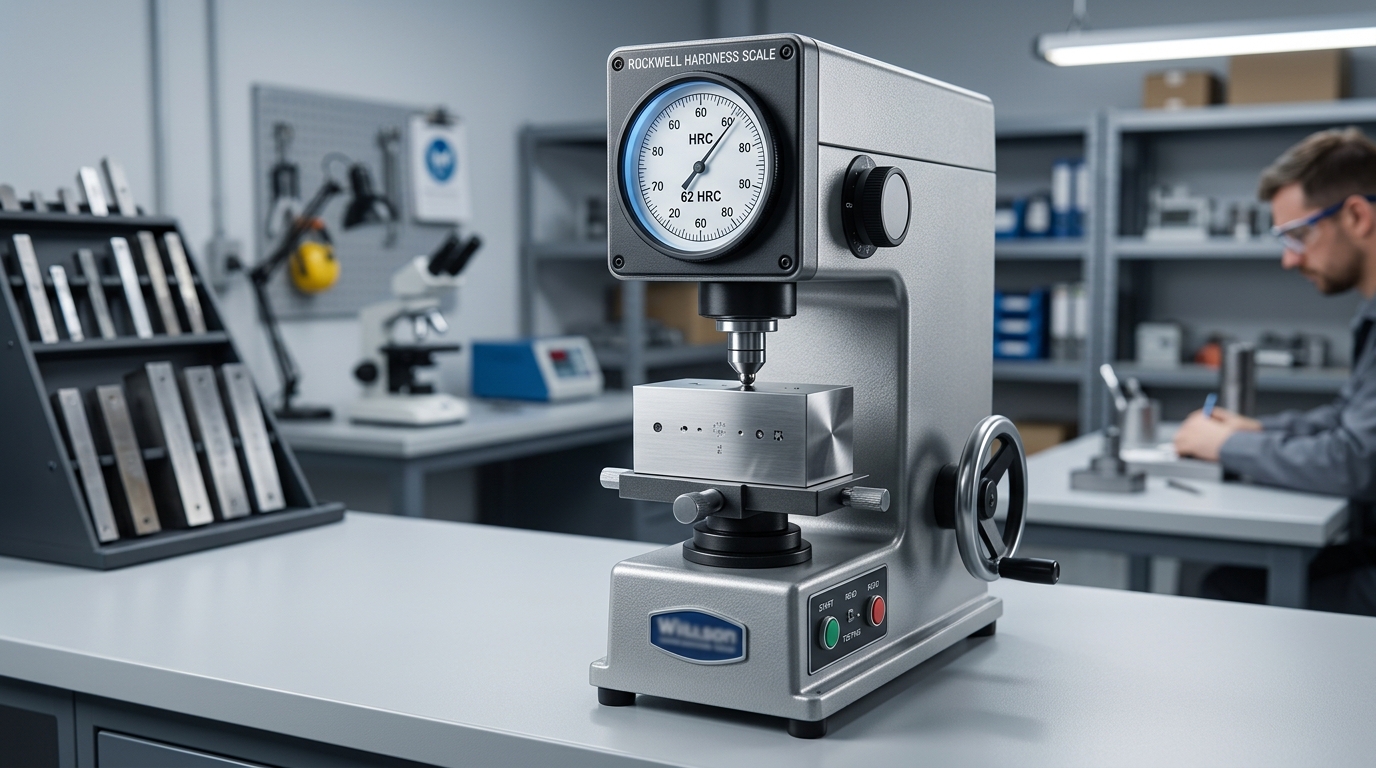
Rockwell hardness test being performed on mold tool steel sample showing HRC measurement for injection mold lifespan prediction
How Plastic Resin Type and Abrasiveness Accelerate Mold Wear
Most mold lifespan discussions focus on the mold itself and barely mention what’s being pushed through it at 10,000-30,000 PSI every cycle. That’s a blind spot. The resin you’re molding can be the dominant factor in how quickly your tool degrades.
Unfilled Commodity Resins — The Easy Ones
ABS, polypropylene, polyethylene, and polystyrene are gentle on mold surfaces. These resins flow smoothly, don’t contain abrasive fillers, and don’t produce corrosive off-gasses. A well-built mold running unfilled PP will hit its rated SPI cycle count without drama. This is the baseline scenario that SPI classifications assume.
Glass-Filled and Mineral-Filled Resins — The Abrasive Killers
Add 30% glass fiber to nylon and you’ve essentially turned your resin into liquid sandpaper. Every shot blasts microscopic glass particles across gate areas, runner surfaces, and cavity walls at high velocity. The wear pattern is predictable: gates erode first, then parting line surfaces, then cavity texture.
Expect a 30-50% reduction in total cycle life when running glass-filled resins compared to unfilled grades in the same mold. A Class 103 mold rated for 500,000 shots with ABS might only survive 250,000-350,000 shots with 30% glass-filled nylon. This isn’t a minor adjustment — it should fundamentally change your mold class selection.
Corrosive Resins — PVC, Flame-Retardant Compounds, Acetal
PVC releases hydrochloric acid during processing. Flame-retardant additives produce bromine and chlorine compounds. These chemicals attack mold steel at the molecular level, causing pitting corrosion that no amount of polishing can reverse once it starts.
The damage concentrates around vents and parting line surfaces where gas accumulates. If you’re molding PVC or heavily flame-retarded materials, stainless cavity steel (S136/420) isn’t optional — it’s the minimum viable choice. Standard P20 will show visible corrosion pitting within 20,000-40,000 cycles of PVC processing.
Mold Design Complexity and Its Effect on Longevity
A simple two-plate mold with a single cavity and no side actions will outlast a complex multi-cavity tool with slides, lifters, and a hot runner system — every time. More moving parts mean more wear surfaces, more potential failure points, and more maintenance overhead.
Thin-Wall Sections and Tight Tolerances
Thin-wall molding requires higher injection pressures and faster fill speeds. Both increase stress on the cavity steel. Parts with wall thicknesses below 1.0mm push molds harder than thick-wall parts, and the elevated pressure accelerates parting line wear and core deflection. If your part design demands thin walls, budget for a higher mold class than the volume alone would suggest.
Side Actions, Lifters, and Unscrewing Mechanisms
Every slide, lifter, and cam adds a moving steel-on-steel interface that wears with every cycle. Slides require precise alignment — as wear accumulates, flash appears at the slide shutoff surfaces. Lifters fatigue over time and can crack. Unscrewing mechanisms introduce rotational wear that’s difficult to repair without replacing entire components.
A mold with four side actions might have 8-12 additional wear surfaces compared to a straight-pull tool. That’s 8-12 more places where maintenance is required and failure can originate.
Hot Runner Systems
Hot runners eliminate runner waste and can improve cycle time, but they add thermal complexity. Heater failures, tip wear, and thermal expansion mismatches are ongoing maintenance items. The hot runner manifold itself is typically good for the life of the mold, but individual nozzle tips — especially with abrasive resins — may need replacement every 200,000-400,000 cycles.
None of this means you should avoid complex molds. It means you should account for complexity in your mold class selection and maintenance budget. A complex Class 103 mold might deliver the cycle life of a simple Class 104 tool if maintenance is neglected.
How Production Volume and Cycle Time Affect Tooling Wear
Two molds can have identical steel, identical design, and identical resin — and still die at wildly different cycle counts. The difference? How hard they’re being pushed.
Cycle Time and Thermal Stress
Faster cycle times mean more frequent thermal cycling of the cavity surface. Each cycle heats the steel when molten resin fills the cavity, then cools it as the part solidifies. This thermal oscillation creates micro-stresses that accumulate over hundreds of thousands of cycles, eventually manifesting as surface checking — fine cracks visible under magnification.
A mold running 15-second cycles experiences roughly twice the thermal stress frequency of the same mold running 30-second cycles over the same calendar period. The total number of cycles the steel can withstand before checking appears is finite regardless of speed, but faster cycles compress that lifespan into fewer calendar months, leaving less time for preventative maintenance between milestones.
24/7 Production vs. Intermittent Runs
Continuous production doesn’t just accumulate cycles faster — it eliminates the recovery windows that intermittent production naturally provides. During downtime between runs, mold components return to ambient temperature, lubricants can be replenished, and minor issues can be caught during setup for the next run.
Molds running around the clock often skip these informal inspection opportunities. Problems that would be caught during a setup inspection on an intermittent schedule compound silently until they cause a visible quality defect or a mechanical failure.
Injection Pressure and Clamp Tonnage
Higher injection pressures — common with thin-wall parts, long flow paths, or high-viscosity resins — accelerate wear on gate inserts, runner surfaces, and the parting line. Excessive clamp tonnage can actually deform mold plates over time, causing flash that progressively worsens. Running a mold at the minimum clamp force that prevents flash, rather than maxing out the press capacity, meaningfully extends parting line life.
The Role of Preventative Maintenance in Extending Mold Life
Here’s the uncomfortable truth: a Class 101 mold with no maintenance will fail before a Class 103 mold with excellent maintenance. Steel quality sets the ceiling, but maintenance determines how close you actually get to that ceiling. Most molds that “fail early” didn’t have a steel problem — they had a maintenance problem.
Lubrication of Moving Components
Slides, lifters, ejector pins, leader pins, and guide bushings all require regular lubrication. Metal-on-metal contact without adequate lubrication generates galling — a form of adhesive wear where material transfers between surfaces, creating rough spots that accelerate further damage. Once galling starts, it’s self-reinforcing.
Use mold-specific lubricants rated for the operating temperature range. General-purpose grease breaks down at the temperatures molds reach during production and can contaminate parts.
Vent and Runner Cleaning
Vents clog. It’s not a question of if, but when. Resin off-gasses deposit a film on vent surfaces that gradually reduces gas escape capacity. The result: burn marks on parts, short shots, and increased cavity pressure that stresses the mold beyond design intent.
Runner systems — especially cold runners — accumulate residue that affects flow balance in multi-cavity molds. Unbalanced flow means some cavities fill at higher pressure than designed, accelerating wear on those specific cavities.
Ejector Pin and Seal Replacement
Ejector pins wear at the bore interface, developing clearance that allows flash to form around the pin. This flash further accelerates bore wear in a destructive feedback loop. Replacing ejector pins before flash appears — based on cycle count rather than waiting for visible symptoms — is one of the highest-ROI maintenance actions you can take.
O-rings and seals in hydraulic cylinders (for core pulls and slides) degrade from heat and chemical exposure. A failed O-ring can cause a hydraulic leak that damages the mold surface or creates a safety hazard. Replace seals on a schedule, not on failure.
Proper Mold Storage
Molds sitting idle between production runs are vulnerable to corrosion, especially in humid environments. Apply a rust preventative coating to all exposed steel surfaces before storage. Ensure cooling channels are blown dry with compressed air — standing water inside cooling lines causes internal corrosion that reduces cooling efficiency and eventually causes leaks.
Store molds in a climate-controlled area if possible. A mold that corrodes during six months of storage can lose 50,000+ cycles of remaining life from surface damage that wasn’t there when it was pulled from the press.
Building a Mold Maintenance Schedule Based on Cycle Count Milestones
A maintenance schedule that runs on calendar dates alone misses the point. A mold running 24/7 accumulates cycles at a completely different rate than one running two shifts per week. Cycle count is the only reliable trigger for maintenance actions.
Here’s a framework you can adapt to your operation:
Every 5,000-10,000 Cycles: Light Cleaning
- Wipe down parting line surfaces and remove any resin flash buildup
- Clean vent channels with a brass brush (never steel — it damages the vent depth)
- Inspect ejector pins for flash or binding
- Verify that all slides and lifters move freely
- Check hydraulic lines for leaks
Every 25,000-50,000 Cycles: Detailed Inspection
- Remove the mold from the press for bench inspection
- Measure critical cavity dimensions against the original spec
- Inspect parting line surfaces for wear or compression marks
- Replace ejector pins showing measurable wear
- Clean and inspect cooling channels for scale buildup
- Re-lubricate all moving components with fresh mold grease
- Inspect hot runner nozzle tips (if applicable) for wear
Every 100,000-250,000 Cycles: Major Service
- Full disassembly and cleaning of all mold components
- Replace all O-rings, springs, and wear items regardless of visible condition
- Re-polish cavity surfaces if texture degradation is measurable
- Pressure-test cooling circuits for leaks
- Verify guide pin and bushing fit — replace if clearance exceeds tolerance
- Document all measurements for trend tracking
At 500,000+ Cycles: Overhaul Assessment
- Commission a full dimensional audit of the cavity and core
- Evaluate whether refurbishment or replacement is more cost-effective
- Replace any components showing fatigue indicators (micro-cracking, deformation)
- Consider re-plating or re-coating cavity surfaces
Track cycle counts with a mechanical or electronic shot counter mounted on the mold. Relying on production records alone introduces counting errors that compound over time. A $50 shot counter can save you from a $50,000 surprise.
Warning Signs Your Injection Mold Is Approaching End of Life
Molds rarely fail catastrophically without warning. They send signals — sometimes subtle, sometimes obvious — that degradation is accelerating. Catching these signals early is the difference between a planned refurbishment and an emergency production shutdown.
Flash at Parting Lines
Flash — thin excess material at the mold’s parting line — is the most common early indicator of wear. It means the parting line surfaces no longer seal completely under clamp pressure. Minor flash can sometimes be managed by increasing clamp tonnage, but that’s a band-aid that accelerates plate deformation. Persistent flash that worsens over time means the parting line needs resurfacing or the mold is nearing end of life.
Dimensional Instability
When parts start drifting out of tolerance — especially critical dimensions like bore diameters, wall thicknesses, or snap-fit features — the cavity or core has worn beyond its dimensional limits. Spot-check critical dimensions every 10,000-25,000 cycles. A gradual trend toward one tolerance boundary is normal; a sudden shift or erratic variation signals a bigger problem.
Increased Rejection Rates
Track your scrap rate by mold. A mold that historically runs at 1-2% scrap and suddenly climbs to 4-5% is telling you something. The cause might be vent clogging, cooling channel degradation, or cavity surface damage — all of which are repairable if caught early, but catastrophic if ignored.
Surface Defects on Molded Parts
Witness marks, drag marks from worn ejector pins, and texture degradation on cosmetic surfaces all indicate advancing mold wear. If your parts require a specific surface finish (SPI-A1 polish, for example), even minor cavity surface degradation can push parts below spec.
Cooling Efficiency Degradation
If cycle times creep upward because parts take longer to cool, or if you notice uneven cooling (warpage that wasn’t there at lower cycle counts), your cooling channels may be scaling or corroding internally. Reduced cooling efficiency increases cycle time, increases thermal stress on the mold, and accelerates the wear curve — a compounding problem.
A key insight most operators miss: by the time you see flash or dimensional drift on parts, the mold has already been degrading for thousands of cycles. The best operators catch wear trends in their measurement data long before they see symptoms on parts.
Frequently Asked Questions About Injection Mold Cycle Life
Can a mold be refurbished to extend its lifespan?
Yes — and it’s often the most cost-effective option. Refurbishment can include re-welding and re-machining worn cavity areas, replacing all wear components, re-polishing surfaces, and re-plating for corrosion protection. A well-executed refurbishment can restore 50-80% of the mold’s original cycle capacity at 30-50% of the cost of a new tool. The viability depends on where the wear is concentrated. Uniform surface wear is easy to address; cracked cores or warped plates may not be worth repairing.
How do aluminum molds compare to steel molds in cycle capacity?
Aluminum molds (typically 7075-T6 or QC-7 alloys) are limited to roughly 10,000-100,000 cycles depending on the resin and part complexity. They’re faster to machine and cost less upfront, making them excellent for prototyping and bridge production. But aluminum is significantly softer than tool steel, so it wears faster, can’t hold tight tolerances as long, and is unsuitable for abrasive resins. For production volumes above 100,000 parts, steel is almost always the better investment.
What is the cost difference between mold classes?
As a rough benchmark, expect these relative cost ranges for a moderately complex single-cavity mold:
| Mold Class | Approximate Cost Range (USD) | Cost Relative to Class 103 |
|---|---|---|
| Class 101 | $80,000 – $150,000+ | 2x – 3x |
| Class 102 | $50,000 – $100,000 | 1.5x – 2x |
| Class 103 | $30,000 – $60,000 | Baseline |
| Class 104 | $10,000 – $30,000 | 0.3x – 0.5x |
| Class 105 | $1,000 – $10,000 | 0.03x – 0.15x |
These numbers swing dramatically based on part size, number of cavities, and geographic sourcing. A 16-cavity Class 101 mold for a medical device can easily exceed $500,000. The point isn’t the absolute dollar figure — it’s the ratio between classes and how that ratio compares to your per-part economics.
How do you track mold shot counts accurately?
Three common methods, ranked by reliability:
- Mechanical shot counters — mounted directly on the mold, they increment with each press cycle. Cheap ($30-$80), reliable, and impossible to lose data since the counter stays with the mold. The downside: they require manual reading and recording.
- Press-integrated cycle counters — most modern injection molding machines track total cycles per job. The risk is that counts get reset during job changes or machine maintenance, and a mold that runs on multiple presses needs manual aggregation.
- MES (Manufacturing Execution System) tracking — enterprise-level software that logs every cycle digitally, ties counts to specific mold serial numbers, and generates automated maintenance alerts. The gold standard, but requires infrastructure investment.
If you do nothing else, bolt a $50 mechanical counter onto every production mold. It’s the simplest way to prevent the “nobody knows how many cycles this mold has run” problem that plagues shops without formal tracking.
Does running the same mold on different machines affect lifespan?
It can. Different presses have different platen parallelism, clamp force distribution, and injection speed profiles. A mold that runs perfectly centered on one press might experience uneven clamp loading on another, accelerating parting line wear on one side. Injection speed and pressure profiles also vary — a press that overshoots on injection pressure during the pack phase puts more stress on cavity steel than one with tighter process control.
The best practice is to qualify each mold on its intended press and document the validated process parameters. If a mold must move between machines, re-validate the process and inspect the mold after the first few hundred cycles on the new press.
Does mold temperature affect cycle life?
Absolutely. Running a mold hotter than necessary increases thermal fatigue on cavity surfaces and accelerates degradation of O-rings and seals. Running too cold can cause higher injection pressures (because the resin freezes off faster), which stresses the mold mechanically. The optimal mold temperature balances part quality, cycle time, and mold longevity — and it’s specific to each resin and part geometry. Follow the resin manufacturer’s recommended mold temperature range as your starting point, according to guidelines published by organizations like the American Society of Mechanical Engineers (ASME).
Maximizing Your Mold Investment — Key Takeaways and Next Steps
Mold lifespan isn’t a mystery and it isn’t random. It’s the predictable outcome of five decisions you make before and during production:
- Match your SPI mold class to your actual production forecast. Over-specifying wastes capital. Under-specifying costs more in the long run through premature failure and unplanned downtime.
- Select tool steel based on your resin, not just your volume. A Class 103 mold in H13 running glass-filled nylon will outperform a Class 103 mold in P20 running the same resin by a wide margin. Steel hardness and resin abrasiveness are inseparable variables.
- Account for design complexity in your mold class decision. A complex mold with slides, lifters, and hot runners needs to be specced one class higher than a simple tool at the same production volume to deliver equivalent reliability.
- Implement cycle-count-based maintenance, not calendar-based. A mold doesn’t care what month it is. It cares how many times it’s been opened and closed under pressure.
- Monitor leading indicators, not lagging ones. Dimensional trends, scrap rate trends, and cooling efficiency data tell you a mold is degrading thousands of cycles before flash or visible defects appear on parts.
The difference between a mold that dies at 60% of its rated capacity and one that exceeds its rated capacity by 20% almost always comes down to maintenance discipline and process control — not luck.
Your Immediate Action Steps
If you’re evaluating a new mold purchase, start by documenting your total lifetime volume forecast, the resin you’ll be running, and the part complexity level. Bring those three data points to your tooling engineer or mold builder and have an explicit conversation about which SPI class and which steel grade align with your requirements. Don’t let the mold builder default to their standard offering without justification.
If you have molds already in production, audit your shot-count tracking today. If any mold lacks a counter, install one this week. Then pull your scrap and dimensional data for the last six months and look for trends. You might discover a mold that’s quietly approaching end of life — and catching it now gives you time to plan a refurbishment or replacement on your terms, not on the mold’s terms.
For further technical reference on mold steel specifications and heat treatment standards, the ASTM International standards library provides detailed material property data that can inform your steel selection decisions.


