
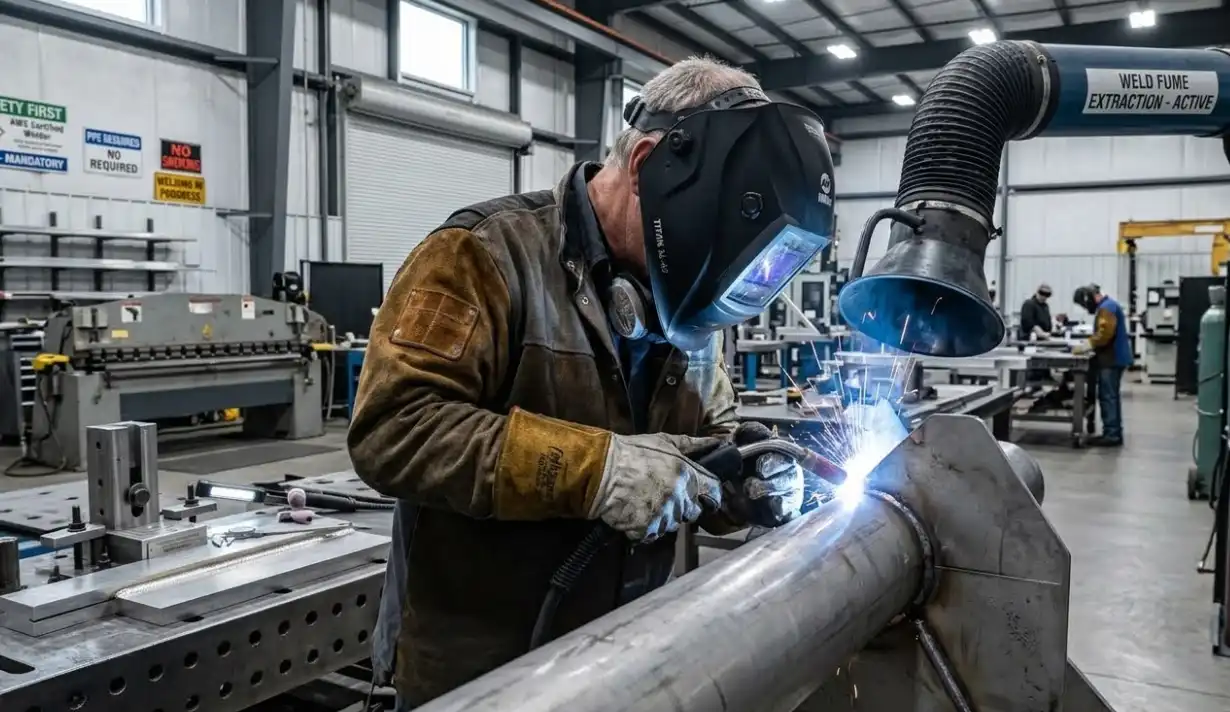
Manual arc welding, technically known as Shielded Metal Arc Welding (SMAW) or commonly referred to as “stick welding,” is one of the most versatile and widely used welding processes in the world. Whether you are repairing heavy machinery on a farm or fabricating structural steel on a construction site, mastering this skill is invaluable.
This comprehensive guide covers the essential concepts, equipment setup, and hands-on techniques required to perform manual arc welding. With a strong emphasis on safety and practical application, this article will walk you through everything you need to know to create strong, high-quality welds.
What is manual arc welding (SMAW) and fundamentals
Before striking an arc, it is crucial to understand the science and mechanics behind the process.
Definition and scope of SMAW
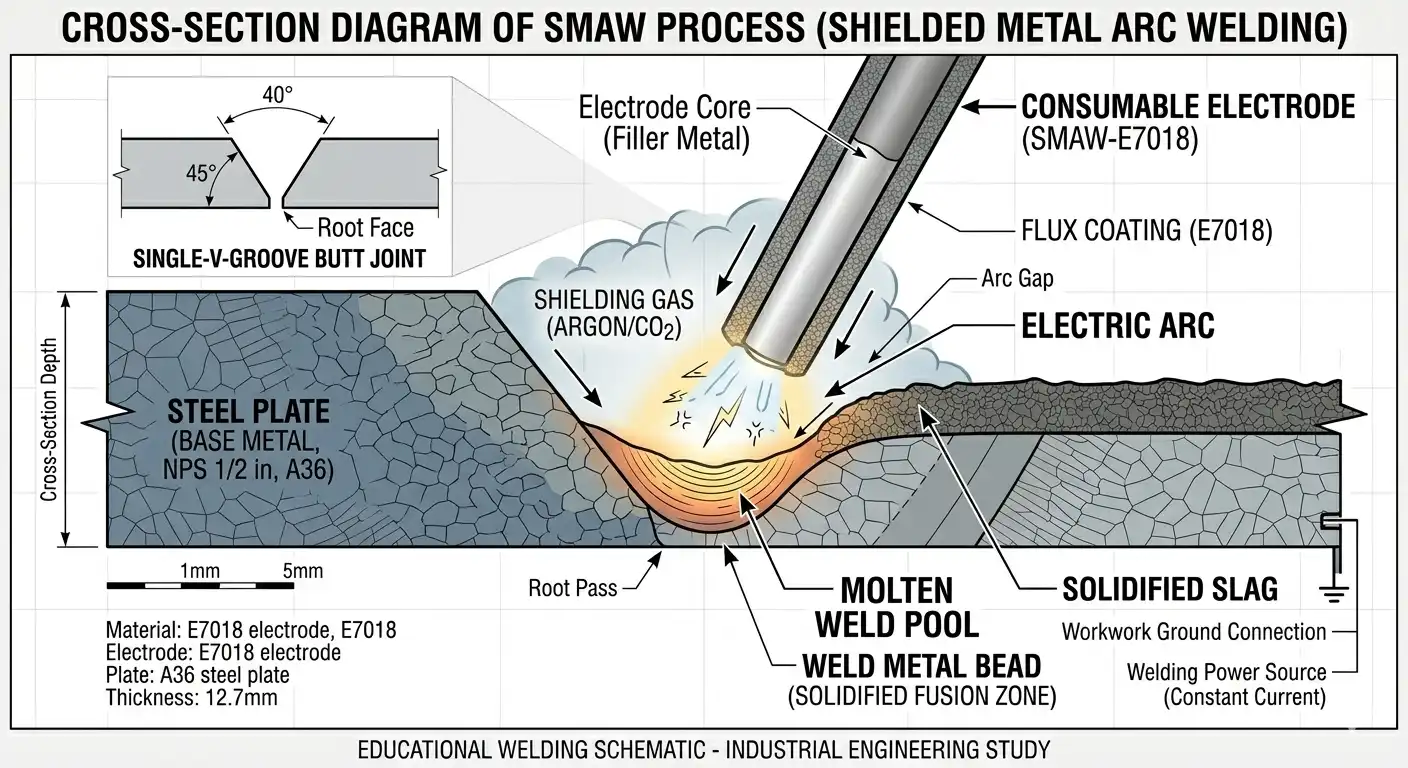
Shielded Metal Arc Welding (SMAW) is a manual arc welding process that uses a consumable electrode coated in flux to lay the weld. An electric current (either alternating or direct) is used to form an electric arc between the electrode and the metals to be joined. The heat of the arc melts both the base metal and the electrode, creating a molten weld pool that cools to form a robust joint.
Key terms and core principles
To navigate the world of SMAW, you must be familiar with a few core terms:
- The Arc: The continuous electrical discharge that generates the intense heat (up to 6,000°C) needed to melt the metal.
- Electrode (Stick): The metal wire core covered in a flux coating that acts as filler material for the joint.
- Flux and Slag: As the flux coating burns, it creates a shielding gas that protects the molten weld pool from atmospheric contamination. Once cooled, it forms a solid crust called slag, which must be chipped away.
Safety and PPE
Welding exposes you to extreme heat, bright UV radiation, and potentially hazardous fumes. Proper safety protocols are non-negotiable.
Personal protective equipment essentials
Your first line of defense is your Personal Protective Equipment (PPE). Never weld without:
- Welding Helmet: An auto-darkening helmet protects your eyes from arc flash and your face from sparks.
- Fire-Resistant Clothing: Wear heavy cotton or leather jackets and long pants. Never wear synthetic materials that can melt into your skin.
- Welding Gloves: Thick, heavy-duty leather gloves protect your hands from heat, spatter, and electrical shock.
- Safety Glasses and Boots: Wear safety glasses under your helmet for chipping slag, and steel-toed boots to protect your feet from falling heavy metal.
Safe workspace and fire prevention
Ensure your workspace is well-ventilated to avoid inhaling toxic welding fumes. Clear the area of all flammable materials, such as rags, cardboard, and chemical solvents. Always keep a fully charged Class ABC fire extinguisher within arm’s reach.
Electrical safety and safe operation practices
Because SMAW uses electricity to generate heat, electrical safety is paramount. Never weld in wet conditions or while standing in water. Regularly inspect your welding cables for cuts, frays, or exposed wires, and ensure your machine is properly grounded before turning it on.
Tools and equipment setup
A successful weld starts with a properly configured machine and the right tools.
Welding power source, cables, and grounding
The heart of your setup is the welding power source, which provides constant current (CC). Attach the ground cable (work lead) securely to a clean spot on your workpiece or the metal welding table. A poor ground connection will result in a stuttering arc and a poor-quality weld.
Electrodes and electrode holders, chipping hammer, and brushes
- Electrode Holder (Stinger): This insulated clamp holds the electrode and safely transfers the electrical current to it.
- Chipping Hammer & Wire Brush: Essential post-weld tools used to chip away the protective slag layer and brush the weld bead clean for inspection.
Work clamps, PPE checks, and setup verification
Before striking an arc, clamp your workpiece securely so it won’t shift due to heat distortion. Perform a final visual check: ensure your helmet is on the correct shade setting, your gloves are on, your ground clamp is secure, and your work area is safe.
Workpiece preparation and joint design
Skipping preparation is the fastest way to ruin a weld. The base metal must be properly prepared to ensure deep penetration and fusion.
Cleaning, fit-up, and securing the workpiece
SMAW is somewhat forgiving of dirty metal, but for the best results, you should always clean the joint. Use an angle grinder or wire brush to remove rust, paint, oil, and mill scale. Align your pieces perfectly (fit-up) and use small “tack welds” to hold the metal securely in place before running the main weld.
Groove vs. fillet joints and when to use them
- Fillet Joints: Used when two pieces of metal meet at an angle, such as T-joints or lap joints.
- Groove Joints: Used primarily for butt joints, where two pieces of metal are laid flat edge-to-edge.
Edge preparation, bevels, and tolerances
For metals thicker than 1/4 inch (6mm), a simple square butt joint won’t allow the arc to penetrate all the way through. You must grind a bevel into the edges to create a V-groove. This allows the electrode to reach the bottom (root) of the joint, ensuring a full-penetration weld.
Electrodes, welding current, and settings
Choosing the right rod and setting your machine correctly dictates how the weld pool behaves.
Electrode types, sizes, and compatibility
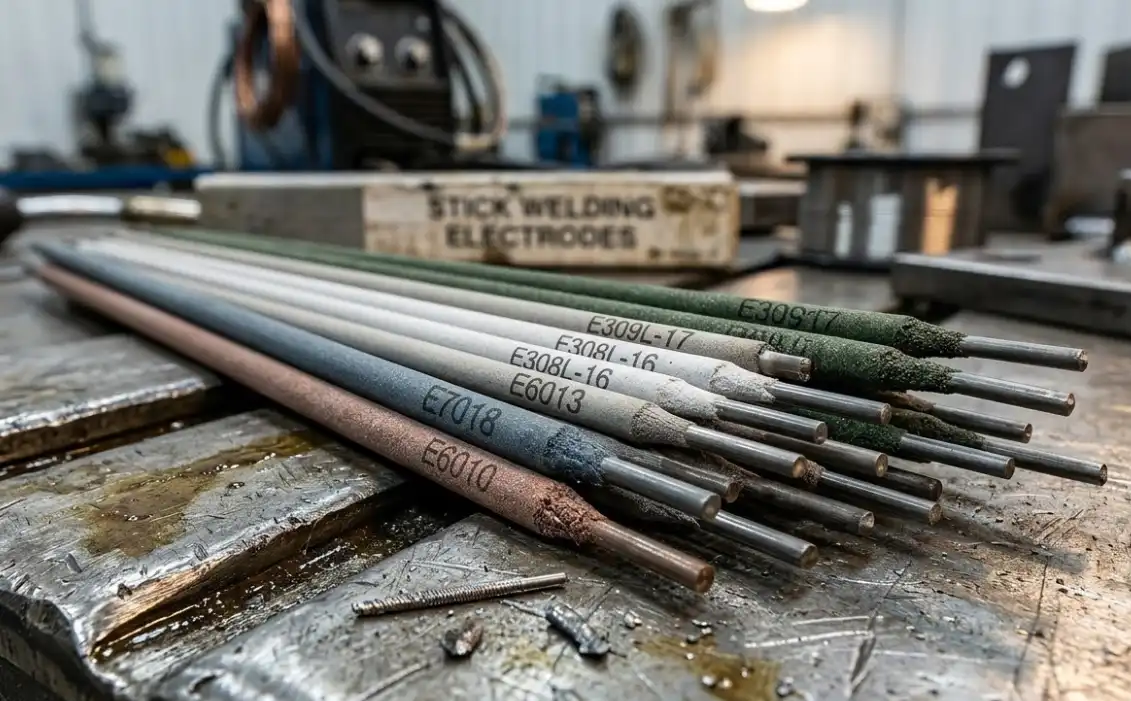
Electrodes are classified by a standard numbering system (e.g., E6010, E6013, E7018).
- E6010/E6011: Deep penetration, fast-freezing puddle; great for dirty or rusty metal.
- E6013: Medium penetration, easy to use, smooth bead; ideal for beginners and sheet metal.
- E7018: Low-hydrogen, medium penetration, produces incredibly strong, structural-grade welds.
Amperage settings, polarity, and coating influence
Most stick welding is done using Direct Current Electrode Positive (DCEP), which provides deep penetration. Amperage is determined by the thickness of the electrode core. If your amperage is too high, the rod will overheat and the weld will flatten out; if it’s too low, the rod will stick to the metal.
Reading charts and practice for setting parameters
Every box of electrodes has a manufacturer’s chart recommending the ideal amperage range (e.g., 90-130 amps for a 1/8″ E7018 rod). Start in the middle of this range and practice on a piece of scrap metal of the same thickness to fine-tune your settings before welding your actual project.
Welding technique: travel speed, angle, arc length
Mastering the physical technique of SMAW requires muscle memory and an understanding of three key variables: speed, angle, and arc length.
Arc start, stability, and maintaining the arc
There are two ways to start an arc: the scratch start (like striking a match) and the tapping method (tapping the rod straight down and lifting slightly). Once the arc establishes, you must immediately settle into the correct arc length to keep it stable.
Travel angle, work angle, and weaving patterns
- Drag Angle: In stick welding, you almost always drag the puddle. Angle the rod 15 to 20 degrees in the direction of travel.
- Work Angle: For a flat butt joint, hold the rod at 90 degrees to the metal. For a T-joint, angle it at 45 degrees to ensure equal fusion on both plates.
- Patterns: You can run a straight “stringer” bead or use slight weaving patterns (like small circles or zig-zags) to tie in wider gaps.
Arc length control and avoiding common mistakes
The golden rule of SMAW is to maintain an arc length roughly equal to the diameter of the electrode’s metal core. If you hold the rod too far away, the voltage spikes, causing massive spatter and a porous weld. If you push it too close, the rod will fuse (stick) to the base metal.
Quality control, defects, and troubleshooting
Even experienced welders make mistakes. Knowing how to identify and fix them is key to producing sound welds.
Common defects (lack of fusion, porosity, undercut) and causes
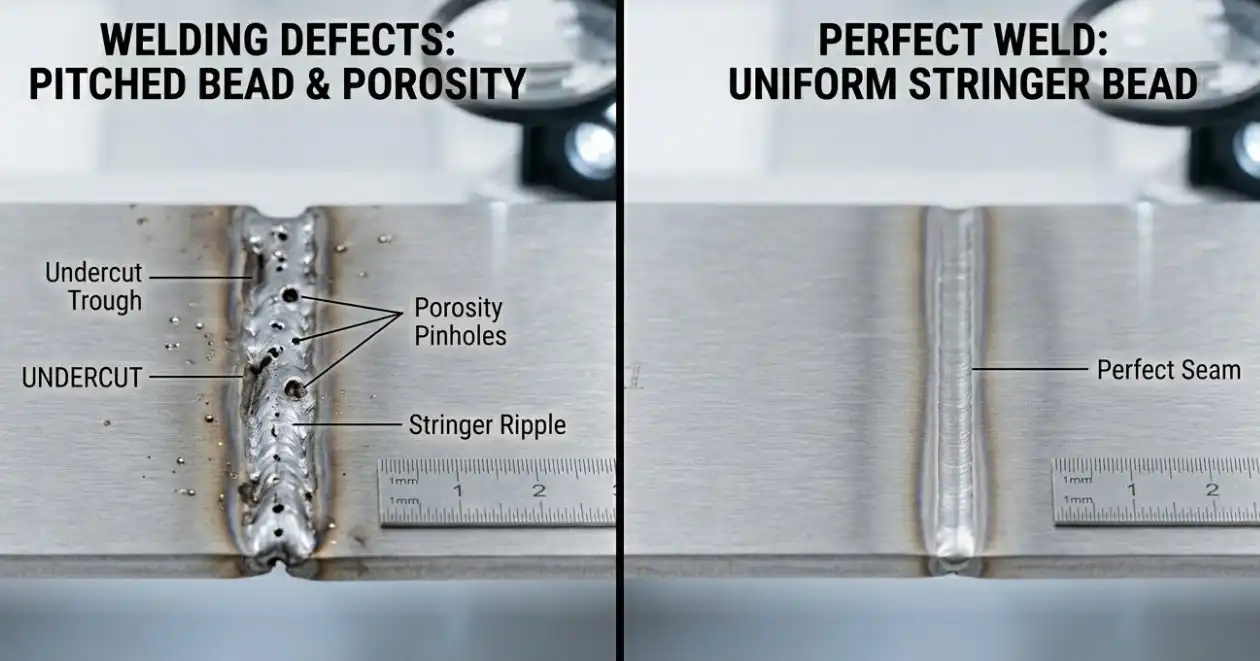
- Porosity (holes in the weld): Caused by damp electrodes, moving too fast, or an arc that is too long.
- Undercut: A groove melted into the base metal near the toe of the weld that is left unfilled. Usually caused by traveling too fast or amperage that is set too high.
- Lack of Fusion: The filler metal failed to melt into the base metal, usually due to low amperage or incorrect work angles.
Visual inspection and basic nondestructive checks
Most workshop quality control is done via visual inspection. A good weld should have uniform, tightly packed ripples, consistent width, and smooth tie-ins at the edges. Look closely for surface cracks or trapped slag.
Troubleshooting tips and corrective actions
If your weld looks tall and ropey, turn your amperage up or slow down your travel speed. If your metal is warping or burning through, turn your amperage down or increase your travel speed slightly. Adjust one variable at a time until the problem is solved.
Maintenance, storage, and best practices
Taking care of your equipment and consumables ensures consistent results every time you strike an arc.
Post-weld care and cleaning
Never leave slag on a finished weld, especially if you plan to paint over it or run a second pass. Chip it away thoroughly and use a wire brush to expose the shiny metal.
Consumables storage and rust prevention
Electrodes must be kept completely dry. Moisture in the flux coating will cause violent spatter and porosity. Low-hydrogen rods (like E7018) should ideally be kept in a heated rod oven once opened. Keep all other electrodes in sealed, airtight containers to prevent rust and moisture absorption.
Practice routines, record-keeping, and continuous improvement
Mastery comes from “hood time.” Practice running “pads of beads”—welding overlapping lines on a flat steel plate until your consistency is flawless. Keep a log of the metal thicknesses, rod types, and amperage settings that worked best for you, creating a personal reference guide for future projects.
Conclusion
Manual arc welding is a highly robust and reliable process. While the equipment is relatively simple, producing sound, structural-quality welds requires diligent preparation, correct machine settings, and highly disciplined hand techniques.
By prioritizing safety above all else, keeping your consumables dry, and dedicating time to ongoing practice, you will steadily master SMAW. Remember that every poor weld is just a troubleshooting opportunity—clean it up, adjust your parameters, and try again.
FAQs
What are the most common mistakes in manual arc welding and how to avoid them?
The most common mistakes include holding an arc that is too long, traveling too quickly, and using incorrect amperage. To avoid these, memorize the rule of keeping your arc length equal to the rod’s core diameter, keep a steady travel pace that allows the puddle to fill in behind you, and always test your amperage settings on scrap metal first.
How do you choose the right electrode for a given material and joint?
Electrode choice depends on the base metal condition and joint requirement. Use E6010 or E6011 for rusty, painted, or dirty metals where deep penetration is needed. Use E6013 for clean sheet metal or general repairs due to its smooth arc. For heavy structural applications requiring high strength, choose E7018.
What basic tests can verify weld quality in a workshop?
The most accessible test is a thorough visual inspection for uniform ripples, zero undercutting, and no visible porosity or cracking. For a destructive workshop test, you can perform a “bend test”—weld two scrap plates together, secure one side in a heavy vise, and strike the other side with a heavy hammer to see if the weld cracks or holds the metal together.
See also
What Is Reinforcement in Welding and Why It Matters
Copper Melting Point: Ultimate Guide for Small Shops


