Stainless steel punishes sloppy heat control. Apply too much energy and you get warped panels, rainbow discoloration, and — worst of all — carbide precipitation that strips the metal of the very corrosion resistance you’re paying a premium for. This guide breaks down every major welding process used on stainless steel today, from traditional TIG to pulsed laser welding, with grade-specific advice for 304 and 316, practical techniques to eliminate heat tint, and honest comparisons so you can pick the right method for your exact application.
Why Stainless Steel Demands a Different Welding Approach
Mild steel is forgiving. You can run a little hot, skip a step, and still end up with a serviceable joint. Stainless steel does not offer that same mercy. The physical properties that make it corrosion-resistant — primarily its chromium content of at least 10.5% — also make it dramatically more sensitive to heat input during welding.
Here’s the core problem: stainless steel conducts heat roughly 60% slower than carbon steel, yet its coefficient of thermal expansion is about 50% higher. That combination means heat concentrates in the weld zone instead of dissipating evenly, and the surrounding metal expands aggressively. The result? Warping, buckling, and distortion that can scrap an entire fabrication.
But distortion is the visible problem. The invisible one is worse.
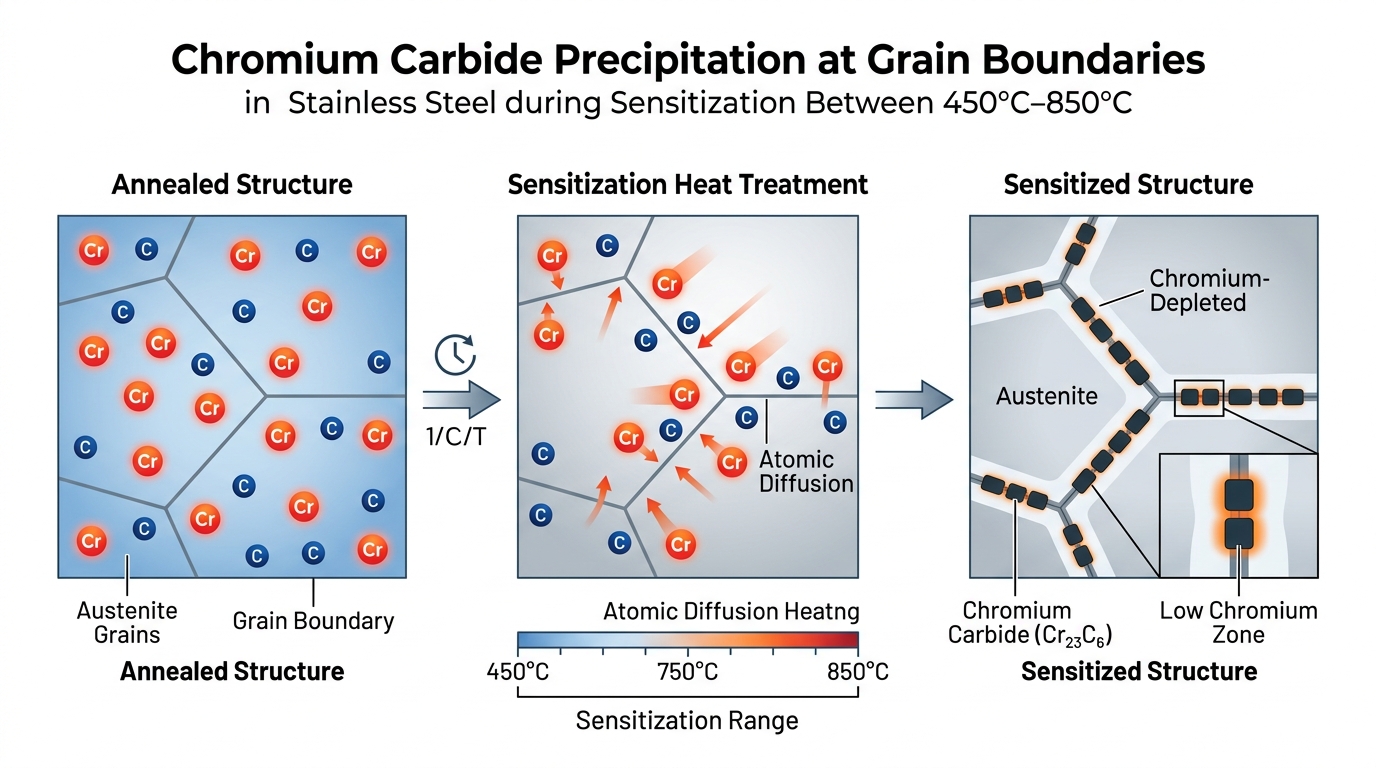
When austenitic stainless steels (the 300 series, including 304 and 316) are held in the 450°C to 850°C temperature range for too long, carbon atoms migrate to grain boundaries and bond with chromium to form chromium carbides. This process — called sensitization — depletes the chromium available to maintain the passive oxide layer that gives stainless steel its corrosion resistance. The welded joint looks fine. Months later, intergranular corrosion eats through it. According to TWI (The Welding Institute), sensitization is one of the most common causes of premature failure in stainless steel weldments.
This is why every decision in stainless steel welding — process selection, shielding gas, travel speed, interpass temperature — revolves around minimizing and controlling heat input. Get that right, and you preserve both the mechanical integrity and the corrosion resistance. Get it wrong, and you’ve turned an expensive alloy into something that performs worse than plain carbon steel.
Common Stainless Steel Grades and Their Welding Characteristics
Not all stainless steels weld the same way, and grade selection determines nearly every parameter you’ll set on your machine. While there are over 150 distinct grades, the overwhelming majority of welding work in commercial and industrial settings involves just two: 304 and 316.
304 Stainless Steel — The Workhorse
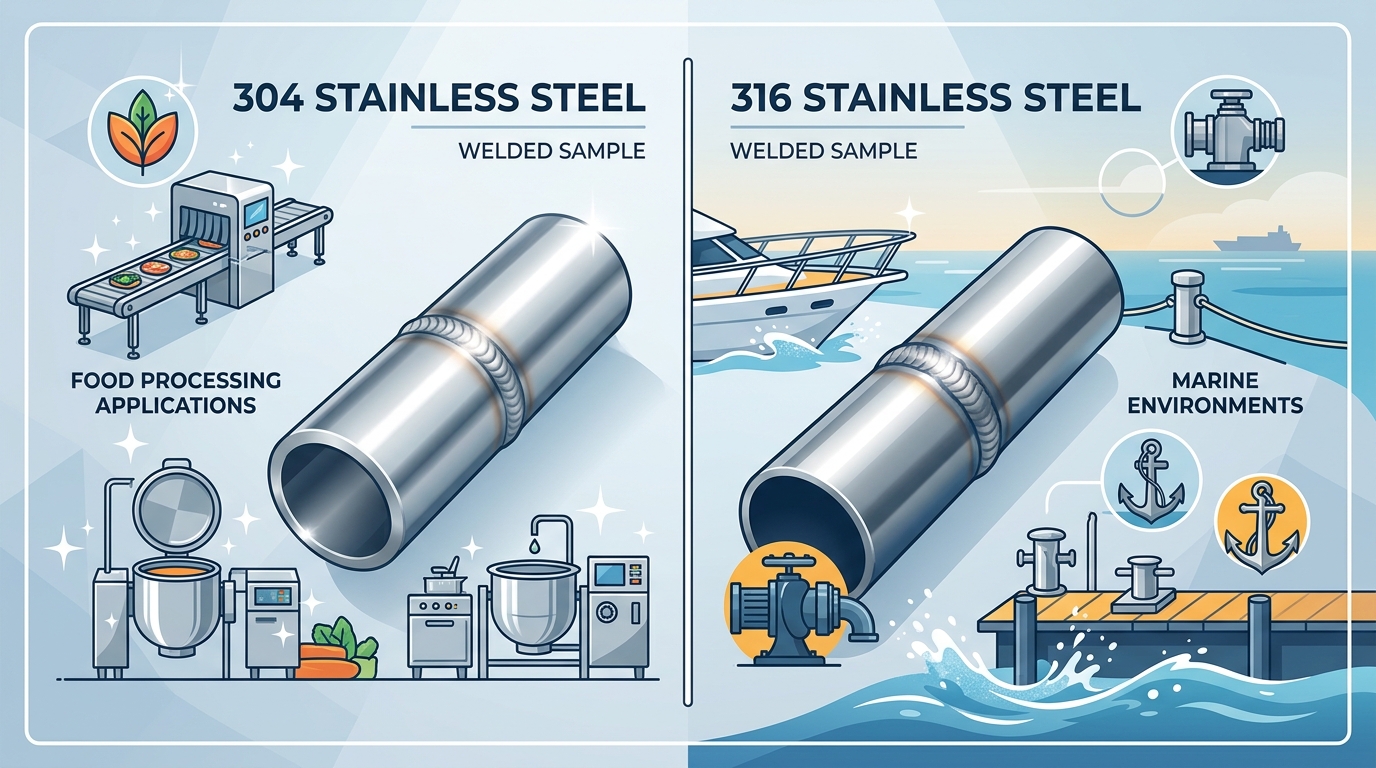
Grade 304 (also designated UNS S30400) contains approximately 18% chromium and 8% nickel. It’s the most widely used stainless steel on the planet, accounting for roughly half of all stainless steel produced globally. You’ll find it in commercial kitchen equipment, food processing lines, architectural trim, pharmaceutical vessels, and decorative panels.
From a welding perspective, 304 is considered highly weldable — with one major caveat. Its carbon content (up to 0.08%) makes it susceptible to the sensitization problem described above. That’s why most fabricators specify 304L (the low-carbon variant, capped at 0.03% carbon) for any application involving welding. The lower carbon content dramatically reduces the risk of chromium carbide formation.
Filler metal selection for 304 is straightforward: ER308L wire or rod. The slightly higher chromium and nickel content in 308L compensates for dilution during the weld, ensuring the finished joint matches the parent metal’s corrosion resistance.
316 Stainless Steel — The Corrosion Fighter
Grade 316 adds 2-3% molybdenum to the chromium-nickel mix, which significantly improves resistance to chloride pitting and crevice corrosion. This makes it the go-to choice for marine environments, chemical processing, medical implants, and any application where the metal contacts saltwater or aggressive chemicals.
Welding 316 requires ER316L filler to maintain that molybdenum content in the weld deposit. Interpass temperature management is equally critical — many specifications cap it at 150°C to prevent sensitization and preserve the enhanced corrosion resistance you’re paying extra for.
Quick Comparison
| Property | 304 / 304L | 316 / 316L |
|---|---|---|
| Chromium Content | 18-20% | 16-18% |
| Nickel Content | 8-10.5% | 10-14% |
| Molybdenum | None | 2-3% |
| Recommended Filler | ER308L | ER316L |
| Chloride Resistance | Moderate | Excellent |
| Relative Cost | Baseline | ~20-30% premium |
| Primary Industries | Food, architectural, general | Marine, medical, chemical |
One mistake I see regularly: fabricators using 308L filler on 316 base metal to save a few dollars on consumables. The resulting weld has no molybdenum. In a benign indoor environment, it might never matter. In a coastal railing or a chemical tank, that weld becomes the weak link in the corrosion chain within months.
Choosing the Right Welding Method for Stainless Steel
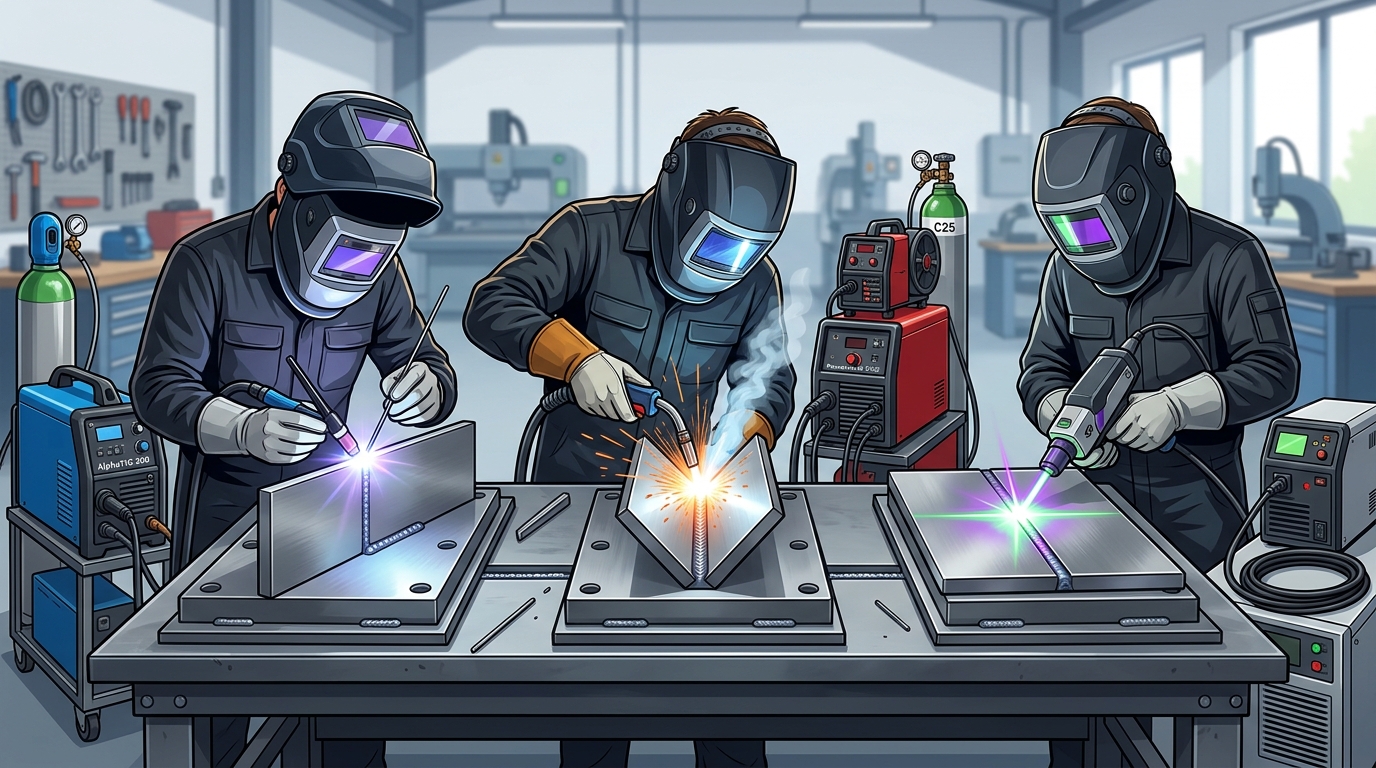
Three welding processes dominate stainless steel fabrication today. Each has a clear sweet spot — and clear limitations.
TIG Welding (GTAW)
TIG remains the gold standard for precision stainless steel work. The non-consumable tungsten electrode and separate filler rod give the welder granular control over heat input and puddle size. For pipe welding, pressure vessels, and any application where weld quality is subject to radiographic inspection, TIG is often the specified process.
Where it excels: Root passes on pipe, thin-wall tubing (down to 0.5mm with skilled hands), food-grade sanitary welds requiring full penetration with no porosity, and any joint where appearance matters as much as strength.
Where it struggles: Speed. TIG is slow. On production runs involving long linear seams or high volumes of repetitive joints, the labor cost per meter of weld becomes a real problem. A skilled TIG welder might travel at 100-200mm per minute on thin stainless. That same joint can be completed 3-5x faster with laser.
MIG Welding (GMAW)
MIG welding feeds a consumable wire electrode through the torch, offering much higher deposition rates than TIG. For thicker sections (above 3mm) and structural applications where production speed matters, MIG is the practical choice.
Where it excels: Heavier gauge fabrication, structural frames, tanks and vessels where the weld will be ground or hidden, and situations where the operator skill pool is limited.
Where it struggles: Heat input is inherently higher than TIG or laser, making it poorly suited for thin sheets. Spatter is a constant issue on stainless, and the shielding gas mixture (typically 98% Argon / 2% CO₂ or a tri-mix) needs careful optimization. Post-weld cleanup is more extensive.
Handheld Laser Welding
This is where the industry has shifted dramatically in the past few years. Handheld fiber laser welding systems — typically in the 1000W to 2000W range — have moved from niche aerospace applications into mainstream fabrication shops. The technology focuses a high-energy-density laser beam through a handheld gun, producing a weld with an extremely small Heat Affected Zone (HAZ).
Where it excels: Thin stainless steel sheet (0.5mm to 3mm), decorative and visible welds where aesthetics are non-negotiable, high-volume production requiring speed, and shops that need to train new operators quickly. The learning curve is genuinely shorter than TIG — most operators produce acceptable welds within days rather than months.
Where it struggles: Joint fit-up tolerance is tighter than arc processes. Gaps that TIG can bridge with filler, laser cannot. Capital cost is higher upfront (though total cost of ownership often favors laser when you factor in reduced finishing labor). And for very thick sections above 4-5mm, you’re typically looking at multi-pass or hybrid approaches.
TIG vs Laser Welding for Stainless Steel Applications
This is the comparison most fabricators are actively evaluating right now, so let’s go deep.
Heat Affected Zone
The HAZ in TIG welding on 1.5mm 304 stainless typically extends 3-6mm from the weld centerline. With handheld laser welding at equivalent parameters, the HAZ shrinks to 0.5-1.5mm. That’s not a marginal improvement — it’s a 70-80% reduction. A smaller HAZ means less distortion, less sensitization risk, and less discoloration on the back side of the panel.
Post-Weld Finishing
Here’s where laser welding saves real money. A clean laser weld on thin stainless often requires zero grinding and minimal polishing. The bead is narrow, flat, and consistent. A comparable TIG weld — even from a skilled operator — almost always needs some degree of blending, especially on visible surfaces. On decorative stainless steel panels (elevator interiors, architectural facades, kitchen equipment), the finishing labor saved per joint adds up fast across a production run.
Speed and Throughput
Laser welding on 1mm stainless steel runs at 40-80mm per second in continuous mode. TIG on the same material: 2-4mm per second. Even accounting for setup time and the tighter fit-up requirements of laser, the net throughput advantage is typically 3-5x for production work.
Learning Curve
A proficient TIG welder on stainless steel takes 6-12 months to develop. The simultaneous coordination of torch angle, filler rod feeding, foot pedal amperage control, and travel speed is genuinely difficult to master. Handheld laser welding simplifies this dramatically — the operator controls travel speed and angle, while the machine handles energy delivery. Most shops report new operators producing production-quality welds within 1-2 weeks.
Weld Strength
Both processes produce full-strength joints when properly executed. Laser welds on stainless steel routinely pass tensile and bend tests to AWS D17.1 and equivalent standards. The narrower fusion zone of a laser weld actually reduces residual stress compared to TIG, which can be an advantage in fatigue-critical applications.
Head-to-Head Summary
| Factor | TIG (GTAW) | Handheld Laser |
|---|---|---|
| Heat Affected Zone | 3-6mm | 0.5-1.5mm |
| Travel Speed (1mm SS) | 2-4 mm/s | 40-80 mm/s |
| Post-Weld Grinding | Usually required | Rarely required |
| Operator Training Time | 6-12 months | 1-2 weeks |
| Gap Bridging Ability | Excellent | Limited |
| Equipment Cost | $3,000-$8,000 | $15,000-$40,000 |
| Consumable Cost | Tungsten + filler rod + gas | Gas only (no filler for autogenous) |
| Best For | Pipe, heavy precision, code work | Thin sheet, decorative, high volume |
My honest take: TIG isn’t going away for pipe welding and heavy precision fabrication. But for thin stainless sheet work — which represents a massive share of the market in food equipment, medical devices, and architectural metalwork — laser welding is the superior process on nearly every metric that matters.
Best Practices for Welding 304 Stainless Steel
Grade 304 is the most frequently welded stainless steel, so getting the fundamentals right here pays dividends across thousands of joints.
Joint Preparation
Cleanliness is not optional — it’s the single biggest factor separating professional-quality stainless welds from mediocre ones. Before striking an arc or firing a laser:
- Remove all oils, grease, and marking pen residue with acetone or a dedicated stainless steel cleaner
- Use a dedicated stainless steel wire brush (never one that has touched carbon steel — iron contamination causes surface rust)
- If cutting was done with a plasma torch or grinder, remove the heat-affected edge material back to clean base metal
- Ensure fit-up gaps are within process tolerance: less than 0.5mm for laser, up to 1.5mm for TIG with filler
Filler Metal Selection
For 304 and 304L base metal, use ER308L filler wire or rod. The “L” designation is critical — it indicates low carbon (0.03% max), which prevents sensitization in the weld deposit. Using standard ER308 (with up to 0.08% carbon) on material that will see corrosive service is asking for trouble.
For laser welding in autogenous mode (no filler), the low-carbon 304L base metal itself provides adequate chemistry in the fusion zone. This is one of the practical advantages of laser — eliminating filler material cost and the complexity of wire feeding.
Interpass Temperature Control
This is where many fabricators get sloppy, and it’s where sensitization happens. The interpass temperature — the temperature of the weld zone before starting the next pass or adjacent weld — should be kept below 150°C (300°F). Use a contact pyrometer or infrared thermometer to verify. Waiting an extra two minutes between passes is cheap insurance compared to replacing a corroded weldment.
Avoiding the Danger Zone
The sensitization range of 450°C to 850°C is where chromium carbides form. Your goal is to move through this temperature range as quickly as possible during both heating and cooling. Practically, this means:
- Higher travel speeds with lower amperage (or lower laser power with faster scanning)
- Stringer beads rather than wide weave patterns
- Adequate shielding gas coverage to prevent oxidation during cooling
- Never preheat austenitic stainless steel (unlike carbon steel, preheating is counterproductive)
A common misconception: some operators preheat 304 stainless “because that’s what we do with steel.” Preheating austenitic stainless extends the time the metal spends in the sensitization range. It’s one of the fastest ways to destroy corrosion resistance.
How Pulsed Laser Welding Transforms Thin Stainless Steel Sheet Work
Welding thin stainless steel — anything under 3mm, and especially below 1.5mm — has always been the hardest test of a welder’s skill. Too much heat and the sheet warps or burns through. Too little and you get incomplete fusion. TIG welding thin stainless at production speed requires a genuinely talented operator, and even then, reject rates can run high.
Pulsed laser welding changes the physics of this problem.
How Pulsed Mode Works
Instead of delivering a continuous beam, the laser fires in rapid pulses — each one delivering a precise packet of energy that melts a small spot, which then solidifies before the next pulse arrives. Typical parameters for 1mm 304 stainless might be:
- Pulse duration: 5-15 milliseconds
- Pulse frequency: 10-50 Hz
- Peak power: 1500-3000W (with average power much lower)
- Spot overlap: 60-80%
Each pulse creates a tiny weld nugget. The overlap of successive nuggets forms a continuous seam. Because the material cools between pulses, the total heat input into the workpiece is a fraction of what a continuous process would deliver.
Practical Advantages on Thin Stainless
Zero burn-through on 0.5mm sheet. Try achieving that consistently with TIG. Pulsed laser makes it routine.
Minimal distortion. A 300mm x 300mm panel of 0.8mm 304 stainless, laser welded around the perimeter, stays flat. The same panel TIG welded will dish and oil-can visibly. This matters enormously in decorative and precision applications.
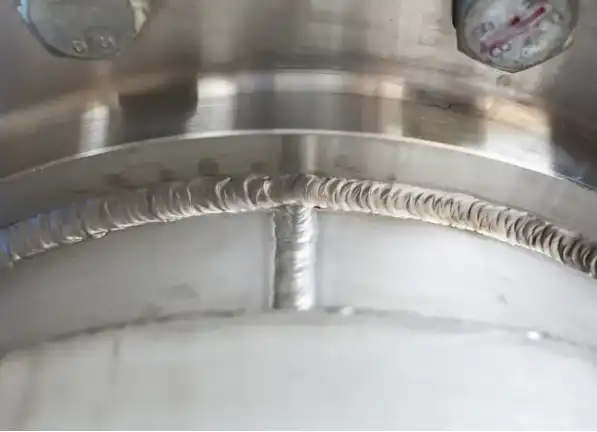
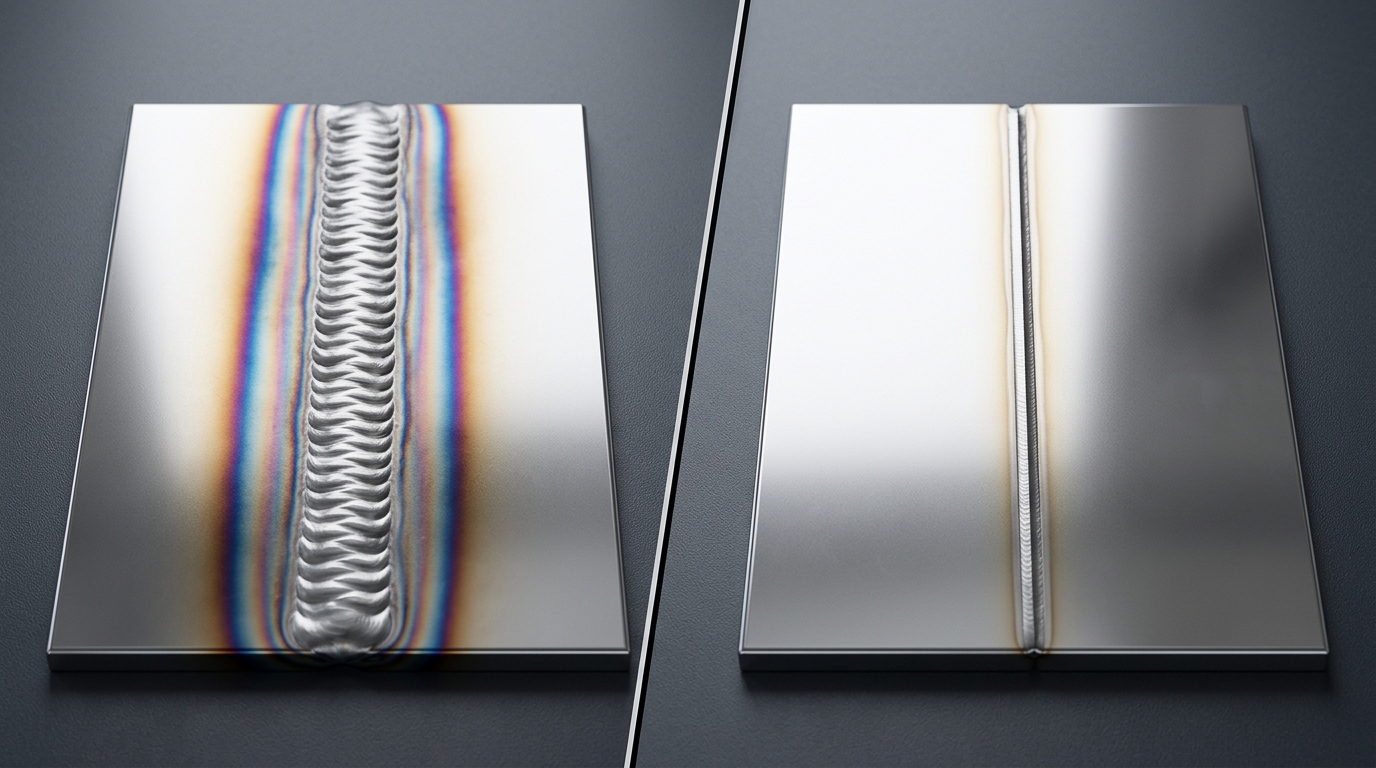
No discoloration on the face side. Because the heat input is so controlled, the characteristic blue-gold-purple heat tint that plagues TIG welds on thin stainless is virtually eliminated. The weld seam comes out silver-white, matching the parent material. For visible welds on kitchen equipment, medical enclosures, and architectural panels, this alone justifies the technology.
Beginner-accessible. The pulsed laser system handles energy management automatically. The operator focuses on tracking the joint at a consistent speed. Shops that previously struggled to hire skilled TIG welders for thin stainless work are now training general fabricators on laser systems in under two weeks.
Limitations Worth Knowing
Pulsed laser welding is not magic. Joint fit-up must be tight — gaps above 0.3mm on thin sheet will cause inconsistent penetration. The initial equipment investment is higher than a TIG setup. And for structural joints on thick plate, you’ll still need conventional arc processes. But within its sweet spot — thin sheet, visible welds, production volume — pulsed laser is hard to beat.
Minimizing Heat Tint and Preventing Warping on Stainless Steel
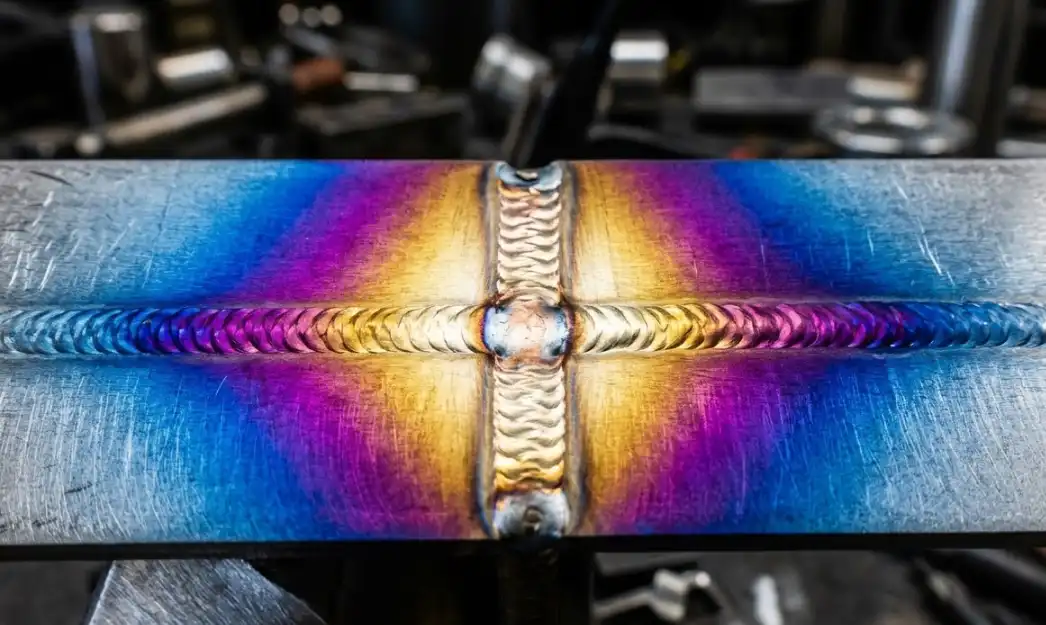
Heat tint — that rainbow of gold, blue, and purple discoloration adjacent to a stainless steel weld — is more than a cosmetic issue. Those colors indicate oxide layers of varying thickness formed at elevated temperatures, and they correspond to zones where the protective chromium oxide layer has been compromised. According to research published by the British Stainless Steel Association (BSSA), even light straw-colored tint represents a measurable reduction in pitting resistance.
Back Purging with Argon
The single most effective technique for preventing heat tint on the back side of stainless steel welds is argon back purging. By flooding the interior of a tube, pipe, or enclosed joint with argon gas, you displace the oxygen that would otherwise react with the hot chromium at the weld root.
Effective purging requires:
- Oxygen levels below 50 ppm (ideally below 20 ppm for critical applications) before welding begins
- A trailing purge that continues until the weld zone cools below 300°C
- Proper dam placement to contain the gas without creating excessive back pressure
- An inline oxygen analyzer if you’re doing code work — guessing isn’t acceptable
Controlling Distortion
Warping prevention on stainless steel is a combination of technique and fixturing:
Tack welding sequence: On a long seam, tack at the center first, then alternate outward toward the ends. This distributes initial shrinkage forces symmetrically rather than pulling the joint progressively to one side.
Skip welding (backstep technique): Instead of welding continuously from one end to the other, weld short segments in a staggered pattern. Each segment’s contraction partially offsets the previous one. On a 500mm seam, welding in 50mm increments with alternating direction can reduce final distortion by 40-60%.
Clamping and fixturing: Stainless steel’s high thermal expansion means it will move during welding. Rigid fixturing that constrains the workpiece during welding and cooling is essential for dimensional accuracy. For thin sheet, copper backing bars serve double duty — they provide clamping force and act as a heat sink, pulling thermal energy away from the weld zone.
Reducing heat input at the source: This is where process selection matters most. Switching from TIG to laser welding on 1.5mm stainless can reduce total heat input by 70-80%, making many of the above mitigation techniques unnecessary. Sometimes the best distortion control strategy is simply using less heat in the first place.
Expert Tips for Achieving Professional-Quality Stainless Steel Welds
These are the details that separate adequate stainless steel welds from excellent ones.
Shielding Gas: Pure Argon, No Exceptions (for TIG and Laser)
For TIG welding stainless steel, use 100% argon as the shielding gas. For handheld laser welding, same thing — pure argon. Some operators experiment with argon-helium mixtures for increased penetration on thicker sections, and that can work, but adding any CO₂ or oxygen (as you might with MIG on carbon steel) will oxidize the chromium and destroy corrosion resistance at the weld surface.
Flow rate matters too. For TIG, 8-12 liters per minute is the typical range. More is not better — excessive flow creates turbulence that actually pulls atmospheric contamination into the gas shield. For laser welding, 15-20 L/min is common because the higher travel speed requires a larger gas envelope.
Surface Contamination Prevention
Stainless steel is a contamination magnet, and the consequences are visible and permanent:
- Carbon steel contamination (from grinding wheels, wire brushes, or clamps used on carbon steel) causes rust spots that appear within days
- Zinc contamination (from galvanized fixturing or nearby galvanized material) causes cracking in the weld
- Chloride contamination (from sweat, marking pens, or cleaning agents containing chlorine) initiates pitting corrosion
Dedicated tools for stainless steel are not a luxury — they’re a requirement. Mark them clearly and store them separately.
Parameter Optimization by Thickness
Rather than memorizing specific numbers (which vary by machine), understand the principle: as material thickness decreases, travel speed must increase and heat input must decrease proportionally. A useful rule of thumb for TIG on stainless: set your amperage to roughly 1 amp per 0.001 inch of thickness (so 60 amps for 0.060″ / 1.5mm material) as a starting point, then adjust based on joint configuration and travel speed.
For laser welding, the relationship is more forgiving because the energy density is higher and the interaction time is shorter. Most modern handheld laser systems include preset parameter libraries for common stainless grades and thicknesses — a genuine advantage for shops without deep welding engineering expertise.
Post-Weld Passivation
Even a perfectly executed weld benefits from passivation — the chemical treatment that restores and strengthens the chromium oxide passive layer. Options include:
- Citric acid passivation (ASTM A967): Environmentally friendly, effective, increasingly preferred
- Nitric acid passivation (ASTM A380): Traditional method, highly effective but requires careful handling
- Electrochemical passivation: Localized treatment using a wand — ideal for field work and spot treatment of welds
Passivation removes free iron from the surface (deposited during fabrication) and promotes a uniform, robust oxide layer. On food-grade and medical applications, it’s not optional — it’s a regulatory requirement.
Frequently Asked Questions About Stainless Steel Welding
Can you MIG weld stainless steel?
Yes, MIG welding works on stainless steel, particularly for thicker sections (3mm and above). Use a shielding gas mixture of 98% argon / 2% CO₂ (or a tri-mix of argon/helium/CO₂) and stainless-specific wire (ER308L for 304, ER316L for 316). MIG produces higher heat input than TIG or laser, so expect more distortion and heat tint on thin material. Short-circuit transfer mode is preferred for thinner gauges to limit heat input.
What gas do you use for stainless steel welding?
Pure argon (100%) for TIG and laser welding. For MIG welding,a shielding gas blend of 98% argon / 2% CO₂ is the most common choice, though some shops use a tri-mix of 90% helium / 7.5% argon / 2.5% CO₂ for improved penetration on heavier sections. Never use pure CO₂ or argon/CO₂ mixes designed for carbon steel — the excess CO₂ oxidizes chromium and ruins corrosion resistance at the weld surface.
Why does stainless steel turn blue or brown after welding?
The discoloration is a thin oxide layer formed when hot stainless steel reacts with atmospheric oxygen. The color corresponds to oxide thickness: light straw (thinnest, least damage) through gold, purple, blue, and finally gray (thickest, most severe). Each color represents progressively more chromium depletion from the surface. Light straw tint on non-critical applications may be acceptable, but blue or darker tint indicates significant loss of corrosion resistance and should be removed mechanically or chemically, then the surface passivated.
Is laser welding stronger than TIG on stainless steel?
When properly executed, both processes produce joints that meet or exceed base metal tensile strength. Laser welds on stainless steel routinely pass destructive testing to AWS and ISO standards. The narrower fusion zone of laser welding actually produces lower residual stress than TIG, which can be advantageous in fatigue and stress-corrosion cracking scenarios. The real difference isn’t strength — it’s the dramatically smaller heat affected zone, reduced distortion, and superior aesthetics that laser delivers.
How do you prevent rust on stainless steel welds?
Rust on stainless steel welds comes from three sources: sensitization (chromium depletion from excessive heat), free iron contamination (from carbon steel tools or particles), and inadequate shielding gas coverage during welding. Prevention requires controlling heat input to avoid sensitization, using dedicated stainless steel tools and clean work surfaces, maintaining proper argon shielding on both sides of the joint, and performing post-weld passivation to restore the chromium oxide layer.
What is the easiest welding method for beginners on stainless steel?
Handheld laser welding has the shortest learning curve by a significant margin. The machine manages energy delivery while the operator focuses on tracking the joint at a steady speed. Most beginners produce acceptable production welds within 1-2 weeks. TIG welding, by contrast, requires simultaneous coordination of torch angle, filler rod feeding, amperage control, and travel speed — a skill set that typically takes 6-12 months to develop to a professional level on stainless steel.
Choosing Your Path Forward in Stainless Steel Welding
Every stainless steel welding decision comes down to three variables: what you’re welding, how many you’re welding, and what the finished joint needs to look like.
For pipe work, pressure vessels, and code-governed fabrication where radiographic inspection is required, TIG remains the benchmark process. Its precision and gap-bridging ability are unmatched for these applications, and the slower speed is an accepted trade-off for the control it provides.
For thin sheet fabrication — food equipment, medical enclosures, decorative panels, kitchen and architectural metalwork — handheld laser welding has become the smarter choice for most shops. The combination of minimal heat input, virtually zero post-weld finishing, fast operator training, and production speeds 3-5x faster than TIG creates a compelling total cost advantage, even accounting for the higher equipment investment.
Regardless of which process you choose, three fundamentals are non-negotiable:
- Shielding gas discipline. Pure argon, proper flow rates, back purging on enclosed joints. Skimping here is the fastest way to turn expensive stainless steel into expensive scrap.
- Heat input control. Stay out of the 450-850°C sensitization zone. Use low-carbon filler metals (308L, 316L). Monitor interpass temperatures. Every degree of unnecessary heat is working against you.
- Proper filler selection. Match the filler to the base metal chemistry. ER308L for 304. ER316L for 316. No shortcuts, no substitutions.
If you’re evaluating handheld laser welding for your stainless steel applications, start with a sample test on your actual production parts and materials. The difference in heat affected zone, distortion, and finish quality compared to your current process will speak for itself. The technology has matured to the point where it’s no longer experimental — it’s the production standard for thin stainless steel work in forward-thinking fabrication shops worldwide.


