You can prevent holes, bubbles, and cracks in welding by understanding what causes these defects and using the right techniques. Cracks often cause parts to fail quickly. Gas bubbles, known as porosity, make the weld weak. Tests show that defects near the surface harm joint strength more than deep ones. If you learn why these problems happen and follow smart steps, you will see stronger and safer welds.
Key Takeaways
- Always clean your base material before you weld. Taking away dirt, oil, and water helps stop holes. This also makes your welds stronger.
- Use the right welding technique and settings. Change your heat, travel speed, and gas flow to stop problems like porosity and cracks.
- Practice often to get better at welding. The more you weld, the more you can control the process. This helps you make fewer mistakes.
- Look at your tools and materials before you start. Check for leaks, clean the surfaces, and make sure everything works well. This helps you avoid problems.
- Follow a quick checklist every time you weld. This helps you find problems early. It also makes sure your welds are strong and safe.
Welding Defects Overview
Why Defects Matter
Welding defects can cause big problems for any project. You want your welds to be strong and safe. Defects like holes, bubbles (porosity), and cracks can make the weld weak. These problems can also make the finished product look bad. Research shows that even small holes or inclusions can lower the long-term strength of welded joints. Larger defects can make pipes or structures fail much sooner than expected. Cracks in the weld can spread over time, making the joint less reliable. You should always check for these issues because they can lead to safety risks and costly repairs.
Tip: Clean, rust-free surfaces help you avoid many common welding defects. Many beginners forget this step, but it is very important for strong welds.
How Defects Form
You may see several types of welding defects during your work. Here are some of the most common ones:
- Incomplete penetration: The weld metal does not fuse all the way with the base metal.
- Undercuts: The arc burns away the edge of the base metal.
- Lack of fusion: The base or filler metal does not melt enough, so the joint stays weak.
- Slag inclusions: Non-metallic materials get trapped in the weld.
- Porosity: Small gas pockets form inside the weld metal.
Most defects happen when you do not prepare the base material well. If you skip cleaning or do not remove rust, you increase the risk of weak welds. Beginners often think they can skip surface prep, but this leads to problems. You should always take time to clean and prepare your materials before welding. This simple step helps you avoid many defects and keeps your welds strong.
Holes in Welding
What Are Holes
You may notice holes in your welds during inspection. These holes can look different depending on how they form. Welding inspection manuals describe several types of holes:
- Cavities: Rounded holes found inside or on the surface of the weld.
- Porosity: Small holes caused by trapped gas bubbles, which make the weld weaker.
- Blowholes: Larger holes or cavities that appear on the surface or inside the weld metal.
- Cluster Porosity: Groups of small holes that show up together.
- Shrinkage Voids: Holes formed when the weld material contracts as it cools, often running parallel to the weld root.
- Wormholes: Long, tube-like cavities caused by too much trapped gas.
You should always check for these holes because they can lower the strength and safety of your welds.
Causes of Holes
Many things can cause holes in your welds. You need to know these causes to prevent them:
- Dirt, oil, grease, rust, or moisture on the base metal can react with the molten weld pool. These reactions create impurities and gas pockets inside the weld.
- Surface contaminants stop the weld metal from bonding well, which leads to incomplete penetration and pinhole formation.
- Moisture and oil introduce hydrogen and other gases into the weld pool. These gases get trapped as the weld cools, forming cavities that weaken the structure.
- Poor filler rods or wires can also add impurities and cause holes.
- Incorrect welding settings, such as too much heat or wrong travel speed, can make the weld pool unstable and increase the risk of blowholes.
Tip: Always clean your base metal before welding. Removing dirt, oil, and moisture helps you avoid holes and makes your welds stronger.
Prevention Tips
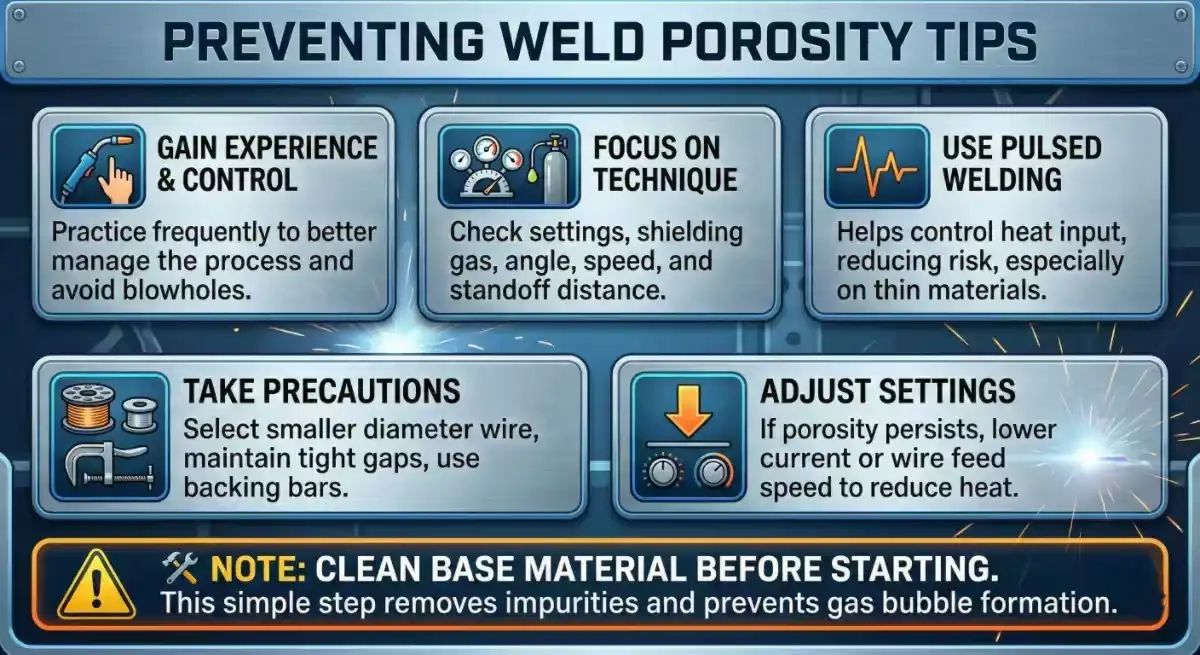
You can follow these steps to prevent holes in your welds:
- Practice and build experience. The more you weld, the better you control the process and avoid blow-through.
- Focus on your welding technique. Check your welder settings, shielding gas, gun angle, travel speed, and distance from the workpiece.
- Use pulse welding. This method helps you control heat input and lowers the risk of holes, especially on thin materials.
- Take preventative measures. Choose a smaller wire diameter, keep a small weld gap, and use backing bars for support.
- Adjust your settings. If holes still appear, lower the current or wire feed speed to reduce heat input.
🛠️ Note: Clean your base material before you start. This simple step removes impurities and stops gas pockets from forming.
If you follow these steps, you will see fewer holes in your welds. Your projects will be safer and last longer.
Porosity in Welding
What Is Porosity
Porosity happens when gas gets stuck inside the weld metal as it cools down. You can find porosity by looking for tiny holes or bubbles in the weld bead. Sometimes, there are small pores all over the weld. Other times, you see bigger holes on the surface that break through the weld. These holes make the weld weak and give it a rough look. Porosity can show up as single bubbles, groups of bubbles, or even long wormholes. Each kind of porosity means gas did not escape before the metal got hard.
Causes of Porosity
Many things can make porosity in your welds. You should watch out for these common causes:
- Gas soaking into the hot weld pool
- Not enough gas shielding
- Dirty surfaces
- Too much or wrong surface coating
- Problems with joint shape
- Bad welding technique
- Wet electrodes or fluxes
- Too much shielding gas flow
- Nozzles that are blocked or broken
- Filler materials that are dirty
- Wrong torch angle or distance
- Welding close to edges or open roots
One big reason for porosity is not enough shielding gas. If you do not have enough shielding gas, air can mix with the hot metal. This lets gases like oxygen and nitrogen make bubbles that get trapped as the weld cools. The kind of shielding gas you use also matters. For example, argon can trap bubbles, but nitrogen can help make the weld pool more steady and lower porosity.
| Evidence Description | Key Points |
|---|---|
| Not enough shielding gas lets air touch the hot weld pool, which makes gas bubbles. | This causes porosity because the bubbles get stuck in the cooling weld. |
| Using inert shielding gas on thick plates can make big porosities in deep welds. | Active gases like nitrogen can also make porosity and brittle nitrides. |
| The type of shielding gas changes how steady the weld pool is. | Argon gas traps bubbles, but nitrogen makes the keyhole steady and lowers porosity. |
| Adding active gases like nitrogen makes the molten metal flow better. | This helps the metal move and lowers porosity. |
Dirty surfaces are another big cause. Dirt, oil, rust, or paint on the metal can make gas when heated. This gas gets trapped and forms bubbles. Wet electrodes or fluxes also add hydrogen, which makes more porosity.
Prevention Tips
You can stop porosity by doing a few easy things:
- Clean the workpiece before you start. Use a wire brush or solvent to remove dirt, oil, rust, and coatings.
- Pick the right shielding gas and set the flow rate correctly. Too much or too little gas can cause problems.
- Check your tools often. Make sure hoses, nozzles, and regulators work well and do not leak.
- Keep electrodes and filler materials dry. Store them away from water.
- Hold the torch at the right angle and distance. This helps the shielding gas cover the weld pool.
- Do not weld near open edges or gaps where air can get in.
- Use good welding technique. Move at a steady speed and keep the arc steady.
🛡️ Tip: Always check your tools before welding. Even a small leak in the gas line can cause a lot of porosity.
If you follow these steps, you will see fewer bubbles and wormholes in your welds. Your finished work will be stronger and look much better.
Cracks in Welding
What Are Cracks
Cracks look like thin lines or splits in the metal. You can see them on top or inside the weld. Some cracks show up right after welding. Others appear later. Crater cracks are star-shaped and show at the end of a weld bead. Face cracks run along the outside of the weld. Toe cracks start at the edge and move into the base metal. Welding codes sort cracks by where they are and how they look. Here is a table that lists common crack types and what they look like:
| Crack Type | Description |
|---|---|
| Crater Crack | Shallow hot cracks formed by improper termination of a welding arc, often star-shaped. |
| Face Crack | Longitudinal crack on the exterior surface of the weld, caused by excessive concavity or rapid cooling. |
| HAZ or Underbead Crack | Cold cracks in the HAZ of steel weldments, usually short and discontinuous. |
| Longitudinal Crack | Cracks found within the weld metal, parallel to the length of the weld, often due to high restraint. |
| Root Crack | Longitudinal cracks along the weld root, can be hot or cold, related to procedure or metallurgical issues. |
| Root Surface Crack | Cracks on the exposed surface of the weld opposite the welding side, can be procedure-related. |
| Throat Crack | Longitudinal cracks in the face of the weld extending toward the root, generally hot cracks. |
| Toe Crack | Cold cracks initiating parallel to the base material surface, often due to thermal shrinkage strains. |
| Transverse Crack | Cracks running nearly perpendicular to the weld axis, often related to hydrogen embrittlement. |
Causes of Cracks
Cracks happen when the weld metal cannot handle stress as it cools. The metal shrinks and this builds up stress inside. If you use the wrong welding steps or do not prepare the joint well, cracks can form. Bad welds, design mistakes, and not enough training also cause cracks. The chart below shows the main reasons cracks form in welds:
Studies show that fast temperature changes and tight spots make stress in the heat-affected zone. Cooling too fast can trap problems in the metal and help cracks start. Sometimes, the way the metal is made helps cracks grow, even if the load is not very high.
Prevention Tips
You can stop cracks by following smart steps. Here are some tips that welding experts suggest:
- Use the same welding process and follow good weld steps for each job.
- Plan joints well and use careful methods to control stress and bending.
- Preheat the metal before welding to lower stress.
- Watch your heat and keep the temperature between welds safe.
- Pick metals and filler materials that work well together.
- Check for dirt before welding and keep things clean.
- Make small weld beads with enough overlap and set speed, voltage, and angle right.
- Ask welding engineers for help with steps.
- Use heat treatment after welding to lower stress.
💡 Tip: Always know the yield strength and how sensitive your materials are. Use filler metal charts to pick the right filler for each job.
If you follow these steps, you will see fewer cracks in your welds. Your projects will be safer and last longer.
Welding Best Practices
You can stop most welding problems by using best practices. These steps help you avoid holes, bubbles, and cracks. Welding groups and experts suggest some important actions. The table below lists some of the best practices:
| Best Practice | Description |
|---|---|
| Proper Joint Design | Make joints easy to reach and shape the bead right. |
| Pre- and Post-Weld Material Treatment | Heat materials before and after welding to lower stress and stop cracks. |
| Proper Filler Metal Selection | Pick filler metal that matches the base metal for strong welds. |
| Filler Metal Storage and Handling | Keep filler metals dry and clean to stop dirt and water from causing problems. |
| Welder Training | Teach welders to follow steps and spot problems for better welds. |
Equipment Maintenance
Take care of your welding equipment. Clean surfaces, check gas flow, and look at hoses and nozzles often. Regular checks help you find problems early. Clean your tools and use coatings if needed. This helps your welds last longer and stay strong.
- Clean welding surfaces before you start.
- Use the right electrode and check if it is worn out.
- Make sure shielding gas flows at the right speed.
- Check your equipment often and fix problems fast.
🛠️ Tip: Good equipment care helps you stop porosity, cracks, and holes.
Technique and Preparation
Good technique and prep are very important. Line up parts right and fit them well to stop bending. Clean workpieces to keep out oxides. Set the current and speed for your weld. Heat materials that crack easily and treat them after welding to lower stress.
- Line up parts for a good fit.
- Clean workpieces before you weld.
- Set current and speed for your weld.
- Heat and treat materials if needed.
💡 Note: Training classes teach these skills and help you get better results.
Material Handling
Handle and store materials with care. Keep electrodes and filler metals dry and clean. Store wires in closed places with steady temperatures. Water can cause rust and make problems. Do not let aluminum filler metal touch water. Good storage keeps your materials ready for strong welds.
- Store filler metals in dry, clean places.
- Keep wires away from water and big temperature changes.
- Check materials before you use them.
📦 Tip: Storing materials right stops rust and keeps welds strong.
Quick Prevention Checklist
You can use this checklist before welding. It helps you stop holes, bubbles, and cracks. Follow each step to make welds strong and safe.
- Clean the base material. Take off dirt, oil, rust, and moisture. Dry surfaces work best.
- Make sure you have the Welding Procedure Specification (WPS). This paper shows the right steps and settings.
- Check welding consumables. Wires, rods, and electrodes must be clean and dry. Use only pure shielding gas.
- Look at jigs, fixtures, and grounding. Tighten clamps and check the ground connection.
- Write down the preheat temperature if your metal needs it. Use a temperature stick or infrared thermometer.
🛠️ Tip: Always check your tools and materials before welding. Small problems can make big defects.
You can use different inspection methods to find defects early. The table below lists common inspection types, their uses, and the tools you need.
| Inspection Type | Use Case | Tools & Techniques |
|---|---|---|
| Visual Inspection | Surface cracks, undercut, overlap | Weld gauges, mirrors, dye-penetrant |
| Magnetic Particle Test | Surface/subsurface cracks | Yoke, powder, UV light |
| Ultrasonic Test (UT) | Internal fusion, porosity | UT probe, calibrated screen |
| Radiographic (RT) | Critical load-bearing welds | X-ray, gamma-ray film |
Start with visual inspection first. Look for cracks, holes, and bubbles. Use weld gauges and mirrors for hard-to-see spots. For deeper checks, use magnetic particle tests or ultrasonic tests. Radiographic tests help you find hidden problems in important welds.
✅ Note: If you use this checklist every time, you will catch most defects before they cause trouble. Good habits help you make better welds.
You can stop holes, bubbles, and cracks if you know what causes them. Use good welding habits to help. The table below lists common welding defects to look for:
| Defect Type | Description |
|---|---|
| Cracks | Flat breaks that can make parts fail. |
| Porosity and Gas Inclusions | Gas bubbles stuck in the weld, which makes it weak. |
| Incomplete Penetration | Weld does not fill the whole joint, so weak spots form. |
Try these tips to stay motivated:
- Keep learning by practicing and training often.
- Check your work and see how you improve.
- Get ready and use your checklist every time.
With practice and smart steps, you can make strong and safe welds.
FAQ
What causes holes in welds?
You often see holes when dirt, oil, or moisture stays on the metal. Poor filler rods and wrong welding settings also lead to holes. Clean your base material and check your equipment before you start.
How can you prevent porosity in welding?
You should clean your workpiece and use the right shielding gas. Keep electrodes dry and check for leaks in hoses. Hold the torch at the correct angle to cover the weld pool.
Tip: Always inspect your tools before welding to avoid porosity.
Why do cracks form after welding?
Cracks form when the metal cools too fast or faces too much stress. Bad joint design and wrong filler metal also cause cracks. Preheat your metal and follow good welding steps to reduce cracking.
What inspection method finds hidden weld defects?
Ultrasonic testing helps you find hidden defects inside welds. You use a probe and screen to check for porosity and fusion problems. Visual inspection works for surface issues, but deeper checks need special tools.
Shielding Gas: Nitrogen vs. Argon in Laser Welding
How Much Should You Pay for Laser Welding Services
Three in one laser machine really worth your money
How Does Laser Wire Feeding Technology Improve Welding Precision