Fiber laser frequency settings decide how many laser pulses hit each second. These settings help you choose how the laser works with metals, plastics, or other things. The right frequency gives you sharp lines, deep marks, or smooth finishes. If you change the fiber laser frequency, you can make the engraving deeper and match it to different materials.
Key Takeaways
- Fiber laser frequency is how often the laser flashes each second. This changes how deep and smooth the engraving looks. Lower frequencies give more energy with each flash. This makes deeper marks on metals like aluminum and brass. Higher frequencies make the details sharper and clearer. This works well on harder materials, but the marks are not as deep. You should always match the frequency to the material and what you want. This helps you get the best results. Try different frequencies on scrap pieces first. This helps you find the best setting for your project.
Fiber Laser Frequency Basics
What Is Fiber Laser Frequency
Fiber laser frequency is how many times the laser flashes each second. People use hertz (Hz) or kilohertz (kHz) to measure this. Most fiber lasers work between 20 kHz and 80 kHz. This means the laser can flash from 20,000 to 80,000 times every second. Each flash is very quick and lasts only a tiny bit of time, called nanoseconds.
Experts use special tools to measure fiber laser frequency. Here is a table that shows some ways to measure it:
| Measurement Technique | Description |
|---|---|
| Optical Frequency Comb | Used for phase-coherent measurement of laser frequency, providing high precision. |
| Primary Cesium Frequency Standard | Serves as a reference for measuring the frequency of lasers, ensuring accuracy in the SI unit of length. |
Some lasers in science can have very high frequencies, like 455,986,240,494,276 Hz. But for most engraving and cutting, you use much lower frequencies.
How Frequency Settings Work
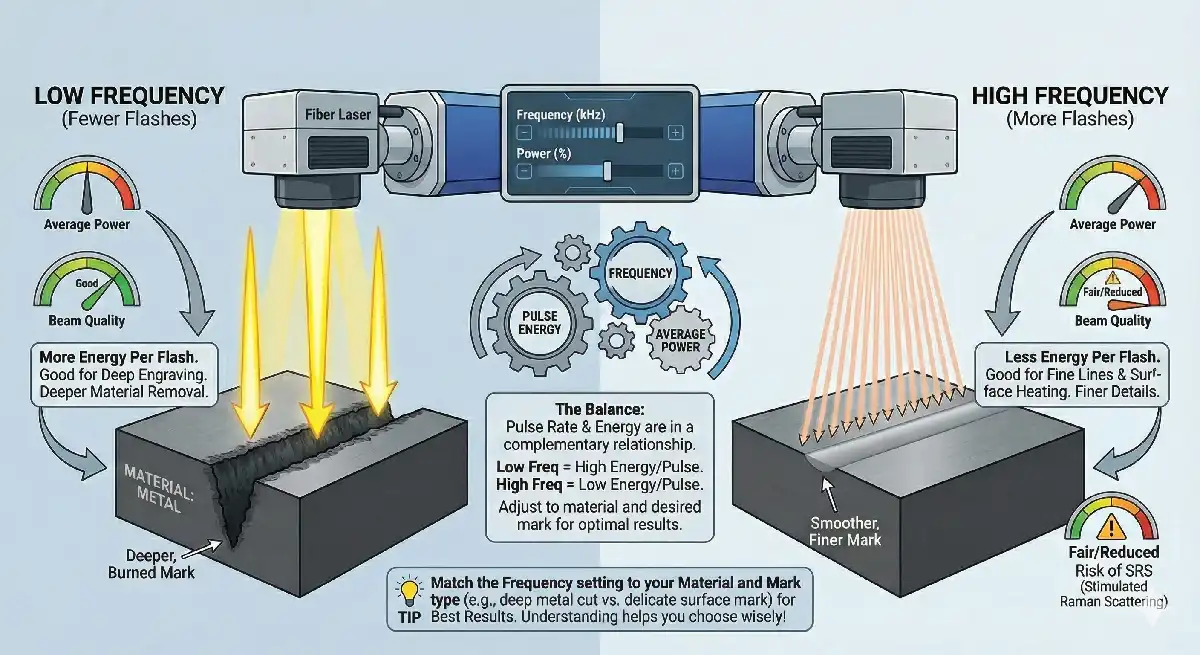
The pulse rate, or frequency, tells you how often the laser flashes. Each flash has energy. If you use a lower frequency, each flash has more energy. This helps you burn away material and make deeper marks. If you use a higher frequency, each flash has less energy, but the laser flashes more times. This can heat the top layer and make smoother, finer marks.
How frequency and pulse energy work together changes how your fiber laser works. When you change the frequency, you also change the highest power and the quality of the laser beam. For deep engraving, you need to balance pulse energy and average power. If you set the frequency too high, you might lose beam quality because of things like stimulated Raman scattering.
Tip: You get the best results when you match the frequency setting to your material and the kind of mark you want.
Fiber laser frequency settings are important for how your laser works. When you know what these settings do, you can make better choices for your projects.
Frequency Settings and Performance
Engraving Quality and Precision
You can change how good and exact your engraving is by adjusting fiber laser frequency. When you use higher frequencies, the laser makes more pulses each second. This gives you sharper lines and clearer details, especially on metals. If you use higher frequencies with slower speeds, designs look more exact. The material you pick also matters. Softer materials may need lower frequency settings so they do not get damaged. Harder materials can handle higher frequencies for sharp marks.
- Frequency settings change engraving precision by:
- Changing the contrast and depth of marks on different materials.
- Making sharper contrasts at higher frequencies, which helps clarity.
- Needing slower speeds with higher frequencies for detailed designs.
- Depending on what the material is to find the best frequency and speed.
You might have to choose between speed and quality. If you go faster, the marks are not as deep because the laser spends less time on each spot. If you want deeper and sharper marks, you may need to slow down or go over the area more than once. Higher pulse frequencies can make marks weaker. Lower frequencies make stronger marks but take longer.
Effects on Depth and Material
Fiber laser frequency settings also change how deep the laser engraves and how the material reacts. Lower frequencies give more energy with each pulse. This helps you make deeper engravings, especially on metals like aluminum, brass, stainless steel, and carbon steel. The table below shows how engraving depth changes with frequency:
| Frequency (kHz) | Engraving Depth (mm) for Aluminum | Engraving Depth (mm) for Brass | Engraving Depth (mm) for Stainless Steel | Engraving Depth (mm) for Carbon Steel |
|---|---|---|---|---|
| 100 | 2.43 | 0.95 | 0.55 | 0.36 |
| 600 | N/A | N/A | N/A | N/A |
You can see that lower frequencies make deeper engravings.
Heat is also important. The table below explains how different frequency levels change heat and marking quality:
| Frequency Level | Impact on Heat Generation | Marking Quality |
|---|---|---|
| Higher | Makes more heat in the area | More even and detailed marks |
| Lower | Helps control heat | Good for light marks or soft materials |
When you use higher frequencies, the laser can make heat build up fast. This can hurt the material if the pulses are too close together. Lower duty cycles let heat cool down between pulses, which helps protect soft materials. The “golden triangle” of power, speed, and frequency helps you balance heat and get good results.
In mass production, you want things to be the same every time. The table below shows how different frequency ranges work for different materials and uses:
| Frequency (kHz) | Material Response | Best Use |
|---|---|---|
| 20–30 | High energy per pulse | Deep engraving on metals |
| 40–60 | Balanced output | Logo marking on stainless steel |
| 70–100 | Smoother but shallower | Plastic, anodized aluminum |
A small change in fiber laser frequency can make your results better. For example, if you raise the frequency from 30kHz to 60kHz on coated aluminum signs, you can get fewer burn marks and cleaner edges.
Tip: You get the best results when you match fiber laser frequency to your material and what you want to make. Try different settings to find the right mix of depth, detail, and heat control.
Adjusting Frequency for Applications
Choosing Settings for Different Materials
You need to select the right frequency settings for each material to get the best results. Different materials react in unique ways when you use a fiber laser. For common materials, you can follow these guidelines:
- Stainless steel, aluminum, and plastics work well with a power setting of 20–50 W.
- Use a spot size between 0.01–0.05 mm.
- Set the speed from 500 to 1000 mm/s.
- A single pass is often enough.
- Choose a frequency between 50–100 KHz.
Each fiber laser model has its own limits. The power rating of your machine decides the highest pulse frequency you can use. You can see this in the table below:
| Laser Rating | Maximum Pulse Frequency |
|---|---|
| 20 Watt | 20 KHz |
| 30 Watt | 30 KHz |
| 50 Watt | 50 KHz |
| 100 Watt | 100 KHz |
Pulse frequency changes the energy in each pulse and the marking speed. The laser’s output power and the speed you use also affect how well the laser works on your material. You need to match these settings to your project.
Practical Examples of Frequency Adjustment
Industry professionals often use special fiber lasers for tasks like jewelry marking or deep engraving. For jewelry, you want smooth edges, so you pick a high-frequency setting. MOPA fiber lasers let you adjust pulse settings for better results on metals like brass and gold. If you need deep engraving, you might use longer pulses and test different settings.
When you start a new project, you should test and calibrate your settings. Many experts follow these steps:
- Make a test part after calibration and measure its features.
- Cut the same test part at regular times to keep results steady.
- Write down your measurements to spot trends.
- Set limits so you know when to check your calibration.
Your experience as an operator helps you make better choices. With practice, you learn how to adjust for different materials and thicknesses. Training and hands-on work help you get the best results, even with tough jobs.
Tip: Always consider the unique features of your fiber laser and the material you use. Testing and practice lead to better results with fiber laser frequency settings.
You need to understand fiber laser frequency settings to get the best results from your projects. When you know how to adjust frequency, you can match your laser to each material and task.
Think of frequency like sandpaper. A 20 kHz setting acts rough, like 20 grit sandpaper. A 200 kHz setting feels smooth, like 200 grit.
- You gain better control over your laser.
- You set up your machine for each material.
- You work more efficiently.
Try different settings to see what works best for your needs.
FAQ
What does fiber laser frequency mean?
Fiber laser frequency means how many times the laser flashes each second. You measure it in hertz (Hz) or kilohertz (kHz). This setting controls how the laser interacts with your material.
What happens if you set the frequency too high?
High frequency gives you smoother and finer marks. You may lose engraving depth. Too much heat can build up, which can damage soft materials.
What materials work best with low frequency?
Low frequency works best with metals like aluminum, brass, and stainless steel. You get deeper engravings because each pulse has more energy.
What should you check before changing frequency settings?
Always check your material type, laser power, and desired result. Test on a sample before starting your main project.
What is the safest way to find the right frequency?
You should run a test on scrap material. Adjust the frequency and check the results. Write down your settings for future use.
Mobile Welding Services: Equipment list
Passive vs Auto-darkening welding helmet: Is it worth it?
Selection guide for 6010 and 6011 welding rods
Top Portable Laser Welding Machines for Stainless Steel and Their Prices