If your automatic wire feeder stops working, you might face several common problems. You should look for loose connections, worn drive rolls, or a dirty liner. Sometimes, issues with the contact tip or the gun cause trouble. Checking each part helps you find the problem quickly. The table below shows the top reasons why your machine might fail:
| Cause | Description |
|---|---|
| Feeder or equipment issues | Problems like relay faults, broken leads, or bad adapter connections can stop the feeder. |
| Drive roll considerations | Using the wrong size or style, or having poor tension, leads to wire feeding problems. |
| Liner problems | A liner that is the wrong size or full of debris can block the wire. |
| Contact tip wear | A dirty or worn tip can cause burnback or poor feeding from spatter buildup. |
| Gun-related issues | The wrong gun length can cause kinks or bunching, making feeding less efficient. |
Always check each connection and part before moving on to more complex fixes.
Key Takeaways
- Check all connections often. Loose or broken connections can make the arc unstable. They can also make the weld look bad.
- Make sure the wire path is open. Look for bends, twists, or things blocking the wire. This helps the wire move smoothly and stops jams.
- Pick the right wire size and type. Use wire that matches your machine’s rules. This helps stop feeding problems and makes the weld better.
- Look at drive rolls and liners often. If parts are old or broken, the wire can slip. This can also make feeding uneven.
- Look at everything before you start. A quick check can find problems early. This can help you avoid expensive fixes.
Automatic Wire Feeder Troubleshooting Basics
When your automatic wire feeder stops working, you need to follow a step-by-step approach. Start with the simplest checks and move to more complex issues. This method helps you find problems quickly and keeps your equipment running safely.
Check All Connections
Loose or damaged connections often cause trouble in automatic wire feeders. You should inspect every connection, including the earth lead and polarity settings. Make sure each connection feels tight and looks clean. If you find a loose wire, fix it right away. Loose connections can lead to unstable arcs, poor weld quality, and even overheating. Regular inspection of electrical connections helps prevent early failure and keeps your machine safe.
Tip: Always check the adapter connections and leads before starting work. A quick inspection can save you time and prevent costly repairs.
Here is a simple checklist to follow:
- Check the earth lead and polarity settings.
- Make sure all connections are tight and free from corrosion.
- Inspect the adapter and control leads for damage.
- Test the spool hub brake tension to prevent free-wheeling.
- Confirm the drive roller type matches the wire you use.
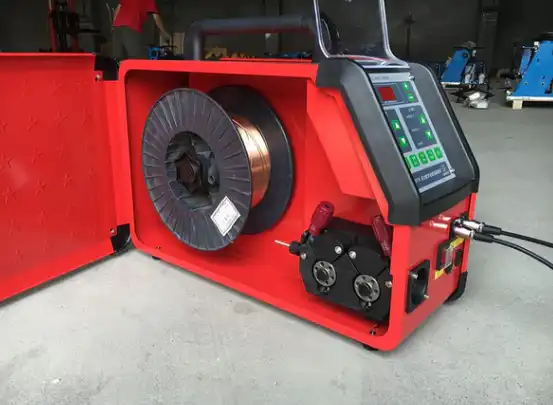
Inspect the Wire Path
A clear wire path is important for smooth feeding. If you see any bends, kinks, or blockages, fix them before you continue. Problems in the wire path can stop the drive rolls from moving or cause the wire to bunch up. You should look at the guide tube, liner, and drive rolls.
| Sign of Faulty Wire Path | Explanation |
|---|---|
| Drive Rolls Not Moving | The drive rolls may not move when you pull the trigger. This could mean a broken relay or faulty control lead. |
| Incorrectly Installed Guide Tube | An improperly installed guide tube can cause feeding issues. Make sure the tube fits the wire size and is adjusted correctly. |
| Poor Connections | Bad connections in the MIG gun adapter can lead to feeding problems. |
| Issues with Welding Liner | A liner that is too short, too long, or dirty can cause erratic feeding, burnbacks, or bird-nesting. |
| Debris Buildup in Liner | Dirt or metal shavings in the liner can block the wire. Replace the liner if you see debris. |
You should also check the wire tension arm. Set it so the wire feeds smoothly without slipping. If you notice inconsistent wire length, adjust the pressure on the feeding wheel.
Test the Trigger and Controls
The trigger and controls help you start and stop the wire feed. If the drive rolls do not move when you pull the trigger, you may have a relay problem or a broken control lead. You should test the trigger by pulling it and watching the drive rolls. If nothing happens, check the relay and control wiring.
Follow these steps to diagnose trigger and control issues:
- Pull the gun trigger and watch the drive rolls.
- If the rolls do not move, inspect the relay and control leads.
- Make sure you use the correct drive roll style and size.
- Check the liner for proper length, size, and cleanliness.
- Inspect the contact tip and diffuser for dirt or wear.
- Keep the gun cable straight to avoid kinks or bunching.
Note: Regular inspections and testing of electrical components help you find problems early. This practice improves safety and keeps your automatic wire feeder working well.
You should also train yourself and your team to spot problems quickly. Staff training helps everyone use the equipment safely and troubleshoot issues before they become serious.
Wire Quality and Feed Issues
Poor Wire Condition
You need to pay close attention to the condition of your welding wire. Damaged or tangled wire can cause your automatic wire feeder to stop working properly. If the wire has bends, twists, or sharp edges, it may get stuck inside the liner or drive rolls. You should always use wire that looks smooth and clean. The quality of the wire affects how well your feeder works. When you choose the right wire, you help your machine run smoothly and reduce downtime. Good wire quality means fewer feeding problems and better welds.
Tip: Always store your wire in a dry place. This keeps it free from damage and helps your feeder work better.
Incorrect Wire Size or Type
Using the wrong wire size or type can lead to feeding problems. Your automatic wire feeder is designed for specific wire sizes and materials. If you use a wire that is too thick or too thin, the drive rolls may not grip it correctly. This can cause slipping or jamming. You should check your machine’s manual to find the recommended wire size and type. Make sure the drive rolls and liner match the wire you use. If you switch to a different wire, adjust your settings before you start welding.
Rust or Contamination
Rust and contamination on the wire can block smooth feeding. You may notice the wire sticking or bunching up inside the liner. Rust that stays on the wire can build up in the liner and cause more problems. Lubricants on the wire can attract dust and dirt, making feeding harder. Contaminated wire often gets stuck in the welding gun. Dirt, rust, or debris on the wire’s surface are common reasons for feeding issues.
- Rust can remain in the liner and cause feed problems.
- Lubricants attract dust and dirt, which complicates feeding.
- Contaminated wire can block its passage through the gun.
- Dirt, rust, or debris on the wire surface often lead to feeding trouble.
You should always inspect your wire before loading it into the feeder. Clean wire helps your machine work reliably and keeps your welds strong.
Drive Roll and Guide Tube Problems
Drive roll and guide tube issues often cause your automatic wire feeder to malfunction. Problems like incorrect drive roll tension or using the wrong size drive roll can make the wire slip or crush, which leads to inconsistent feeding. Worn or clogged liners also block the wire’s path. You need to check these parts regularly to keep your machine running smoothly.
Worn or Damaged Drive Rolls
Drive rolls grip and push the wire through the system. When these rolls wear out or get damaged, you will notice several symptoms:
- Visual wear on the grooves of the drive rolls
- Wire slippage during feeding
- Bird nesting, which means the wire tangles up
- Burn back, where the wire fuses to the contact tip
If you see any of these signs, replace the drive rolls right away. Clean drive rolls help you avoid feeding problems and keep your welds strong.
Drive Roll Tension
Proper drive roll tension is important for smooth wire feeding. If the tension is too high, the rolls can crush or deform the wire. If the tension is too low, the wire may slip and not feed correctly. Both too much and too little tension can cause burnback, which interrupts your welding process.
- Improper tension can deform the wire and cause arc instability.
- Not enough tension leads to wire slippage.
- Both extremes can result in burnback.
You should adjust the tension until the wire feeds smoothly without slipping or flattening.
Guide Tube Installation
A well-installed guide tube helps the wire move easily from the spool to the gun. Follow these steps for best results:
- Release the pressure arms and remove the filler wire.
- Pull out the inlet guide tube and insert a new one.
- Turn the locking clip aside to free the middle guide tube.
- Insert a new middle guide tube, making sure the arrow points in the wire’s direction.
- Lock the new middle tube in place.
- Replace the outlet guide tube by pushing out the old one.
Check the guide tubes for dirt or damage each time you change the wire. Clean and correct installation helps prevent feeding issues and keeps your automatic wire feeder working well.
Liner and Adapter Connector Issues
Liner Fit and Cleanliness
You need to watch the liner inside your welding gun. The liner helps guide the wire from the feeder to the tip. If the liner is dirty or does not fit, wire feeding can be hard. Dirt, kinks, or worn spots make the wire slow or stop. Friction goes up when the liner is not clean. This can make the wire move unevenly or not at all. You should keep the liner clean and check it often.
Here are some steps to help your liner stay in good shape:
- Take out the liner and look for bends or blockages.
- Use compressed air to clean out dust and metal bits.
- Put in a new liner if you see damage or wear.
- Make sure the liner fits the wire size you use.
- Check the liner every time you change the wire spool.
A clean and well-fitted liner helps your automatic wire feeder work better. Doing regular checks stops sudden problems and keeps welds strong.
Tip: Keep the gun cable straight. Sharp bends or tight loops make friction worse and cause feeding trouble.
The table below shows how liner and cable problems affect wire feeding:
| Issue Type | Description |
|---|---|
| Worn, Kinked, or Clogged Liner | More friction slows the wire and makes feeding uneven. |
| Poor Gun Cable Management | Sharp bends and tight loops add friction and hurt wire travel. |
| Scheduled Liner Maintenance | Regular checks and new liners help the wire feed smoothly. |
Adapter Connector Condition
You should also look at the adapter connector. This part joins the gun to the feeder. If the connector is loose, dirty, or broken, the wire may not feed. Look for rust, dirt, or damage. Clean the connector with a dry cloth and tighten loose screws. Put in a new connector if you see cracks or broken spots. A good adapter connector keeps the signal strong and helps the wire feed well.
Note: Checking the adapter connector often can stop surprise problems and keep welding safe.
Contact Tip and Gun Inspection
Contact Tip Wear
You need to check the contact tip often. The contact tip helps transfer electricity to the welding wire. When it wears out, you may see problems with your welds. Worn tips can cause the wire to move in the wrong position. This mistake can make your welds weak. Sometimes, the strength of the welded joint drops by half. You may also notice dirt or copper building up in the weld pool. These contaminants can lower the quality of your welds. If the contact tip does not work well, the arc becomes unstable. You might see poor metal transfer or even sudden failures during welding. You should watch for changes in how your machine works. If you see sparks jumping or the wire feeding unevenly, check the contact tip right away.
Here is a table that shows how contact tip wear affects your welding:
| Evidence Point | Description |
|---|---|
| Impact on Electrical Conductivity | Worn tips reduce conductivity, which affects the welding process. |
| Positional Errors | The wire may move off-center, lowering weld strength by up to 50%. |
| Contamination Risks | Wear can add copper and oxides to the weld pool, hurting weld quality. |
| Catastrophic Failures | Poor current transfer leads to unstable arcs and bad metal transfer, causing failures. |
| Monitoring Challenges | Tip wear makes it hard to monitor and control the welding process. |
| Machine Learning Applications | New technology can predict tip wear using welding signals. |
Tip: Replace the contact tip if you see burn marks, uneven wire feeding, or poor welds.
Gun and Cable Damage
You should inspect the gun and cable every time you use your automatic wire feeder. Damage in these parts can stop the wire from moving smoothly. The liner inside the gun guides the wire. If the liner gets clogged or worn, you may see weld defects. A good liner reduces friction and keeps the wire feeding without trouble. Problems often start at the neck of the liner. You can use partial liners that are easy to replace. This step helps you fix issues quickly and avoid long downtime.
Look for these signs of gun and cable damage:
- The wire feeds unevenly or stops.
- You see kinks or bends in the cable.
- The liner feels rough or has blockages.
- Welds look weak or have holes.
- The gun feels hot or smells burnt.
Note: Always keep the gun cable straight. Sharp bends increase friction and cause feeding problems.
Regular inspection helps you catch problems early. You keep your equipment safe and your welds strong.
Machine and Power Checks
You need to check your machine and power supply when your automatic wire feeder does not work as expected. Problems with voltage, speed control, or internal faults can stop the wire from feeding smoothly. You can spot many issues by looking at the machine’s main components and testing the power system.
Motor Voltage and Speed Control
Motor voltage and speed control play a big role in wire feeding. If you notice the wire speed changing or stopping, you should start by checking the motor terminal connections. Loose or burned connections can cause the motor to lose power. You also need to inspect the contactor contacts. Pitting or welding on these contacts can interrupt the flow of electricity. Test the overload heaters or electronic overload outputs to make sure they work. If your machine uses fuses, verify their continuity. You can install phase loss relays to detect voltage imbalances. These steps help you find problems that affect wire speed and feeding.
- You may see variable wire feed speed if the motor control has issues.
- Misaligned feed roller grooves can change the wire speed.
- The power supply setup can cause wire speed to fluctuate when arc voltage changes.
Tip: Always check the wire feeder’s power supply and motor controls before starting a job. This helps you avoid sudden stops and keeps your welds strong.
Internal Machine Faults
Internal faults can stop your wire feeder from working. You need to look for signs like wire stubbing, burn back, or poor arc quality. These problems often come from worn contact tips, dirty liners, or spatter in the gas nozzle. Wrong drive rolls and flawed welding circuits also cause trouble. Regular checks help you catch these issues early.
| Issue | Description |
|---|---|
| Worn Out Contact Tip | Wire stubbing and burn back can happen if the tip is degraded. Look for oval holes and spatter. |
| Dirty Liner | Contamination increases resistance and causes slippage. Replace liners often. |
| Spatter Laden Gas Nozzle | Spatter blocks gas flow and leads to weld porosity. Clean the nozzle regularly. |
| Wrong Drive Rolls | Incorrect rolls scar or slip the wire. Match rolls to wire type. |
| Flawed Welding Circuit | High resistance causes voltage drops and poor arc quality. Check connections and cables. |
You keep your automatic wire feeder running well when you check these machine and power issues often.
Quick Fixes for Automatic Wire Feeder
Visual Inspection Steps
You can solve many problems with your automatic wire feeder by starting with a careful visual inspection. This process helps you spot issues before they become serious. Follow these steps to check your equipment:
- Make sure your workspace is clear. You need easy access to every electrical panel and disconnect switch.
- Look at all electrical connections. Watch for exposed wires, loose wires, broken covers, or missing parts.
- Check for signs of heat damage, rust, or moisture on enclosures, connectors, and wire ends.
- Confirm that all covers and labels are in place on panels and outlets.
- Inspect grounding wires. They should be secure and free from damage.
- Examine fixtures and controls. Make sure they are mounted tightly and show no signs of wear.
Tip: A quick inspection can prevent bigger problems later. You keep your equipment safe and working well.
If you find any damage or loose parts, fix them before you use the machine. Regular checks help you avoid sudden breakdowns and keep your welding jobs on track.
When to Seek Professional Help
Sometimes, you need expert help to fix your automatic wire feeder. If you try basic fixes and the problem does not go away, call a professional. Here are signs that you should get help:
- You replace worn tips, nozzles, or diffusers, but feeding issues continue.
- You adjust drive rolls and tension, but the wire still slips or jams.
- You check the wire spool and guide, but alignment problems remain.
- You inspect the gun liner for kinks or damage, but wire travel stays uneven.
- You keep the gun cable straight, but friction does not improve.
- You store and handle wire properly, but feeding problems persist.
Note: Professional technicians have special tools and training. They can find hidden faults and repair your machine safely.
If you see repeated problems or cannot find the cause, do not wait. Getting help early can save you time and money. You protect your equipment and ensure strong welds.
You can help your automatic wire feeder work by checking it often. Doing simple checks keeps your machine running well. Regular care stops problems and saves you money. If you fix issues fast, they do not get worse.
- Look at your machine and set it up right every six months.
- Change old or broken parts before they stop working.
- Do not use the feeder if you see something wrong.
If trouble does not go away, ask an expert to help keep your equipment safe.
FAQ
Why does my wire feeder keep stopping during welding?
You may have a blocked liner or worn drive rolls. Check for kinks in the wire and clean the liner. Replace damaged parts.
Tip: Regular cleaning helps prevent sudden stops.
What should I do if the wire feeds unevenly?
You should inspect the drive roll tension and check for wire rust. Adjust the tension until the wire moves smoothly.
- Clean the wire before loading.
- Replace rusty wire.
How often should I replace the liner?
Replace the liner every six months or when you notice feeding problems.
🛠️ A clean liner keeps your wire feeder working well.
Can I use any wire type with my automatic wire feeder?
You must use wire that matches your machine’s specifications. Check the manual for recommended wire size and type.
| Wire Type | Feeder Compatibility |
|---|---|
| Mild Steel | Most Feeders |
| Aluminum | Special Feeders |
The light emission characteristics of laser welding machines
Why choose a laser welder manufacturer direct from China
What are fiber laser frequency settings and why do they matter
Top Portable Laser Welding Machines for Stainless Steel and Their Prices