
The global collaborative robot market hit $1.9 billion in 2023 and is projected to exceed $11.8 billion by 2030, according to MarketsandMarkets research — yet roughly 30% of first-time cobot deployments experience significant delays because teams skip critical planning steps. If you’re figuring out how to integrate a cobot into your production line, the process breaks down into a clear sequence: assess your line’s readiness, select the right cobot and end-of-arm tooling, complete a risk assessment aligned with ISO/TS 15066, program the application, train your operators, and validate cycle-time targets before full go-live. This guide walks through every stage with specific technical benchmarks, real-world pitfalls, and the exact order of operations that separates a smooth deployment from a costly stall.
What Cobot Integration Actually Involves (Quick Overview)
Learning how to integrate a cobot into a production line isn’t a single event — it’s a structured sequence of five phases that typically spans 2 to 12 weeks depending on application complexity. Most teams underestimate the upfront assessment work and overestimate the programming difficulty.
The five phases: (1) Application assessment and risk analysis → (2) Cobot selection and cell design → (3) Safety validation per ISO/TS 15066 → (4) Programming, end-of-arm tooling (EOAT) setup, and dry-run testing → (5) Operator training and production go-live.
According to the International Federation of Robotics (IFR), cobot installations grew by 12% globally in 2023, yet roughly 30% of first-time deployments miss their original timeline because teams skip a formal risk assessment — the single most common shortcut that backfires.
A critical detail many guides omit: the integration process doesn’t end at go-live. You need a 30-day production monitoring window to validate cycle time targets and refine force-limiting thresholds (the maximum contact force a cobot applies before stopping). Skip this, and you’ll chase intermittent stoppages for months. The sections below walk through each phase with specific tooling choices, compliance checkpoints, and the real-world pitfalls that separate a smooth cobot integration from a costly stall.
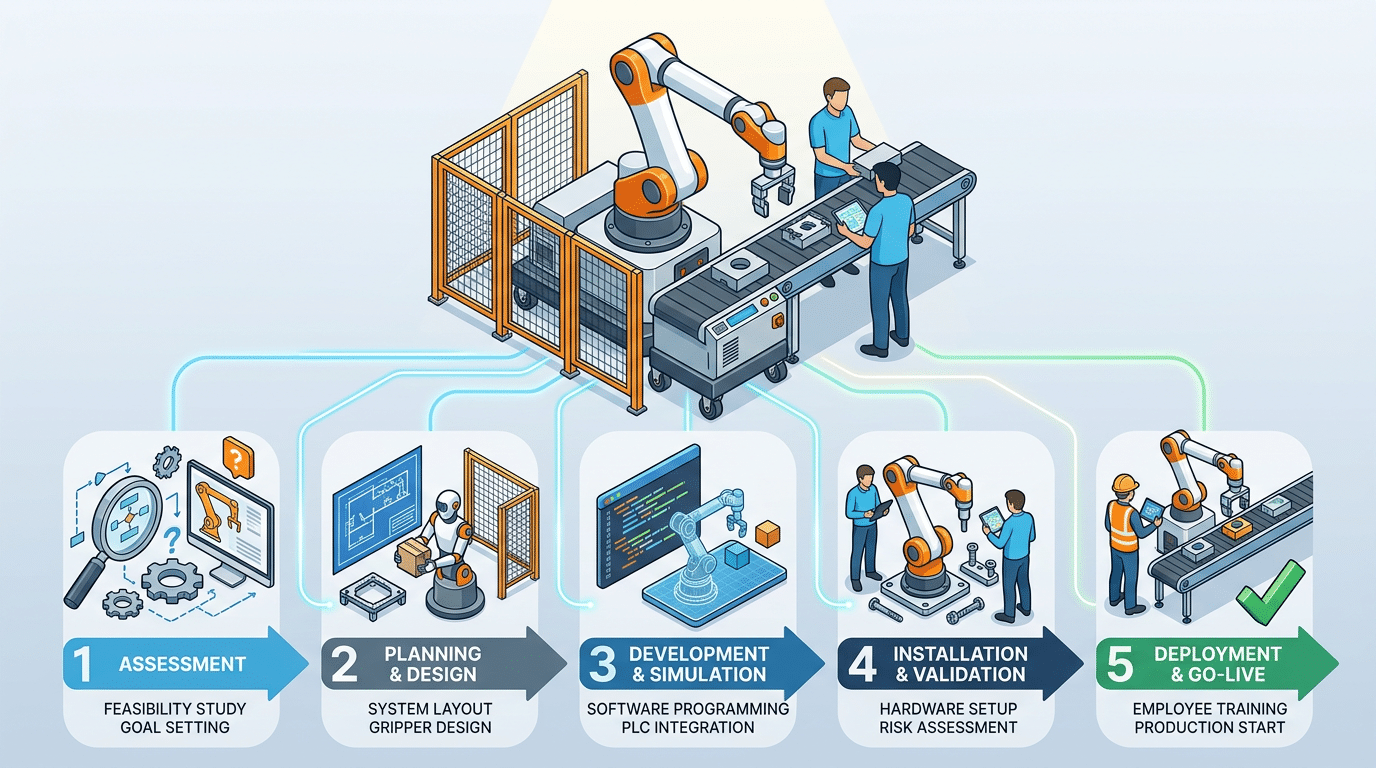
How to integrate a cobot into production line — five-phase overview diagram showing assessment, selection, safety, programming, and go-live
Assessing Whether Your Production Line Is Ready for a Cobot
Before figuring out how to integrate a cobot into your production line, you need an honest readiness assessment. Not every process benefits from a collaborative robot — and deploying one in the wrong spot wastes $30,000–$50,000 in hardware alone, plus months of engineering time.
Start with task suitability. Cobots excel at repetitive, ergonomically challenging, or precision-dependent tasks — think machine tending, pick-and-place, screw driving, or palletizing. If a task requires constant human judgment or highly variable manipulation, it’s a poor candidate. According to the International Federation of Robotics’ 2023 report, roughly 10% of all industrial robot installations are now cobots, concentrated heavily in these repeatable applications.
Quick Readiness Checklist
- Cycle time tolerance: Can the task accept slightly slower speeds? Cobots typically operate at ≤1.5 m/s for safety compliance.
- Payload & reach: Most cobots handle 3–16 kg. Measure your heaviest part and farthest placement point precisely.
- Floor space: Cobots need less room than caged robots, but still require a minimum 600 mm clearance radius for safe human interaction.
- Existing infrastructure: Do you have 110/220V power, compressed air (if needed for grippers), and a PLC or fieldbus the cobot can communicate with?
- Operator buy-in: Has the line team been consulted? Resistance from operators derails more projects than technical issues.
Pro tip: run a simple time study on your target task first. If manual cycle time varies by more than 40% between operators, that inconsistency is exactly where a cobot delivers the fastest payback.
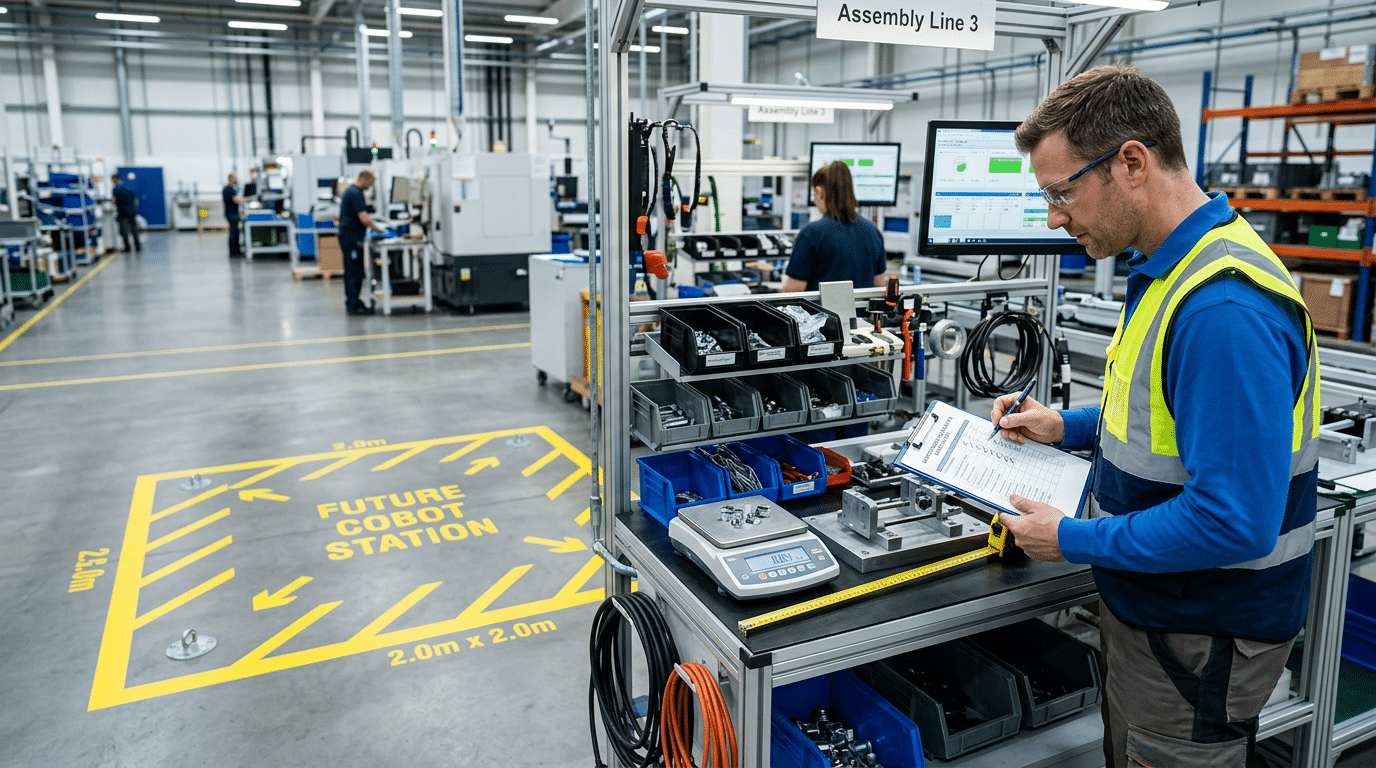
Engineer assessing production line readiness for cobot integration with checklist and workspace measurements
How to Choose the Right Cobot for Your Specific Application
Your application dictates the cobot — not the other way around. A pick-and-place task handling 0.5 kg components needs a completely different arm than a palletizing cell stacking 12 kg boxes. Start by defining your payload capacity (including end-of-arm tooling weight), reach, and repeatability requirements. For precision assembly, you’ll want ±0.02 mm repeatability; for palletizing, ±0.1 mm is fine.
Brand ecosystems matter more than most buyers realize. Universal Robots’ UR series dominates with a 50%+ global cobot market share, largely because its UR+ ecosystem offers 400+ certified peripherals — grippers, vision systems, force-torque sensors — that simplify integration. FANUC’s CRX line excels in machine tending with robust IP67-rated models built for coolant-heavy environments. ABB’s GoFa and Doosan’s A-series target higher payloads (up to 25 kg) for palletizing.
Here’s a practical filter when figuring out how to integrate a cobot into your production line: match application type to specs first, then shortlist brands.
- Welding: Prioritize path accuracy and arc-compatible controllers (FANUC CRX, UR20).
- Inspection: Focus on repeatability and vision system compatibility.
- Machine tending: Demand IP65+ ratings and high uptime duty cycles.
- Pick-and-place: Speed (up to 2 m/s TCP) and cycle time matter most.
Skip cobots marketed as “universal.” Every application has a best-fit model — choosing wrong costs you 3–6 months in rework and adapter workarounds.
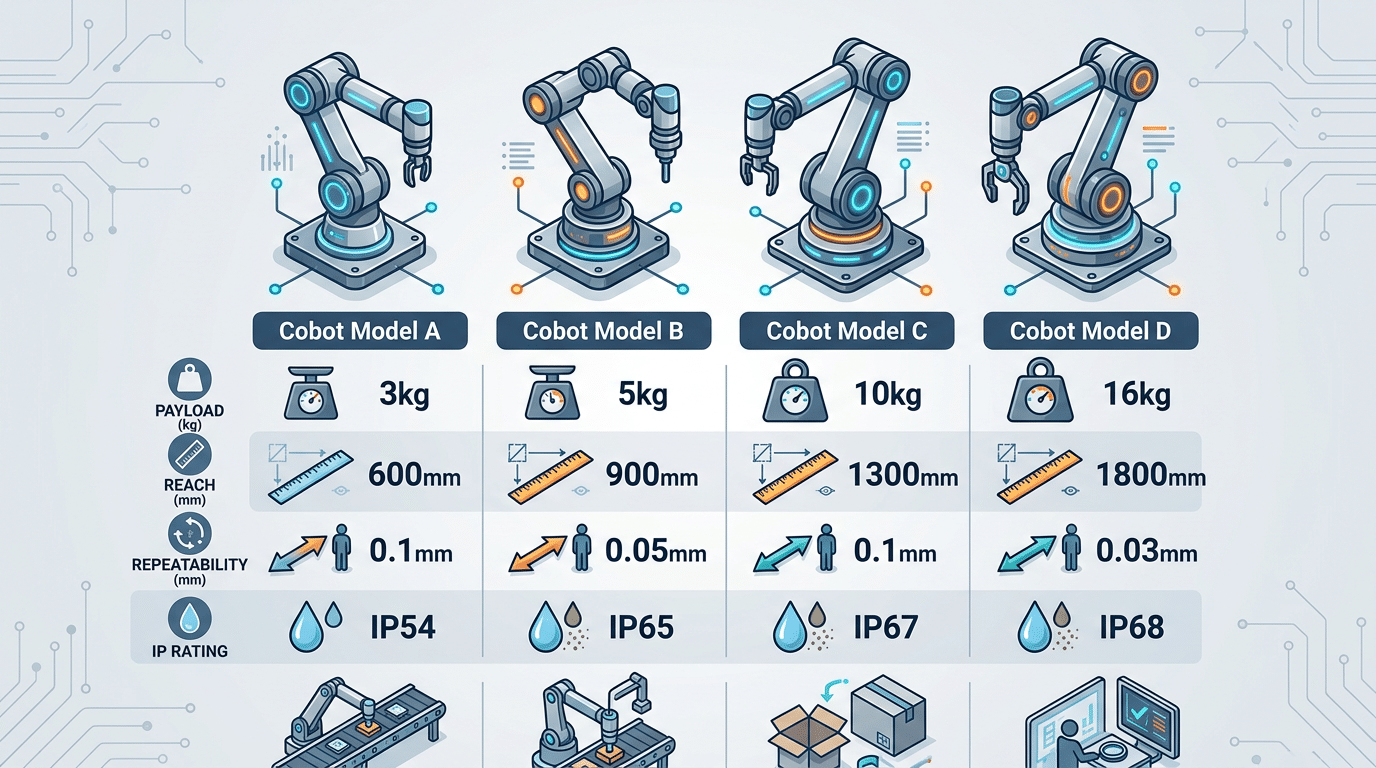
Cobot selection comparison chart showing payload reach and repeatability for production line integration
Step-by-Step Cobot Integration Process From Planning to Go-Live
Knowing how to integrate a cobot into a production line means following a repeatable sequence — skip a phase and you’ll pay for it in downtime later. Here’s the condensed project roadmap most integrators actually use:
- Risk assessment and layout planning — Conduct a task-based risk assessment per ISO 10218 standards. Map operator paths, clearance zones, and cable routing before anything gets bolted down.
- Mechanical mounting and cell design — Anchor the cobot base to a surface rated for at least 3× the combined payload and arm weight. Vibration dampening matters more than most teams expect.
- EOAT selection and setup — Match grippers or sensors to your part geometry. A wrong end-of-arm tool alone accounts for roughly 30% of integration delays, according to experienced system integrators.
- Programming and path configuration — Use hand-guiding (freedrive mode) for initial waypoints, then refine with parametric adjustments for cycle-time optimization.
- Safety system validation — Verify force-limiting thresholds, emergency stops, and zone-monitoring sensors under real operating conditions — not just simulation.
- Testing and production ramp-up — Run at reduced speed (≤250 mm/s) for the first 48–72 hours. Log every fault code to build a baseline before scaling to full throughput.
One critical tip: never finalize cell design before EOAT is confirmed. The tooling dimensions directly affect reach envelopes and safety zone calculations, so locking layout too early forces costly rework.
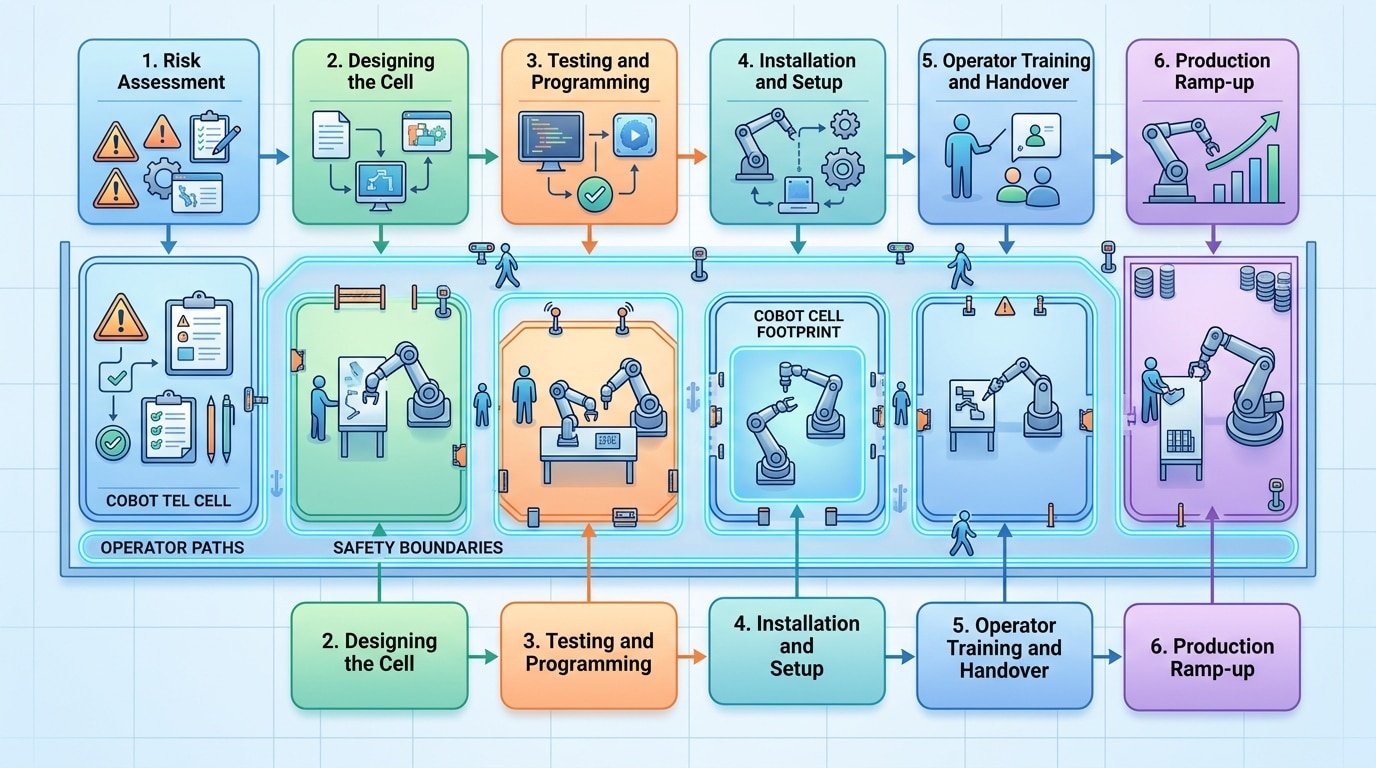
step-by-step cobot integration process diagram from planning to production go-live
Safety Requirements and ISO/TS 15066 Compliance
Here’s the biggest misconception in collaborative robotics: cobots are not inherently safe. They’re designed to enable safe human-robot collaboration — but only after a thorough risk assessment. Skipping this step is how injuries happen and lines get shut down.
ISO/TS 15066 defines four collaborative operation modes, and understanding which applies to your cell is non-negotiable when figuring out how to integrate a cobot into a production line:
- Safety-rated monitored stop — the robot halts when a human enters the workspace, resumes when they leave.
- Hand guiding — an operator physically moves the robot, which only operates at reduced speed.
- Speed and separation monitoring — sensors dynamically adjust cobot speed based on human proximity.
- Power and force limiting (PFL) — contact force stays below biomechanical pain thresholds, e.g., 150 N for the hand and 210 N for the upper arm.
Most integrators default to PFL mode because it seems simplest. That’s a mistake. PFL alone limits payload speed to roughly 250 mm/s in many configurations, killing cycle time. A proper risk assessment — following ISO 12100 methodology — often reveals that combining speed and separation monitoring with PFL delivers both safety and throughput.
Document everything: hazard identification, risk estimation, risk reduction measures, and residual risk acceptance. Auditors expect a traceable paper trail, not assumptions.
Programming and End-of-Arm Tooling Setup
Most operators can teach a cobot its first pick-and-place routine in under an hour using hand-guided waypoint teaching — physically moving the arm to each position and saving the coordinates. For more complex paths, a teach pendant lets you fine-tune joint angles, speed limits, and force thresholds with millimeter precision. Skip hand-guiding for welding or dispensing tasks; use offline simulation software like RoboDK or the cobot manufacturer’s digital twin instead, which lets you validate cycle times before touching the physical cell.
Your end-of-arm tooling (EOAT) choice will make or break the integration. A pneumatic gripper handles rigid parts fast but struggles with fragile components — switch to a certified vacuum suction cup from the UR+ ecosystem and you can cut changeover time by up to 60%. Servo-electric grippers offer programmable grip force, which matters when you’re handling mixed SKUs on the same line.
Here’s the practical rule when figuring out how to integrate a cobot into your production line: always benchmark EOAT weight against your cobot’s effective payload. A 2 kg gripper on a 5 kg-rated cobot leaves only 3 kg for the workpiece — and that margin shrinks further at full arm extension. Mismatching tooling is the fastest way to blow past cycle time targets and trigger payload faults mid-shift.
Training Your Workforce to Collaborate With the Cobot
Workforce buy-in is the most underestimated variable when figuring out how to integrate a cobot into a production line. A McKinsey workforce study found that 70% of automation projects that stall do so because of people issues — not technical ones. Skip change management, and even a perfectly programmed cobot collects dust.
Three Tier Training Structure
- Operator-level (4–8 hours): Start/stop procedures, e-stop protocols, basic HMI interaction, and clearing simple fault codes like collision detection resets.
- Maintenance team (16–24 hours): Payload recalibration, TCP (Tool Center Point) reconfiguration, joint torque monitoring, and preventive maintenance schedules for harmonic drives.
- Champions/super-users (40+ hours): Full waypoint programming, force-torque threshold tuning, and integration debugging with PLCs.
Overcoming Resistance on the Floor
Involve line operators before the cobot arrives. Let them name it — seriously. Teams that participate in early deployment decisions show measurably higher adoption rates. Frame the cobot as a tool that eliminates repetitive strain tasks, not headcount.
Pro tip: Schedule the first live demo during a shift with your most skeptical operators present. Winning over vocal critics converts entire teams faster than any slide deck.
Common Cobot Integration Mistakes and How to Avoid Them
Even teams that understand how to integrate a cobot into a production line stumble on the same avoidable errors. A Universal Robots analysis found that overcomplicating the first application is the single most common reason deployments stall — teams try to automate a complex, multi-step assembly instead of a simple, repetitive task with clear success metrics.
- Underestimating cycle time: Cobots typically operate at 30–50% slower speeds than industrial robots. Benchmark actual cobot cycle time against your takt time before committing.
- Skipping risk assessment: A proper ISO 12100 risk assessment isn’t optional — it’s the legal foundation of your safety case.
- Wrong EOAT selection: Mismatched grippers cause 80% of early-stage failures. Match gripper force, stroke, and finger geometry to your part’s weight, material, and tolerance.
- Neglecting cable management: Dress packs and cable carriers prevent pinch points and signal dropout — skip them and expect unplanned downtime within weeks.
- No scalability plan: Design your mounting, I/O architecture, and PLC communication so a second cobot can be added without rewiring the entire cell.
The fix for all five? Start with the simplest viable task, validate every assumption with real-world testing, and document everything for the next deployment.
Measuring ROI and Production Impact After Integration
Tracking the right metrics turns anecdotal success into a defensible business case. After you integrate a cobot into your production line, measure these KPIs at 30, 60, and 90 days: cycle time per unit, overall throughput, defect rate (PPM), labor hours reallocated, and ergonomic incident reports. Compare each against your pre-integration baseline — the one you should have captured during the readiness assessment.
Most single-cobot deployments achieve payback within 12–18 months. According to the International Federation of Robotics, collaborative robots in SMEs frequently deliver ROI faster than traditional automation because integration costs are 40–60% lower. One metric many teams overlook: calculate the cost of quality improvement by multiplying your defect-rate reduction by the average rework cost per unit. That number alone often justifies expansion.
Building a case for additional stations? Don’t just show savings — show capacity unlocked. If your cobot freed 1.5 FTEs who now handle higher-value inspection work, quantify the revenue those inspections protect. Present a simple payback table to leadership:
| Metric | Before Cobot | After 90 Days |
|---|---|---|
| Cycle Time | 38 sec/unit | 29 sec/unit |
| Defect Rate | 1,200 PPM | 740 PPM |
| Ergonomic Incidents | 3/quarter | 0/quarter |
Hard data like this makes the next deployment approval a formality, not a negotiation.
Frequently Asked Questions About Cobot Integration
How long does it take to integrate a cobot into a production line? Simple pick-and-place cells can go live in 2–4 weeks. Complex multi-station setups with custom EOAT and vision systems typically require 8–16 weeks from risk assessment through validated production runs.
Do cobots need safety fencing? Not always — but “no fence” doesn’t mean “no safeguards.” A proper ISO/TS 15066 risk assessment determines whether speed limiting, safety-rated monitored stop, or area scanners are sufficient. Roughly 30% of cobot deployments still use some form of light curtain or restricted zone.
How much does a full cobot cell cost? Budget $50,000–$150,000 for a complete cell including the cobot arm, end-of-arm tooling, mounting, integration labor, and safety devices. The robot itself is often only 40–50% of total cost.
Can cobots work on existing lines without major modifications? Yes — that’s their primary advantage. Most cobots mount on standard tables or aluminum extrusion frames and communicate via common I/O protocols. Minimal line disruption is realistic if you’ve mapped your integration points correctly.
What maintenance do cobots require? Grease joints every 12,000–15,000 operating hours, inspect cable harnesses quarterly, and recalibrate TCP (tool center point) after any tooling swap. Skipping TCP recalibration is the single fastest way to introduce quality drift without realizing it.
See also
Cobot Risk Assessment Checklist — 47 Points Covering ISO 15066 and Beyond
Welding Cast Iron: Safe Methods & Pro Tips
Cobot Adoption Rate by Industry — Key Stats and Trends
How to combine laser cleaning machine with industrial robots
What Operators Should Know About Laser Cleaning Machine Training


