Thin-gauge handheld fiber laser welding can be incredibly fast and clean—until a weld starts showing pores, undercut, or, worse, blows a hole through a 1.0 mm panel. If you’re working on 0.8–3.0 mm stainless or carbon steel with a continuous-wave handheld system, the quickest path to quality is a disciplined checklist and small, deliberate parameter moves.
This guide gives you a shop-floor troubleshooting matrix, practical starting windows, and a simple inspection workflow mapped to widely used acceptance references. We’ll keep theory short and tie every point to an action you can try on your next test bead.
Key takeaways
- Most thin-sheet issues trace back to a mix of cleanliness, gas stability, and energy density. Fix those first, then fine-tune wobble and focus.
- Start in a stable parameter window, then adjust in small steps: power ±5–15%, speed ±10–20%, wobble width ±0.5–1.0 mm, and focus by +0.5–1.0 mm when needed.
- For acceptance decisions, use ISO quality levels as context and confirm surface-breaking flaws with PT; reserve RT/UT for special cases.
- For ≤1.5 mm sheet, favor higher wobble frequency and narrower width to avoid burn-through while keeping sidewalls wetted.
- Record each test weld (settings + photos); small, logged changes are the fastest way to repeat success.
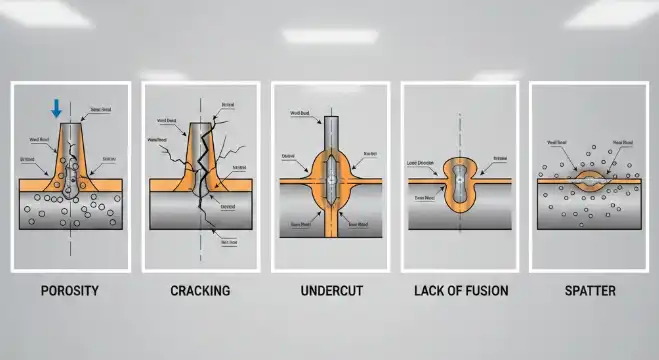
Laser welding defects at a glance: troubleshooting matrix
| Defect | What you’ll see | Likely causes (handheld thin SS/CS) | First checks | Parameter adjustments | Inspect with | Acceptance context |
|---|---|---|---|---|---|---|
| Porosity | Pinholes on surface; dull cratered spots; occasional internal voids | Oil/rust/moisture, coating vapor, turbulent or insufficient shielding, unstable keyhole | Cleanliness, gas purity/flow, nozzle standoff, lens contamination | Reduce speed 10–15% or increase wobble frequency; steady power (±5%); set laminar gas ~14–20 L/min; remove coatings | VT, then PT for surface-breaking; RT/UT if geometry allows | Use ISO 13919-1 levels to guide allowable porosity; stricter jobs target A/B levels |
| Lack of fusion / insufficient penetration | Tall, narrow bead; cold toes; incomplete root | Low power density; speed too high; focus off; narrow wobble; poor fit-up/gaps | Verify focus height; clamp tightly; clean optics | Increase power 5–15% or reduce speed 10–20%; add +0.5–1.0 mm defocus; widen wobble by 0.5–1.0 mm; consider wire feed | VT; macro-etch during setup | ISO 13919-1 covers lack of fusion/penetration; aerospace may cite AWS D17.1 classes |
| Undercut | Groove along weld toe reducing section | Excess energy density at the edge; low frequency + wide wobble; mis-aim | Check torch angle and aim; confirm gas nozzle alignment | Increase wobble frequency; reduce power 5–10% or increase speed 10–15%; slight positive defocus to soften spot | VT with good lighting/magnification | ISO 13919-1 limits undercut depth/length by quality level |
| Burn-through / blow-through | Holes, root sag, or edge collapse on thin stock | Power too high; speed too low; tight focus; low frequency linger; large gaps | Re-check thickness and joint gap; backer/chill use | Decrease power 5–15% and/or increase speed 10–30%; narrow wobble; raise frequency; run slight defocus (conduction bias) on ≤1.5 mm | VT; macro check for penetration profile | Aim for appearance with no burn-through at your target quality level |
| Cracking (hot/cold) | Fine linear indications on surface or centerline | High restraint/thermal gradients; composition (higher C in CS); excessive heat input | Fixture restraint; material grade; preheat needs (CS) | Moderate heat input; use oscillation; reduce restraint; for CS, add mild preheat; use compatible filler wire if needed | VT then PT for surface-breaking c | Acceptance depends on class and service; follow job spec referencing ISO/AWS |
Sources noted later explain standards context; use the matrix to triage fast, then dive into the specific fix below.
Start here: stable parameter windows for thin SS/CS
These are conservative starting windows for handheld continuous-wave fiber laser welding on 0.8–3.0 mm stainless steel (SS) and carbon steel (CS). Validate on scrap coupons first, then tune for joint type and fit-up. Ranges are synthesized from reputable manufacturer and technical guides, including the GWK Laser welding guide and the parameter overview by Laserax.
Stainless steel (autogenous unless noted)
| Thickness | Power (W) | Speed (mm/s) | Wobble width (mm) | Frequency (Hz) | Focus (mm) | Shielding gas (L/min) |
|---|---|---|---|---|---|---|
| 0.8 mm | 900–1200 | 25–40 | 1.5–2.5 | 80–150 | 0 to +0.5 | 14–18 |
| 1.5 mm | 1200–1500 | 18–30 | 2.0–3.0 | 60–120 | 0 to +0.5 | 16–20 |
| 3.0 mm | 1500–2000 | 12–22 | 2.5–3.5 | 30–80 | 0 to +1.0 | 16–20 |
Carbon steel (autogenous unless noted)
| Thickness | Power (W) | Speed (mm/s) | Wobble width (mm) | Frequency (Hz) | Focus (mm) | Shielding gas (L/min) |
|---|---|---|---|---|---|---|
| 0.8 mm | 1000–1300 | 20–35 | 2.0–3.0 | 60–120 | 0 to +0.5 | 12–18 |
| 1.5 mm | 1200–1700 | 15–28 | 2.5–3.5 | 40–90 | 0 to +0.5 | 14–20 |
| 3.0 mm | 1600–2200 | 10–20 | 3.0–4.5 | 25–70 | 0 to +1.0 | 16–20 |
Notes
- Use nitrogen or argon for SS depending on finish and corrosion requirements; argon or argon/CO₂ blends are common on CS. Aim for smooth, laminar shielding without turbulence.
- If fit-up is poor, consider 0.8–1.2 mm filler wire to bridge gaps and improve sidewall fusion.
- Keep travel smooth; a 10–15° torch tilt can improve visibility without starving shielding.
According to the GWK Laser welding guide and the parameter overview in the Laserax knowledge base, these windows are appropriate starting points; final values depend on joint geometry, alloy, and desired bead profile. See the linked sources in the Evidence section for context.
The five fixes in practice
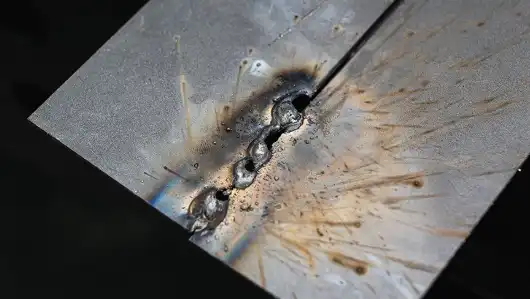
Porosity — cues, causes, quick fixes
What you see: Surface pinholes, cratered spots, occasionally a peppered texture. Internals require imaging but usually you’ll catch the surface evidence first.
Likely causes: Contamination (oil, rust, moisture), turbulent or low shielding, keyhole instability, coatings (e.g., zinc on coated CS) vaporizing into the pool.
Try this:
- Clean mechanically, then solvent-wipe; dry the joint area.
- Set steady shielding: aim ~14–20 L/min with correct standoff and nozzle aim to avoid jets that cause swirls.
- If pores persist, reduce speed 10–15% or bump wobble frequency to let gas escape while keeping the pool tight. Keep power steady (±5%).
- On coated CS, strip coating in the weld zone.
Inspection: VT first, then penetrant testing (PT) for surface-breaking pores when needed; see the PT note in the Inspection section below.
Lack of fusion / insufficient penetration — cues, causes, quick fixes
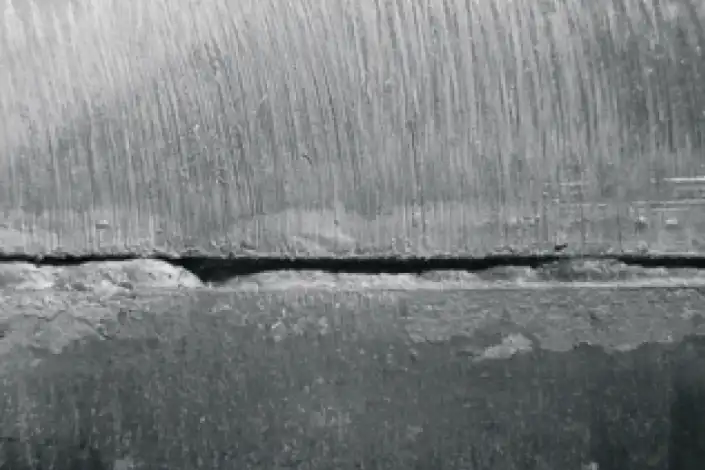
What you see: Tall, narrow bead, cold toes, poor wetting, or incomplete root.
Likely causes: Not enough power density, speed too high, focus slightly off, wobble too narrow, fit-up gaps, dirty optics.
Try this:
- Increase power 5–15% or reduce speed 10–20% to raise heat input.
- Add +0.5–1.0 mm positive defocus to enlarge the spot and calm the keyhole.
- Widen wobble by 0.5–1.0 mm for better sidewall washing; consider filler wire for larger gaps.
- Re-clamp and realign; clean lens/protective window.
Inspection: VT; macro-etch cross-sections during procedure development to confirm penetration profile.
Undercut — cues, causes, quick fixes
What you see: A groove along the toe that thins the sheet and becomes a crack starter if left unaddressed.
Likely causes: Energy concentrated at the edge due to tight focus, too-low frequency with a wide wobble, or mis-aim; excessive travel speed can also erode toes.
Try this:
- Increase wobble frequency to shorten dwell per edge pass.
- Reduce power 5–10% or increase speed 10–15%.
- Shift focus slightly positive to broaden the spot and soften edge erosion.
- Verify nozzle alignment and maintain a steady torch angle.
Inspection: VT with bright, angled lighting and 2–5× magnification.
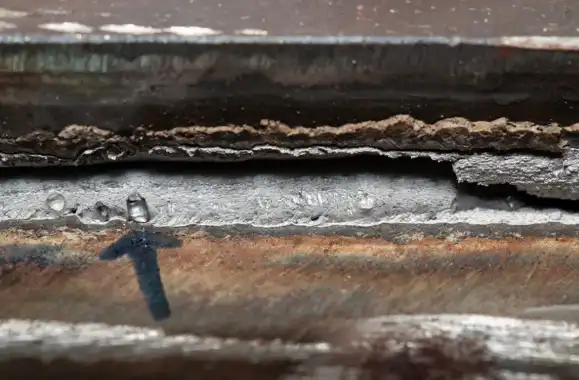
Burn-through / blow-through — cues, causes, quick fixes
What you see: Holes, root sagging, or localized collapse—common when welding ≤1.0–1.5 mm without tight control.
Likely causes: Too much power, too slow, tight focus, wobble width too large at low frequency, big gaps.
Try this:
- Decrease power 5–15% and/or increase speed 10–30%.
- Narrow the wobble and raise frequency; if needed, operate with slight positive defocus (more conduction-like) to spread energy.
- Improve fit-up or use copper backing/chill to sink heat.
Inspection: VT and, for setup, macro-etch to verify you’re achieving the desired penetration without collapse.
Cracking (hot/cold, centerline) — cues, causes, quick fixes
What you see: Fine linear cracks at or near the centerline, sometimes with brittle feel during bend testing.
Likely causes: High restraint, rapid cooling on thin stock, material sensitivity (e.g., higher carbon or certain SS grades), excessive heat input.
Try this:
- Reduce peak heat input and cooling rate with higher wobble frequency and moderate power; avoid dwelling.
- Reduce restraint or re-fixture to lower stresses.
- For CS, add mild preheat and control interpass temperature; select compatible filler wire if necessary.
Inspection: VT then PT to reveal surface-breaking cracks.
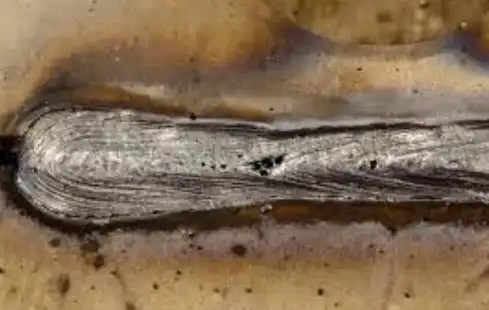
Practical example — eliminating porosity on 1.5 mm 304 SS
Scenario: A handheld CW fiber laser is welding a 1.5 mm 304 SS lap joint. Bead shows scattered surface pinholes.
Step 1 — Prep and gas: Mechanically clean and solvent-wipe both faying surfaces; dry thoroughly. Set argon flow from 12 L/min to 18 L/min and correct the nozzle standoff to maintain smooth, laminar coverage.
Step 2 — Parameter trims: Starting from 1300 W, 22 mm/s, 2.5 mm wobble at 90 Hz, reduce speed to 20 mm/s and raise wobble frequency to 120 Hz to stabilize the pool. Keep power steady.
Step 3 — Re-test and inspect: The pores disappear on the test coupon; proceed to VT across the seam and run PT on a 50 mm segment to confirm no surface-breaking indications.
The key was stabilizing shielding and giving gas time to escape without over-widening the pool. Think of it like letting bubbles rise in syrup—keep the flow smooth and the dwell just long enough.

Inspection workflow and acceptance context
- Visual Testing (VT): Start here with good lighting and 2–5× magnification. Record bead width, toe blending, undercut, and heat tint on SS.
- Penetrant Testing (PT): For surface-breaking indications, follow the principles in ISO 3452—clean, apply penetrant, dwell per product datasheet and written practice, remove excess, apply developer, then inspect. A concise technical overview of the ISO 3452 family is available via an NDT.net conference paper; it explains scope and reference blocks used for PT performance checks.
- RT/UT as needed: Use radiography or ultrasonics only when geometry, material, and acceptance class justify it; thin sheet often limits UT effectiveness.
- Macro-etch during setup: Cut and etch representative coupons to validate penetration and fusion before production.
For acceptance context, many shops reference the quality levels in ISO 13919-1 for laser weld imperfections (Levels A/B/C, with A the most stringent). Aerospace and similar high-reliability work often follows classed requirements from AWS D17.1 for fusion welding, which covers laser processes. Use your job spec to pick the applicable class or quality level and then tune parameters to achieve it.
Safety callout: Class 4 handheld laser basics
These systems are Class 4 lasers. Assign a Laser Safety Officer (LSO), use wavelength-rated eyewear, control stray beams/reflections, and ensure effective fume extraction. Many programs also require interlocks, continuity sensing clamps, and plume/back-reflection monitoring in the cell. AWS’s Welding Digest has a practical overview of handheld laser welding standardization and safety expectations worth reviewing with your LSO.
Next steps and templates
- Print or save the troubleshooting matrix and the parameter tables. Run a three-bead test matrix (baseline, +10% heat input, −10% heat input) and log the appearance and measurements.
- Build a simple test record: photo, parameters, thickness, joint type, and pass/fail against your acceptance level.
- When you hit a stable setup, lock the recipe and train to it. Small moves, good notes, repeatable results—simple as that.
Evidence and further reading
- ISO acceptance levels for laser weld imperfections are defined in the official standard; see the ISO page for ISO 13919-1 for scope and purchase/preview: ISO’s overview of ISO 13919-1.
- Handheld laser welding safety and evolving standardization are discussed in AWS Welding Digest’s overview of handheld laser welding.
- For aerospace and other classed applications, see EB Industries’ summary of AWS D17.1 for fusion welding.
- Penetrant testing basics and ISO 3452 context are outlined in NDT.net’s conference paper on the ISO 3452 family.
- Parameter starting points and practical guidance are covered in GWK Laser’s laser welding guide and in Laserax’s overview of laser welding parameters.
— Author: Manufacturing Process Engineer — Laser Welding Specialist. Editorially reviewed for technical accuracy against the cited sources.


