Frontline welding lives and dies by how well we set and hold five operational variables: current and voltage, arc length, travel speed, electrode or gun angle, and manipulation. Nail these, and most beads run smooth, sound, and repeatable. Miss them, and you invite undercut, lack of fusion, porosity, and rework.
This best-practice guide is written for working welders and foremen running SMAW, GMAW, and GTAW on mild steel. You’ll get conservative starting windows, how to measure and adjust on the floor, and quick defect-to-fix pointers. Always follow your WPS and the filler and machine manufacturer’s guidance; the ranges below are typical and intended to get you in the ballpark.
The five essential elements of welding
- Current and voltage set heat input and arc characteristics, affecting penetration, bead profile, and spatter.
- Arc length is the literal gap between the electrode/arc and the puddle; it changes voltage demand and shielding stability.
- Travel speed controls bead size and tie-in; too fast risks undercut and cold lap, too slow risks excessive convexity or burn-through.
- Electrode or gun angle governs where heat and arc force go, especially at toes and sidewalls.
- Manipulation means using stringers or small, disciplined oscillation to wet the toes without washing out the face.
Quick reference: parameter windows you can trust
Assumptions: mild steel, clean joint, DCEN for GTAW, typical shop positions, and common shielding gases. Use these as starting points, then tune to the puddle and your WPS.
| Process | Size | Typical starting window | Notes |
|---|---|---|---|
| SMAW E7018 | 3/32 in (2.4 mm) | 70–100 A flat; 65–90 A out-of-position | Keep a tight arc; DC+ commonly used. Manufacturer tables (e.g., Miller and ESAB) show similar bands. |
| SMAW E7018 | 1/8 in (3.2 mm) | 90–140 A flat; 80–130 A out-of-position | Reduce amps for vertical and overhead; short arc helps tie-in. |
| SMAW E7018 | 5/32 in (4.0 mm) | 120–200 A flat; 110–180 A out-of-position | Watch heat input on thin stock. |
| GMAW ER70S-6 short-circuit | 0.030 in (0.8 mm) | WFS 200–350 ipm ≈ 80–140 A; 16–19 V; CTWD 3/8–1/2 in | Voltage largely controls arc length; keep CTWD consistent. |
| GMAW ER70S-6 short-circuit | 0.035 in (0.9 mm) | WFS 180–320 ipm ≈ 100–180 A; 17–20 V; CTWD 3/8–1/2 in | Keep arc tight to avoid cold lap. |
| GMAW ER70S-6 spray or pulsed | 0.035–0.045 in | 180–300+ A; 24–32 V; CTWD 1/2–3/4 in | Requires argon-rich gas; listen for stable hiss, not crackle. |
| GTAW DCEN on steel | 1/16 in tungsten | 40–90 A; 10–20 CFH or 5–10 LPM; arc length about tungsten diameter | Keep tungsten sharp; avoid drafts. |
| GTAW DCEN on steel | 3/32 in tungsten | 80–150 A; 12–20 CFH or 6–10 LPM; short, stable arc | Slight push improves puddle view. |
| GTAW DCEN on steel | 1/8 in tungsten | 125–200 A; 15–25 CFH or 7–12 LPM; short arc | Increase cup size as amps go up to maintain shielding. |
Evidence you can check today
- According to the MIG process overview and training pages in ESAB University, short-circuit typically runs at lower voltage (mid-to-high teens) with tight arc length and defined CTWD, while spray transfer requires higher voltage/current and argon-rich shielding. See the MIG and TIG process guides collected in ESAB University’s education index: ESAB University process guides.
- Miller’s resource library provides process explainers and calculators that map wire feed to current and outline typical GTAW tungsten-to-amperage guidance. See the process fundamentals and calculators inside the resources section: Miller Resources library.
- For neutral background on how arc length and parameters influence transfer and shielding stability, consult TWI’s technical knowledge pages: TWI technical knowledge on arc welding.
How to set and verify each element on the shop floor
Current and voltage
What to watch: penetration at the toes and root, bead crown, spatter level, and arc sound. At a given wire size in GMAW, wire feed mainly sets current; voltage sets arc length. In SMAW and GTAW, amperage is the primary knob.
Common defect correlations
- Too low heat: lack of fusion, tall convex bead, erratic tie-in at toes.
- Too high heat: undercut, excessive fluidity, burn-through on thin.
Three-step tuning workflow
- Establish a safe baseline from the table above and your WPS. For GMAW short-circuit with 0.035 in wire, for example, start near 19 V and ~250 ipm, then check CTWD.
- Read the puddle for 2–3 inches. If convex and cold, add 10–20 A (or +30–50 ipm on WFS) and reduce voltage 0.5–1.0 V if arc is long and spattery. If undercut shows, reduce voltage by 0.5–1.0 V and slow travel 10–20%.
- Verify tie-in at toes and backside where applicable. Record final settings for repeatability.
Context on current, voltage, and transfer mode interactions appears in ESAB’s MIG process guides and Miller’s transfer-mode explainers listed in their resource libraries: ESAB University process guides, Miller Resources.
Arc length control
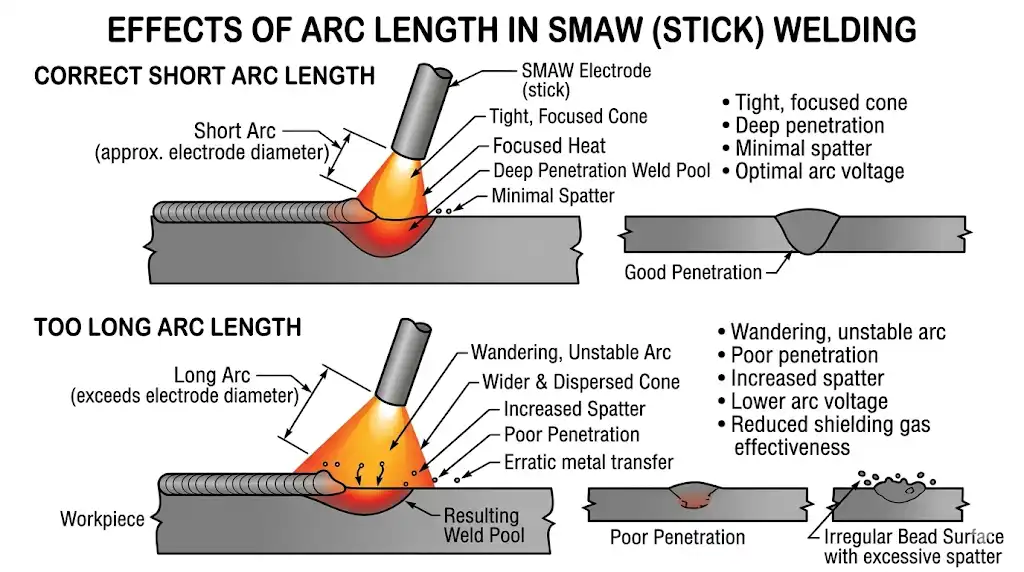
Targets by process
- SMAW: run a tight arc—around the electrode diameter is a practical cue for low-hydrogen rods. A long arc raises voltage demand, increases spatter, and can cause undercut.
- GMAW: arc length is largely a function of voltage and CTWD. Keep it short in short-circuit; excessive distance increases spatter and porosity risk.
- GTAW: maintain an arc length about the tungsten diameter or less; longer arcs destabilize shielding and reduce penetration.
Quick bench test
- Lay a 2–3 inch bead at baseline settings. Shorten arc incrementally until spatter subsides and the puddle wets the toes smoothly. If the arc begins to stutter, you may be too tight—recheck angles and cleanliness.
For fundamentals on arc length effects and shielding stability, see TWI’s knowledge pages on arc welding basics: TWI technical knowledge.
Travel speed
Read the puddle, not the clock. A bead that leaves faint ripples and consistent wetting at both toes usually signals good speed. If the bead crowns high with little toe wash, you’re likely too slow or too cold; if the toes are gouged with a thin face, you’re too fast or too hot.
Adjustment cues
- Correct cold lap: increase current 10–20 A (or WFS +30–50 ipm) and slow travel 10–15%.
- Correct undercut: reduce voltage 0.5–1.0 V, slow travel 10–20%, and correct angle to reduce push.
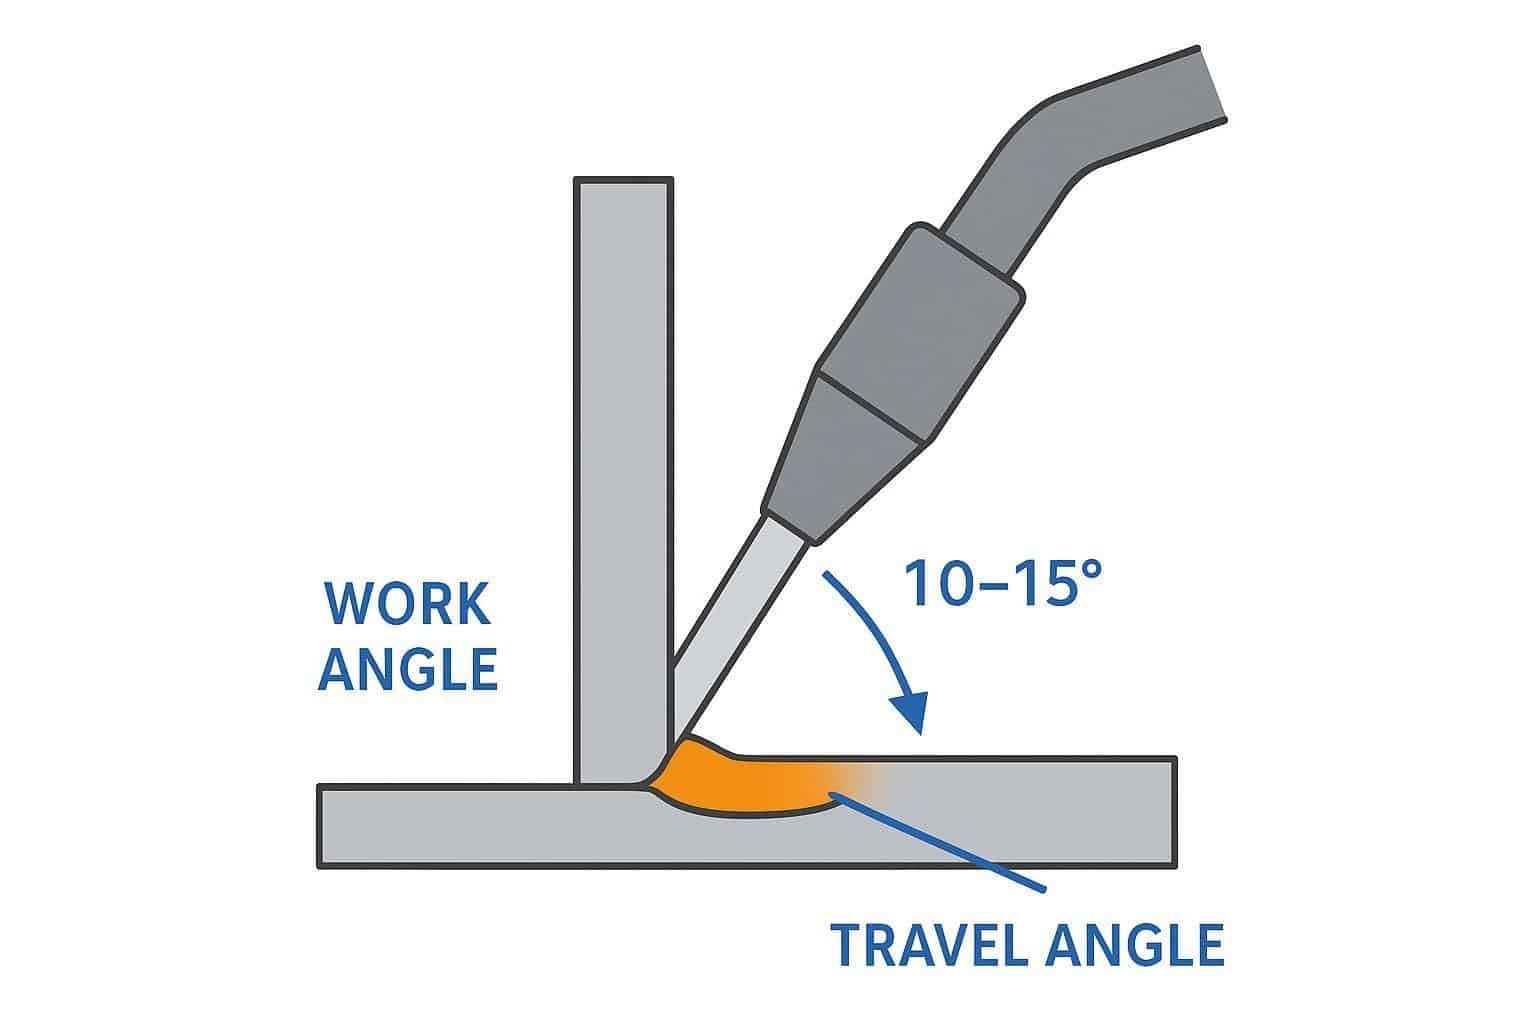
Electrode or gun angle
Aim for a 45 degree work angle on a T-joint fillet and a modest 5–15 degree travel angle. Push for GMAW to improve visibility and wetting in flat and horizontal; drag with SMAW stringers when you need tighter penetration control or in vertical-up beads where you step and pause to wash the toes.
For visual guidance on work and travel angles and how they influence toe fusion and bead shape, see ESAB University’s technique explainers and TWI’s practitioner pages: ESAB University education index, TWI technical knowledge.
Electrode or torch manipulation
Keep it disciplined. Favor stringers for critical low-hydrogen SMAW welds and narrow weaves only when needed to bridge or tie in toes. In GMAW short-circuit, a small crescent or C motion can help wet the toes, but wide oscillations often cause cold lap. In GTAW, a slight torch wiggle with consistent filler timing is usually enough; avoid sweeping the arc so wide that shielding breaks down.
Troubleshooting matrix: from symptom to fix fast
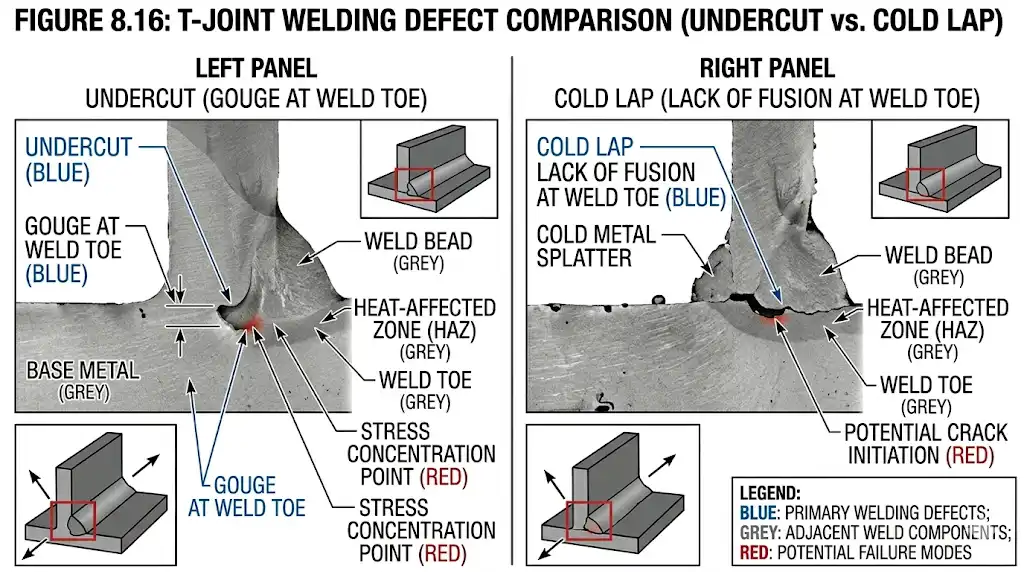
| Symptom | Likely variables out of spec | First fixes to try |
|---|---|---|
| Undercut at toes | Travel speed too fast; voltage too high; excessive push angle; arc length long | Slow travel 10–20%; reduce voltage 0.5–1.0 V; correct angle toward neutral; shorten arc and recheck CTWD. |
| Lack of fusion or cold lap | Current too low; voltage too low in GMAW; travel too slow with long arc; poor cleanliness | Increase current 10–20 A or WFS +30–50 ipm; tighten arc; raise voltage slightly for proper transfer; clean and dry joint. |
| Porosity | Contamination; gas flow too low or too high causing turbulence; arc length long; leaks | Clean to bright metal; set gas 12–20 CFH on TIG and 20–35 CFH on MIG depending on nozzle; shorten arc; leak-check hoses and fittings. |
| Slag inclusions (SMAW) | Excess weave without cleaning; angle not washing toes; low heat | Switch to stringers; clean between passes; increase amps 10–20 A; adjust work angle so arc force washes toes. |
| Burn-through on thin | Heat too high; travel too slow; arc length long | Drop current 10–20 A or WFS −30–50 ipm; increase travel 10–20%; shorten arc; use chill bar or step technique. |
Short bench checks before you strike an arc
Ground on bright metal near the joint and inspect leads; verify gas type and flow with a flowmeter; remove mill scale, oil, paint, and check fit-up and tacks; confirm CTWD for GMAW. Run a 2–3 inch verification bead at baseline settings and adjust only one variable at a time while watching the puddle, then note final settings for the next shift.
Why does this disciplined approach work? Because repeatable results come from controlling the few variables that matter most. Get these five right and you’ll see fewer defects, faster travel, and cleaner inspection outcomes.
References and further reading
- ESAB University — process guides for MIG and TIG, including parameter and technique guidance: https://www.esab.com/en/mea/support/education/index
- Miller resources — process explainers and weld setting calculators for common processes: https://www.millerwelds.com/resources
- The Welding Institute — technical knowledge library on arc welding fundamentals and parameter effects: https://www.twi-global.com/technical-knowledge


