Contaminated injection molds cost manufacturers far more than most realize — not in dramatic failures, but in the slow bleed of rejected parts, unplanned downtime, and premature tool replacements that quietly erode margins. The fix is straightforward but often poorly executed: a disciplined cleaning program matched to the right technology. This guide breaks down every major cleaning method — manual, ultrasonic, dry ice blasting, and laser — with a clear-eyed look at where each one fits, where it falls short, and how to build a maintenance schedule that genuinely extends tool life rather than just checking a box.
Why Injection Mold Cleaning Directly Impacts Tool Life and Part Quality
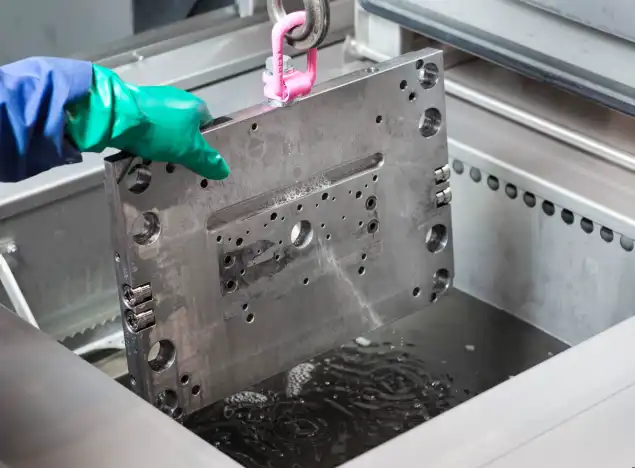
Every injection cycle leaves behind a trace. Polymer off-gassing deposits a thin film on cavity walls. Mold release agents accumulate in corners. Microscopic corrosion begins wherever moisture contacts unprotected steel. Individually, none of these are catastrophic. Collectively, over thousands of shots, they transform a precision tool into a defect generator.
The defects themselves are familiar to anyone who has spent time on a molding floor: burn marks from trapped gas, short shots from clogged vents, flash from parting line contamination preventing proper seal, and surface blemishes from residue transfer. What gets less attention is the compounding damage to the mold itself. Carbonized deposits act as insulation, creating hot spots that accelerate thermal fatigue cracking. Corrosion pits the surface, and once pitting starts, it accelerates — each pit becomes a nucleation site for further oxidation.
Here is the cost-of-inaction math that makes this concrete. A typical production mold rated for 500,000 shots might lose 15-25% of its service life when cleaning is neglected or performed inconsistently. On a mold valued at $80,000 to $250,000, that represents $12,000 to $62,500 in lost tooling value — not counting the scrap parts, the emergency repair downtime, or the expedited replacement lead times that cascade through production schedules.
The core principle is simple: injection mold cleaning is not a maintenance cost. It is a tool life investment with a measurable return.
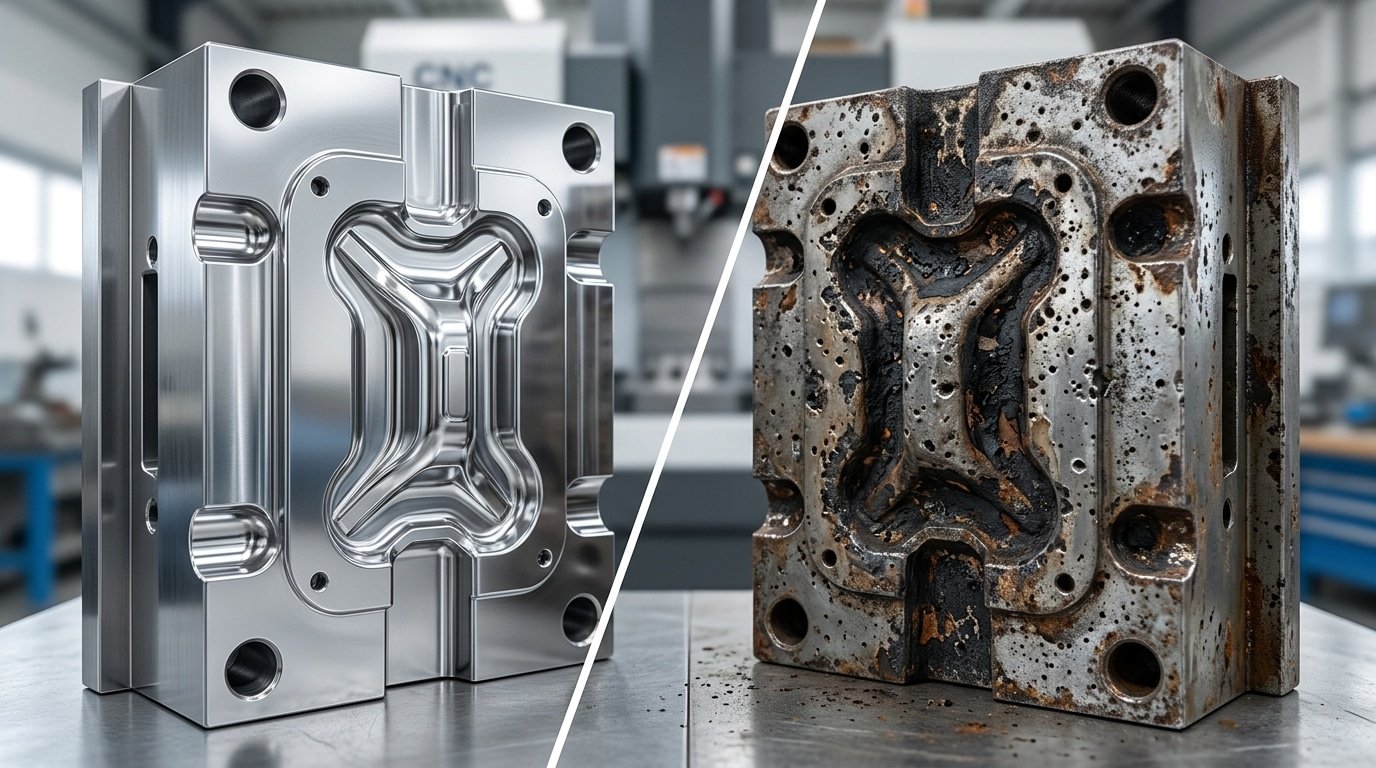
Side-by-side comparison of clean versus contaminated injection mold surfaces showing corrosion and carbon buildup
Common Contaminants That Damage Injection Molds
Effective cleaning starts with understanding exactly what you are removing and why it formed in the first place. Not all mold contamination is created equal, and each type demands a different approach.
Outgassing Residue
When thermoplastic resin is heated to processing temperatures, volatile organic compounds (VOCs) escape from the melt. These gases — a cocktail of monomers, additives, flame retardants, and plasticizers — condense on cooler mold surfaces, particularly around vents and parting lines. The deposit starts as a thin, oily film. Over hundreds of cycles, it polymerizes into a hard, tenacious layer that progressively restricts gas escape. Resins with high filler content or aggressive flame retardant packages (common in electronics housings) produce outgassing residue at significantly faster rates.
Carbonized Polymer Deposits
Stagnant resin in dead spots, runner ends, and gate areas degrades under sustained heat exposure. The polymer chains break down, oxidize, and eventually carbonize into hard black deposits. These carbon particles can break loose and transfer onto part surfaces, causing black specks — a cosmetic defect that triggers immediate rejection in automotive and consumer electronics applications. Worse, carbonized material bonded to cavity surfaces acts as thermal insulation, disrupting the carefully engineered cooling profile of the mold.
Mold Release Agent Buildup
External mold release sprays solve an immediate ejection problem but create a long-term contamination one. Silicone-based and wax-based release agents accumulate in textured surfaces and fine features, gradually filling the texture profile and altering part appearance. The buildup also interferes with subsequent painting or bonding operations on molded parts. Many experienced molders treat excessive release agent use as a symptom — the root cause is usually inadequate draft angles, insufficient polish, or contamination that is increasing friction.
Corrosion and Rust
Moisture is the enemy. It enters through condensation during mold cooling, from humid shop air during storage, and from certain corrosive off-gases (PVC processing generates hydrochloric acid vapor, for example). Even hardened tool steels like H13 and S7 are not immune. Rust begins in micro-crevices and around water line connections, then spreads to cavity surfaces. Once corrosion pits a polished surface, restoring the original finish requires re-polishing or re-texturing — expensive operations that also remove base metal and alter cavity dimensions.
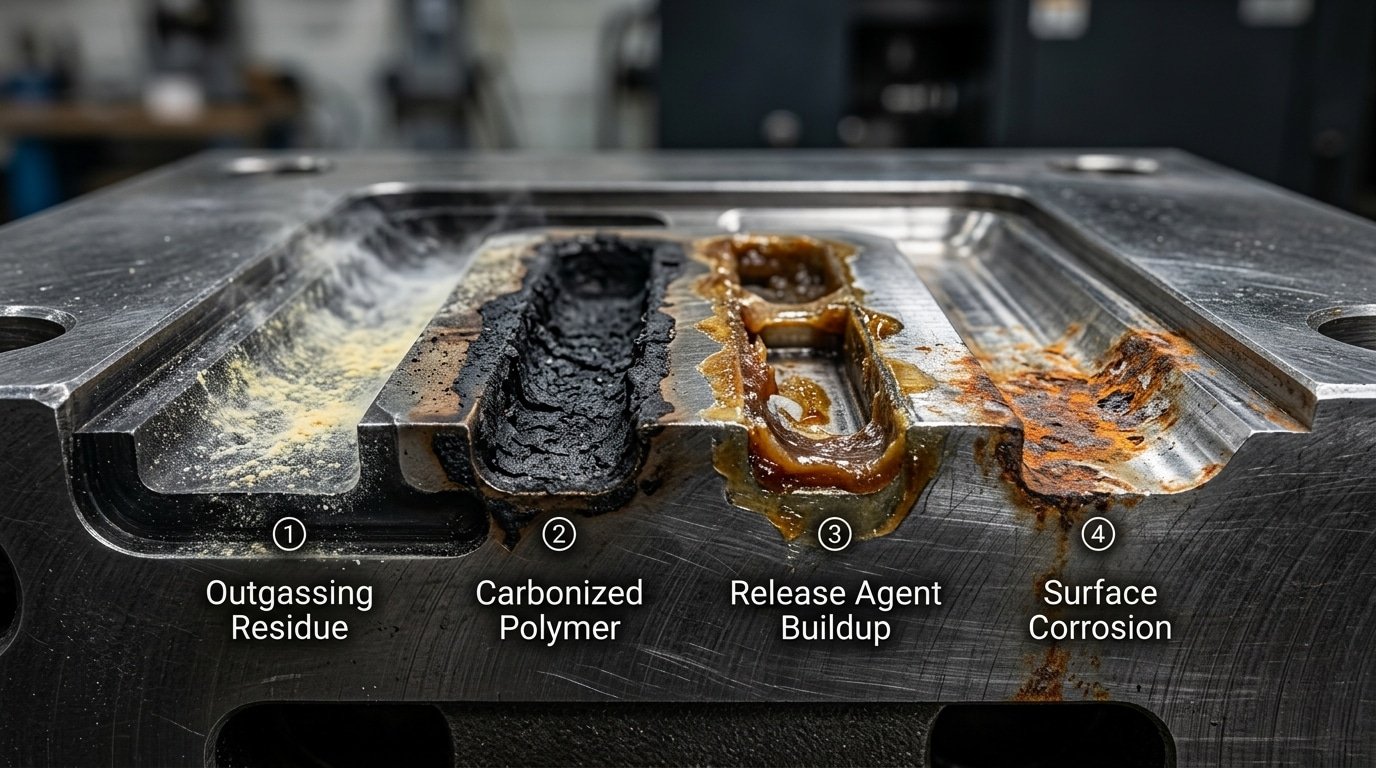
Four common injection mold contaminants including outgassing residue carbonized polymer release agent buildup and rust corrosion
How Gas Buildup and Residue Cause Burn Marks and Short Shots
Removing gas residue from injection molds is one of the most underappreciated aspects of mold maintenance. The mechanism is worth understanding in detail because it explains why certain defects keep recurring even after process parameter adjustments.
During injection, the advancing melt front pushes air and volatile gases ahead of it toward the vents — narrow channels machined into the parting line, typically 0.01 to 0.05 mm deep depending on the resin. These vents are engineered to allow gas to escape while preventing plastic from flashing through. The system works beautifully when vents are clean.
When outgassing residue coats these micro-channels, the effective vent depth decreases. A vent machined to 0.025 mm with even 0.005 mm of deposited residue has lost 20% of its cross-sectional flow area. Gas escape slows. Pressure builds.
What happens next is sometimes called the “diesel effect.” Trapped gas, compressed rapidly by the advancing melt front, reaches temperatures exceeding 300-400°C — hot enough to auto-ignite. The result is a characteristic brown or black burn mark on the part surface, typically at the last-fill areas where gas concentrates. According to research published by the Journal of Polymer Degradation and Stability, the thermal degradation of trapped volatiles at these extreme local temperatures also generates additional corrosive byproducts that further damage the mold surface.
Short shots — parts that do not fill completely — follow a related path. When enough vents are restricted, the back-pressure from trapped gas physically resists the melt front. The cavity cannot fill before the gate freezes. Operators often respond by increasing injection pressure or speed, which temporarily overcomes the resistance but accelerates vent erosion and creates new problems like flash and clamp force overload.
The fix is not a process adjustment. It is cleaning the vents. Regularly.
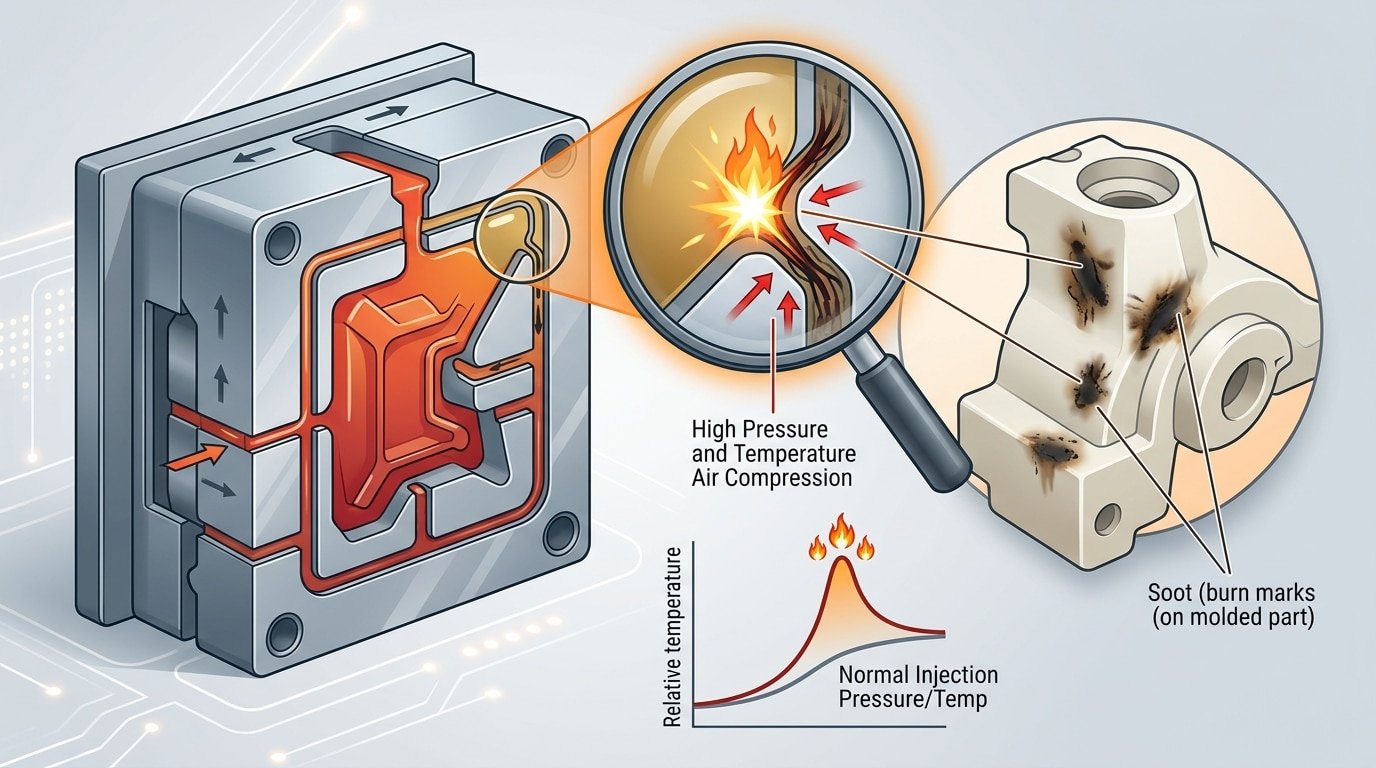
Technical diagram of diesel effect in injection mold showing gas trapped by clogged vents causing burn marks
Building a Strict Mold Maintenance Schedule That Prevents Costly Repairs
A mold maintenance schedule that actually works is not a calendar reminder. It is a tiered system tied to shot counts, resin type, and observed part quality — because a mold running glass-filled nylon at 300°C accumulates contamination at a completely different rate than one running unfilled polypropylene at 210°C.
Tier 1: Production-Level Maintenance (Every Shift or Run)
Quick parting line wipe-down with approved solvent. Visual inspection of vents, gates, and ejector pins. Spray rust preventive on cavity surfaces during any stoppage exceeding 30 minutes. This takes 10-15 minutes and catches obvious contamination before it bakes on.
Tier 2: Preventive Cleaning (Every 5,000-25,000 Shots)
The interval depends heavily on the resin. High-outgassing materials like POM, PVC, or flame-retardant ABS may need cleaning every 5,000-10,000 shots. Clean commodity resins like HDPE might go 25,000 shots between preventive cleans. This tier involves thorough vent cleaning, gate area decontamination, and inspection of water lines for scale buildup. Document findings — the data tells you whether to shorten or extend the interval.
Tier 3: Scheduled Deep Clean (Every 50,000-100,000 Shots or Quarterly)
Full mold disassembly. All components cleaned — cavities, cores, slides, lifters, ejector system. Detailed inspection for wear, corrosion, and cracking. Water channels flushed and tested for flow rate. This is where ultrasonic cleaning or laser cleaning earns its keep, reaching contamination that production-level maintenance cannot address.
Tier 4: Major Overhaul (Based on Condition Assessment)
Re-polishing or re-texturing as needed. Replacement of worn components. Full dimensional verification. This is not routine — it is triggered by Tier 3 inspection findings.
The key insight that separates shops with excellent tool life from those constantly fighting fires: every cleaning event must be documented with shot count, findings, and actions taken. This data transforms maintenance from guesswork into a predictive system. After three or four cycles, you know exactly when each mold starts showing contamination, and you can schedule cleaning before defects appear on parts.
According to the Plastics Industry Association, shops with documented mold maintenance schedules report 30-50% fewer unplanned mold repairs and measurably longer tool life compared to those relying on reactive maintenance.
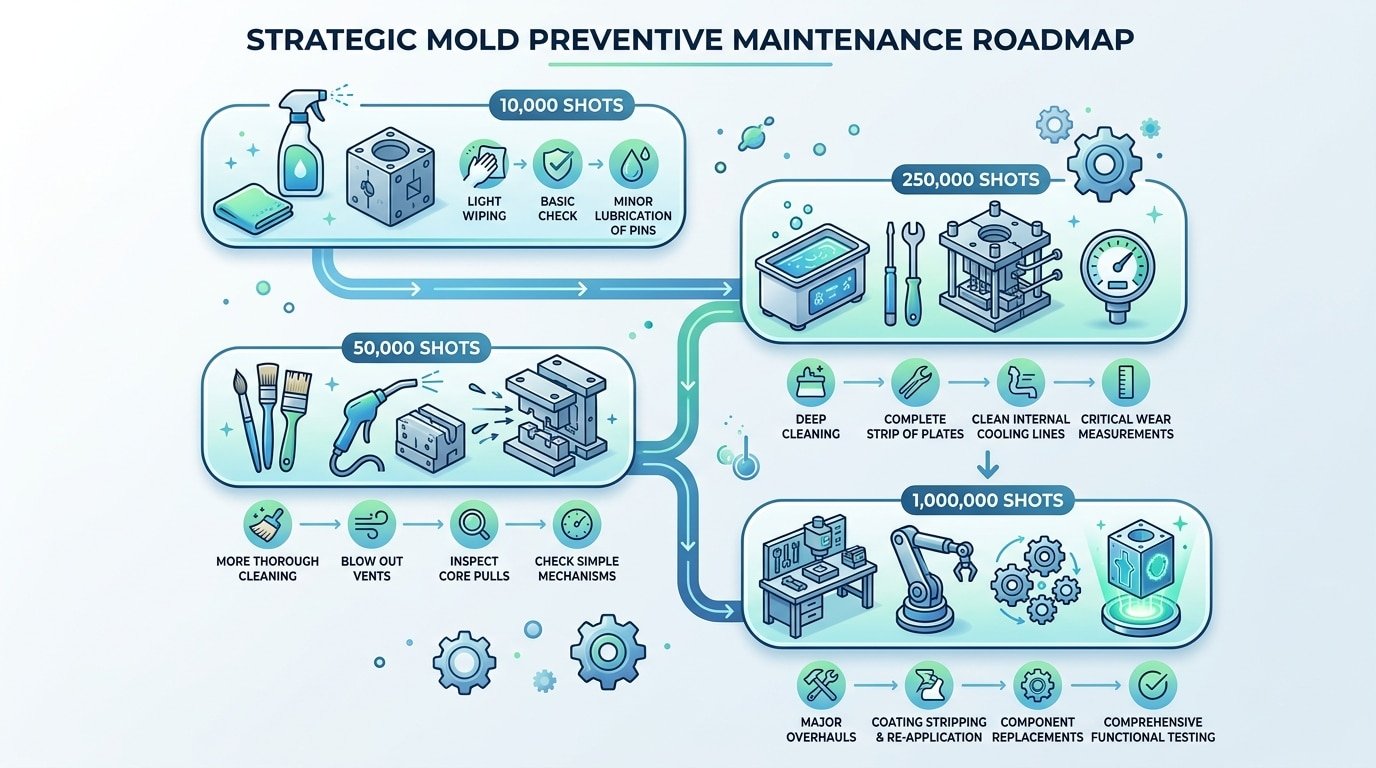
Four-tier injection mold maintenance schedule flowchart showing production cleaning preventive cleaning deep clean and major overhaul intervals
Manual and Chemical Cleaning Methods and Their Limitations
Manual cleaning is where most shops start, and for good reason — the barrier to entry is essentially zero. Brass brushes, cotton swabs, approved solvents, and a knowledgeable technician can handle routine contamination on accessible surfaces. For production-level Tier 1 maintenance, manual methods are perfectly adequate.
Chemical purging compounds offer another accessible option. Running a purging compound through the hot runner and cavity displaces degraded resin and can remove light deposits from flow surfaces. Some formulations are specifically designed to target carbonized buildup.
But manual and chemical methods hit a wall quickly when cleaning demands escalate.
Surface damage risk is the biggest concern. Steel brushes — even brass ones — leave micro-scratches on polished cavity surfaces. An SPI A-1 diamond-polished finish (1-2 Ra) can be degraded to A-3 quality after repeated aggressive manual cleaning. On textured surfaces, brushes catch on texture peaks and gradually round them off, altering the appearance of every part produced afterward. Restoring the original texture means sending the mold out for re-texturing — a process that costs $2,000-$10,000+ depending on mold size and texture complexity, plus weeks of lead time.
Chemical solvents bring their own issues. Effective solvents for carbonized deposits tend to be aggressive — methylene chloride, NMP, strong alkaline solutions — raising worker safety and environmental disposal concerns. Milder solvents are safer but often inadequate for heavy contamination. And no solvent reaches deep into blind micro-vents without prolonged soaking and mechanical assistance.
Consistency is another problem. Manual cleaning quality depends entirely on the technician performing it. Two different operators cleaning the same mold will achieve different results. Critical areas like micro-vents and deep ribs may be skipped if they are difficult to access.
None of this means manual cleaning should be abandoned. It means manual cleaning should be reserved for what it does well — routine surface maintenance — while more demanding cleaning tasks are handled by technologies designed for them.
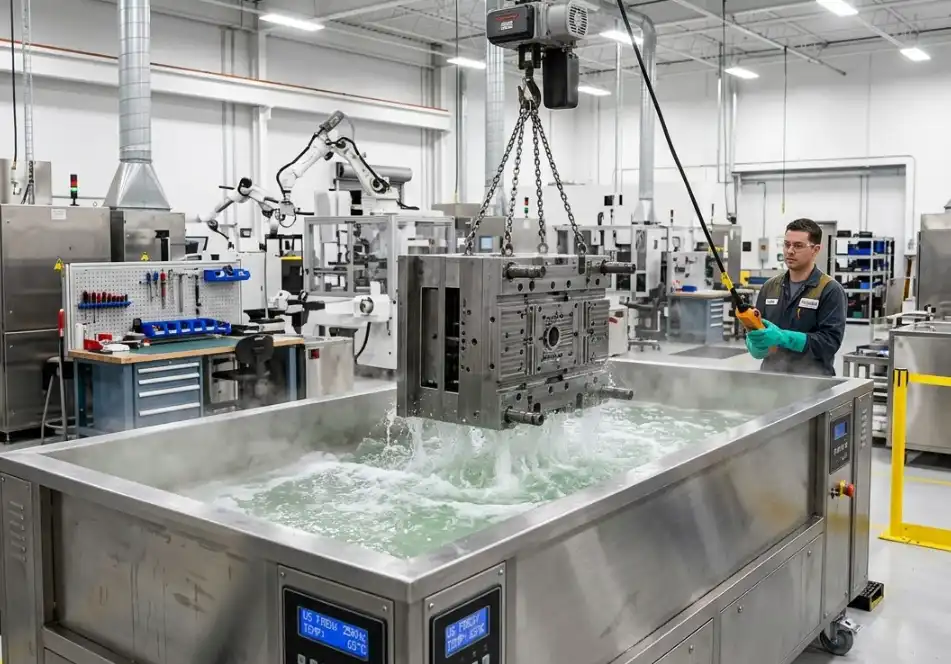
Ultrasonic Mold Cleaning for Complex Tooling Geometries
Ultrasonic mold cleaning solves the access problem that manual methods cannot. The technology works by immersing mold components in a solvent bath and subjecting the liquid to high-frequency sound waves — typically 25-45 kHz. These sound waves create millions of microscopic cavitation bubbles that form and collapse violently, generating localized shock waves that dislodge contamination from every surface the liquid contacts.
The beauty of cavitation is that it does not care about geometry. Deep cores, intricate cooling channels, micro-vents, and undercuts that no brush or swab could reach get cleaned with the same intensity as flat, open surfaces. For molds with complex internal features — multi-cavity tooling, molds with numerous slides and lifters, or tools with deep narrow ribs — ultrasonic cleaning delivers a level of thoroughness that manual methods simply cannot match.
Where Ultrasonic Cleaning Works Best
Removing outgassing residue and light polymer deposits from disassembled mold components. Cleaning ejector pins, core pins, and small inserts that are difficult to handle individually. Flushing contamination from cooling channels when combined with appropriate cleaning solutions.
Practical Limitations
Size constraints are the most obvious. The mold component must fit inside the ultrasonic tank. Large mold halves — anything beyond about 600 mm — require industrial-scale equipment that represents a significant capital investment. More critically, ultrasonic cleaning requires mold disassembly. You cannot clean a mold on-press. Every ultrasonic cleaning cycle means pulling the mold from the machine, disassembling it, cleaning, reassembling, and reinstalling. For a complex mold, that process can consume 8-16 hours of downtime.
The cleaning solution matters enormously. Water-based solutions are environmentally friendly but less effective on carbonized deposits. Solvent-based solutions work better on heavy contamination but reintroduce the chemical handling and disposal issues. Finding the right solution for each contaminant type requires testing and experience.
There is also a subtle risk with aggressive ultrasonic settings. Excessive cavitation intensity or prolonged exposure can cause micro-pitting on soft metals and highly polished surfaces. Aluminum molds and copper-alloy core pins need lower power settings and shorter cycle times than hardened steel components.
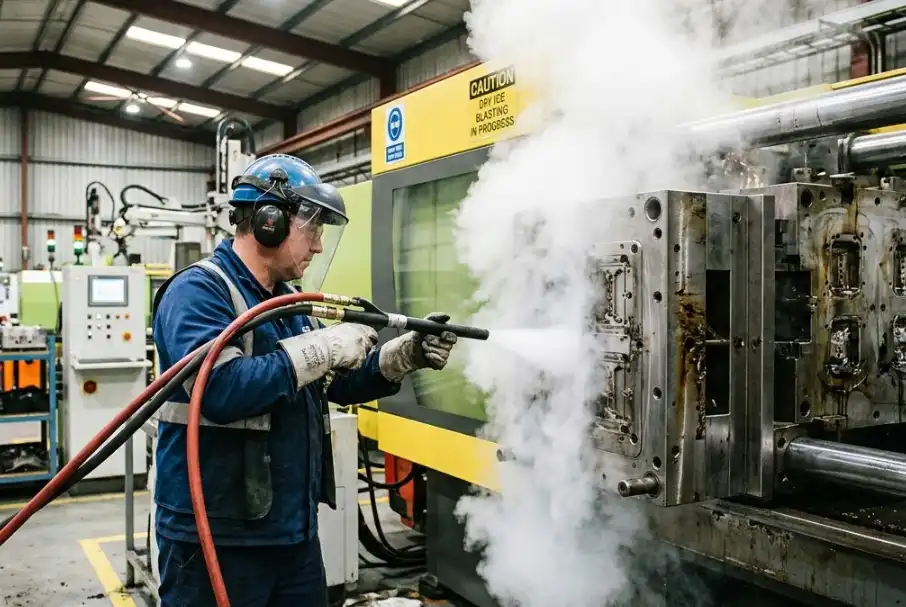
Dry Ice Blasting for Molds Without Abrasive Surface Damage
Dry ice blasting for molds occupies an interesting middle ground — more capable than manual cleaning, more portable than ultrasonic, and gentler than most people expect. The process propels pellets of solid CO2 at the mold surface using compressed air. When the pellets strike the contaminated surface, three things happen simultaneously.
First, thermal shock. The dry ice pellets are at -78.5°C. The sudden temperature differential between the pellet and the contaminated surface causes the contaminant layer to contract and crack, breaking its bond with the substrate. Second, kinetic energy. The pellet impact physically dislodges the fractured contaminant. Third, sublimation. The CO2 pellet transitions directly from solid to gas upon impact, expanding roughly 800 times in volume. This rapid expansion lifts and blows away loosened debris.
The result: contamination is removed, and the dry ice simply disappears as gas. No secondary waste. No residual moisture. No abrasive media embedded in texture details. This makes dry ice blasting particularly attractive for textured molds where abrasive methods are off-limits and for on-press cleaning where you do not want to introduce liquids near hot tooling.
Advantages for Mold Cleaning
On-press capability is a major selling point. Many shops blast molds at operating temperature without removing them from the machine, reducing downtime from hours to minutes. The non-abrasive nature preserves textured surfaces and polished finishes. No chemical disposal is required. The process is effective on mold release buildup, light outgassing residue, and grease contamination.
Honest Limitations
Dry ice blasting struggles with heavy carbonized deposits. The thermal shock mechanism works best on contaminants that are relatively brittle and have weak adhesion to the substrate. Baked-on carbon that has chemically bonded to the steel surface resists the thermal cracking mechanism and may require multiple passes or pre-treatment.
Noise is significant — typically 80-100 dB depending on air pressure and nozzle configuration. Hearing protection is mandatory. The CO2 gas generated during blasting displaces oxygen, requiring adequate ventilation, especially in enclosed press areas. Pellet consumption adds ongoing cost, and the pellets have a limited shelf life (they sublimate during storage), so logistics planning matters.
Operator skill also plays a larger role than vendors typically acknowledge. Angle, distance, dwell time, and air pressure all affect results. An inexperienced operator can spend twice as long and achieve half the cleaning quality of someone with practice.
Why Laser Mold Cleaning Machines Are Changing the Industry Standard
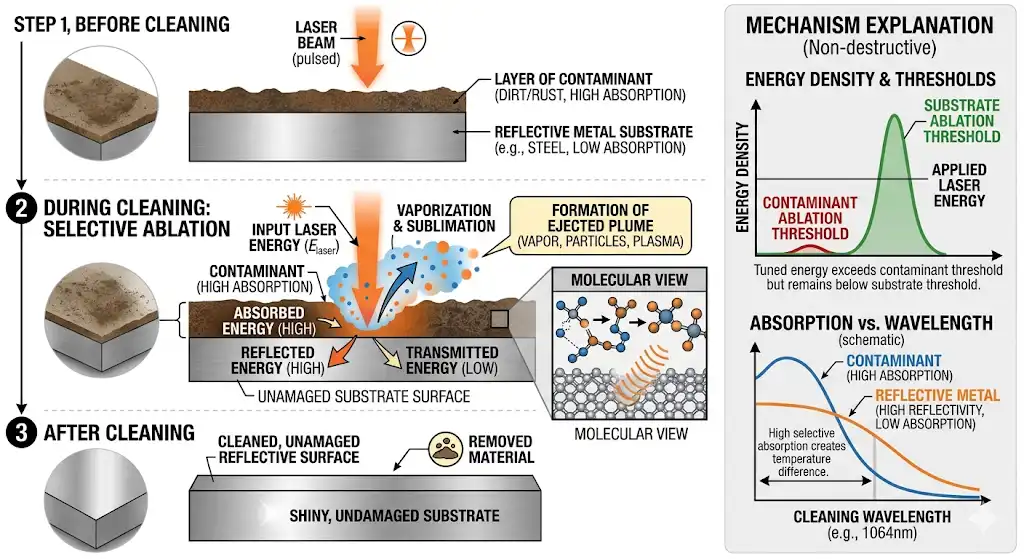
A laser mold cleaning machine represents a fundamentally different approach to contamination removal. Instead of mechanical force, chemical reaction, or thermal shock from an external medium, laser cleaning uses precisely controlled light energy to ablate contaminants directly from the mold surface.
The physics are elegant. A pulsed fiber laser (typically 100W-1000W for mold cleaning applications) emits short-duration, high-peak-power pulses that are absorbed by the contaminant layer. The contaminant — whether outgassing residue, carbonized polymer, or oxide layer — absorbs the laser energy far more readily than the polished or hardened steel beneath it. The contaminant vaporizes or is ejected as micro-particles. The steel substrate, which reflects the laser wavelength efficiently, remains unaffected.
This selective absorption is the key differentiator. The laser removes what does not belong and leaves what does.
No Abrasion. No Chemicals. No Consumables.
Unlike every other cleaning method discussed so far, laser cleaning introduces nothing to the mold surface — no brushes, no media, no solvents, no pellets. The only “consumable” is electricity. There is no secondary waste stream to manage, no chemical inventory to maintain, and no abrasive particles that could embed in texture details. For shops dealing with environmental compliance requirements, this simplification is substantial.
On-Press Cleaning Without Cooldown
Laser cleaning can be performed with the mold still in the press, at operating temperature. A handheld laser cleaning head or an automated scanning system directs the beam across the mold surface. Cleaning a cavity surface that would take 45 minutes with manual methods or 20 minutes with dry ice can be completed in 5-10 minutes with laser, depending on contamination severity and surface area. That difference, multiplied across hundreds of cleaning cycles per year, translates directly into recovered production hours.
Sub-Millimeter Precision
The laser beam can be focused to spot sizes below 0.1 mm, allowing operators to clean individual micro-vents, fine texture details, and tight-tolerance features without affecting adjacent areas. This level of control is impossible with any contact-based or media-based method. For precision molds where a 0.01 mm change in surface geometry affects part quality, laser cleaning is not just an upgrade — it is the only method that guarantees zero dimensional impact.
The technology has matured significantly in recent years. Modern laser mold cleaning machines from manufacturers like those in the industrial laser sector offer user-friendly interfaces, preset parameter libraries for common mold steels and contaminant types, and integrated fume extraction systems. The capital cost remains higher than dry ice blasting equipment, but the total cost of ownership — factoring in zero consumables, reduced downtime, and eliminated chemical disposal — often reaches breakeven within 12-18 months for shops running multiple molds.
Precision Molds and Textured Surfaces Where Laser Cleaning Excels
Not every mold needs laser cleaning. A simple two-plate mold running commodity resin with SPI B-2 finish can be maintained perfectly well with manual methods and occasional dry ice blasting. Laser cleaning earns its premium in applications where the consequences of surface damage are severe and the limitations of other methods become deal-breakers.
Optical-Grade Molds
Molds for lenses, light guides, and transparent housings require SPI A-1 or better surface finishes — mirror-polished to sub-micron roughness. Any scratch, any embedded particle, any change in surface roughness shows up as a visible defect in the transparent part. Manual brushing is out of the question. Even dry ice blasting at aggressive settings can leave micro-marks on these surfaces. Laser cleaning, with its zero-contact mechanism, maintains the original polish indefinitely.
Medical Device Tooling
Medical molds often feature micro-channels, thin-wall sections, and extremely tight tolerances. Contamination in micro-features directly affects part functionality — a clogged micro-vent on a syringe barrel mold produces a cosmetic defect that triggers rejection under medical device quality standards. These molds also face stringent cleanliness requirements where chemical residue from solvents is unacceptable. Laser cleaning leaves zero residue.
Textured Automotive Molds
Automotive interior molds carry complex grain textures — leather grain, geometric patterns, soft-touch finishes — created through chemical etching or laser texturing. These textures are defined by features as fine as 0.02-0.05 mm. Mold release buildup fills these fine features, gradually dulling the texture appearance on molded parts. Manual cleaning with brushes rounds off texture peaks. Dry ice blasting works well for light buildup but may not fully clear heavy deposits from deep texture valleys.
Laser cleaning addresses textured molds with a precision that other methods cannot replicate. The beam parameters can be tuned to remove only the contaminant layer sitting on top of the texture, preserving the original EDM or etched profile exactly as designed. Shops that have switched to laser cleaning for textured molds consistently report longer intervals between re-texturing — some eliminating re-texturing entirely over the mold’s service life, saving tens of thousands of dollars per tool.
Micro-Venting Channels
This deserves its own mention because vent maintenance is the single most impactful cleaning task for part quality. Vents machined to 0.01-0.03 mm depth are easily damaged by mechanical tools and difficult to reach with media-based methods. Laser cleaning can selectively ablate outgassing deposits from vent channels without altering vent depth — verified by profilometer measurements before and after cleaning showing zero dimensional change on the base steel.
Side-by-Side Comparison of Injection Mold Cleaning Methods
Choosing the right cleaning method is not about finding the “best” technology in absolute terms. It is about matching the method to your specific molds, contaminants, production constraints, and budget. This comparison provides the framework for that decision.
| Criteria | Manual / Chemical | Ultrasonic | Dry Ice Blasting | Laser Cleaning |
|---|---|---|---|---|
| Surface Safety | Risk of scratching polished/textured surfaces | Safe at proper settings; risk of micro-pitting on soft metals | Non-abrasive; safe for most surfaces | Completely non-abrasive; zero substrate impact |
| Cleaning Speed | Slow (30-90 min per cavity) | Moderate (1-4 hours including disassembly) | Moderate (15-30 min on-press) | Fast (5-15 min on-press) |
| On-Press Capability | Yes (limited effectiveness) | No (requires disassembly and tank immersion) | Yes | Yes |
| Heavy Carbon Deposits | Poor without aggressive chemicals | Good with proper solution | Limited; multiple passes needed | Excellent; high-power pulses ablate carbon effectively |
| Outgassing Residue | Moderate | Excellent | Good | Excellent |
| Rust / Oxide Removal | Chemical rust removers effective but harsh | Moderate | Limited | Excellent (laser descaling) |
| Micro-Vent Cleaning | Very difficult; risk of damage | Good (if liquid reaches vents) | Moderate | Excellent; sub-mm precision |
| Consumable Costs | Low (brushes, solvents) | Moderate (cleaning solutions, tank maintenance) | Moderate-High (dry ice pellets, compressed air) | Near zero (electricity only) |
| Environmental Impact | Chemical disposal required | Solution disposal required | CO2 emissions; ventilation needed | Minimal; fume extraction for ablated particles |
| Capital Investment | Minimal ($200-$500) | Moderate ($5,000-$30,000) | Moderate ($15,000-$50,000) | Higher ($30,000-$150,000+) |
| Best For | Routine Tier 1 maintenance; accessible surfaces | Deep cleaning disassembled components with complex geometries | On-press cleaning of textured molds; light-to-moderate contamination | Precision molds; high-value tooling; heavy contamination; micro-features |
Reading This Table Correctly
Most well-run mold shops do not rely on a single method. The practical approach combines manual cleaning for daily maintenance, ultrasonic for periodic deep cleans of disassembled components, and laser or dry ice for on-press preventive cleaning between deep-clean cycles. The investment decision comes down to mold portfolio value and production volume. A shop running 50+ active molds with high-value textured tooling will see ROI from a laser cleaning machine far faster than a shop running 5 simple commodity molds.
One factor the table cannot fully capture: consistency. Laser cleaning delivers the same result every time, regardless of operator. Manual and dry ice methods introduce variability that accumulates over the mold’s lifetime.
Frequently Asked Questions About Injection Mold Cleaning
How often should injection molds be cleaned?
There is no universal answer because cleaning frequency depends on resin type, mold complexity, and part quality requirements. As a baseline: production-level wipe-downs every shift, preventive cleaning every 5,000-25,000 shots (shorter intervals for high-outgassing resins like PVC or flame-retardant grades), and full deep cleans every 50,000-100,000 shots. The real answer comes from tracking your own data — document shot counts alongside part quality observations, and patterns will emerge within two or three maintenance cycles that tell you exactly when each specific mold needs attention.
Can laser cleaning damage hardened tool steel?
No, when parameters are set correctly. The fundamental physics of laser mold cleaning relies on the difference in absorption characteristics between contaminants and polished/hardened steel. Contaminant layers absorb laser energy efficiently, while tool steels like H13, S7, and P20 reflect the wavelength used by fiber lasers. Independent profilometer measurements consistently show zero measurable change in surface roughness or dimensional geometry after laser cleaning. The critical caveat: parameters must be appropriate for the material. A 1000W laser at maximum power density aimed at an aluminum mold insert requires different settings than the same laser cleaning hardened H13. Reputable laser cleaning equipment includes material-specific presets to prevent operator error.
What is the ROI of switching from manual to laser cleaning?
ROI calculations vary by shop, but the math typically includes three components. First, recovered production time — if laser cleaning saves 30 minutes per cleaning event versus manual methods, and you perform 500 cleaning events per year across your mold fleet, that is 250 hours of recovered press time. At a loaded machine rate of $150-$300/hour, that alone represents $37,500-$75,000 annually. Second, eliminated consumables and chemical disposal costs — typically $3,000-$8,000/year for an active shop. Third, extended tool life and reduced re-texturing/re-polishing — harder to quantify precisely but often the largest factor for shops running high-value textured molds. Most shops running 20+ active molds report breakeven within 12-18 months.
Is dry ice blasting safe for all mold steels?
Dry ice blasting is safe for virtually all mold steels including hardened tool steels, stainless steels, and aluminum alloys. The pellets are softer than all of these materials (dry ice has a Mohs hardness of approximately 1.5), so mechanical abrasion is not a concern. The thermal shock from the -78.5°C pellets is also well within the thermal cycling tolerance of mold steels. The caution is with extremely thin or fragile mold features — very thin core pins or delicate shut-off edges — where the kinetic force of the compressed air stream (not the pellets themselves) could potentially cause deflection. Reducing air pressure for these areas eliminates the risk.
How do you remove gas residue from micro-vents without damaging them?
This is where method selection matters most. Mechanical tools — even thin brass shim stock — risk widening or deepening micro-vents machined to tolerances of 0.01-0.03 mm. Ultrasonic cleaning works if the mold is disassembled and the cleaning solution can access the vent channels. Dry ice blasting can clear surface-level residue from vent openings but may not fully penetrate deep into the vent land. Laser cleaning is the most reliable option for micro-vent maintenance because the beam can be focused precisely on the vent channel, ablating deposited residue without any contact with the steel surfaces that define the vent geometry. Post-cleaning verification with a depth gauge or optical profilometer confirms vent dimensions remain unchanged.
Does mold cleaning frequency change with different resin types?
Dramatically. Unfilled polyolefins (PP, PE) are among the cleanest-running resins and allow the longest intervals between cleaning — often 20,000-25,000+ shots for preventive cleaning. At the other extreme, PVC generates corrosive hydrochloric acid vapor that demands cleaning and rust prevention after every production run. Glass-filled and mineral-filled engineering resins accelerate abrasive wear and leave filler deposits that bond tenaciously to cavity surfaces. Flame-retardant compounds — particularly brominated and phosphorus-based systems — produce aggressive outgassing that coats vents and cavity surfaces rapidly, often requiring preventive cleaning every 3,000-8,000 shots. Your maintenance schedule must account for these differences rather than applying a one-size-fits-all interval.
Actionable Steps to Extend Mold Life Through Better Cleaning Practices
Everything discussed above distills into a concrete action plan. Not theory — steps you can begin implementing this week.
Step 1: Audit your current cleaning practices. Walk the shop floor and document what is actually happening — not what the maintenance manual says should happen. Which molds get cleaned regularly? Which ones get neglected because they are “running fine”? Where are technicians using steel tools on polished surfaces? Where are vents being ignored because they are hard to reach? This audit typically reveals gaps that explain recurring quality issues.
Step 6: Establish shot-count-based maintenance triggers. Move away from calendar-based or “when we see defects” cleaning schedules. Install shot counters on every mold if you have not already. Set initial preventive cleaning intervals based on resin type using the guidelines above, then adjust based on actual observations. A simple spreadsheet tracking shot count, cleaning date, findings, and subsequent part quality is sufficient to start.
Step 3: Classify your mold portfolio by cleaning requirements. Not every mold justifies the same investment in cleaning technology. Group your molds into tiers: commodity molds where manual cleaning is adequate, mid-value molds where dry ice blasting or ultrasonic cleaning adds value, and high-value precision or textured molds where laser cleaning technology delivers the greatest return. This classification drives equipment investment decisions.
Step 4: Evaluate laser cleaning for your highest-value tooling. Request a demonstration from a laser cleaning equipment provider using one of your actual molds with real contamination. Compare the result — cleaning quality, time, and surface condition — against your current method. The difference on textured or precision molds is typically dramatic enough to make the business case self-evident. Companies like TRUMPF and other industrial laser manufacturers offer application testing to validate results before purchase.
Step 5: Track and measure mold performance metrics. Define the KPIs that matter: scrap rate by mold, unplanned downtime events, cleaning time per event, re-texturing/re-polishing frequency, and total mold life in shots. Measure these before and after implementing improved cleaning practices. The data makes the ROI visible and builds organizational support for continued investment in mold maintenance.
Mold cleaning is not glamorous work. It does not make the highlight reel at industry conferences. But it is the single highest-leverage activity for extending tool life, reducing scrap, and keeping production running without surprises. The shops that treat cleaning as a strategic investment — with the right methods, the right schedule, and the right technology for each mold — consistently outperform those that treat it as an afterthought.
Start with the audit. The gaps you find will tell you exactly where to focus next.


