Heat tint on a stainless steel weld isn’t just cosmetic — that rainbow discoloration signals a chromium-depleted zone where corrosion resistance can drop by as much as 80%, according to research published by the British Stainless Steel Association. If you need to know how to clean colored welds on stainless steel pipe, the core approach breaks down into three proven methods: chemical pickling with acid paste, electrochemical weld cleaning, and mechanical abrasion — each suited to different budgets, pipe sizes, and industry compliance requirements. This guide walks through every method with specific steps, safety protocols, and the trade-offs that actually matter when you’re standing in front of a freshly welded joint deciding what to reach for.
What Causes Weld Discoloration on Stainless Steel Pipe
That rainbow of colors around a fresh weld isn’t just cosmetic. It’s a visible record of chromium being stolen from the steel’s surface. Stainless steel resists corrosion because of a microscopically thin chromium oxide layer — roughly 1 to 5 nanometers thick — that forms naturally when chromium reacts with oxygen. During welding, extreme heat accelerates this oxidation far beyond normal levels, producing a much thicker oxide layer that depletes the chromium content in the metal directly beneath it.
Each discoloration color corresponds to a specific oxide thickness and temperature range. A light straw or pale yellow tint appears around 290–370°C (550–700°F), where the oxide layer is still relatively thin and chromium loss is minimal. Gold pushes into the 370–450°C range. Blue shows up between roughly 450–540°C, and at this point the oxide layer has grown thick enough to seriously compromise the passive layer underneath. Purple and dark gray indicate temperatures exceeding 540°C, where chromium depletion can reach depths of several micrometers — enough to reduce local corrosion resistance by 50% or more compared to the base metal.
The key mechanism is called sensitization. At elevated temperatures, chromium migrates to grain boundaries and combines aggressively with carbon, forming chromium carbides. This leaves chromium-starved zones that can’t regenerate the protective passive film. According to research published by the British Stainless Steel Association, even a straw-colored tint can reduce pitting resistance by up to 30% in chloride-rich environments.
Understanding this color-to-damage relationship is the first step in learning how to clean colored welds on stainless steel pipe effectively. A light straw tint and a dark gray oxide demand completely different cleaning approaches — and choosing wrong can leave hidden corrosion vulnerabilities beneath a surface that looks perfectly clean.
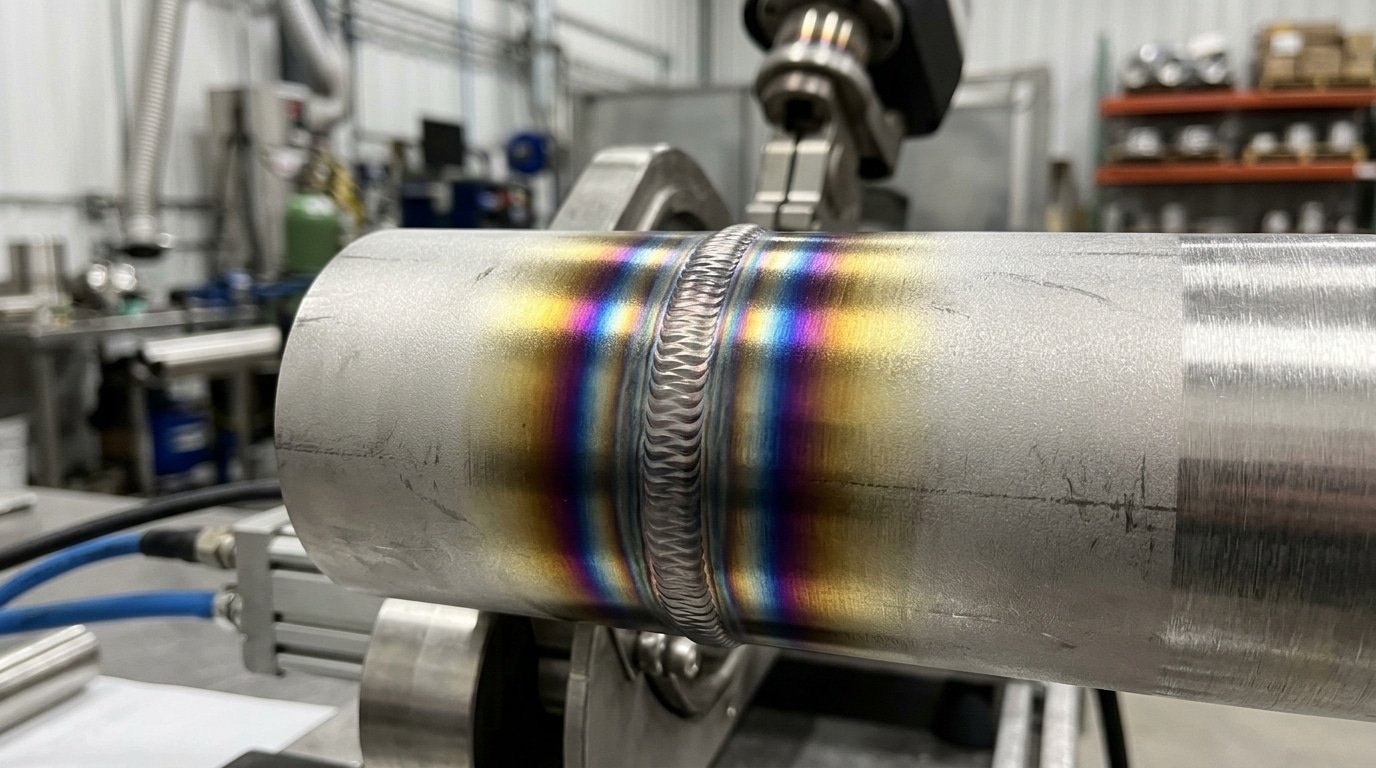
Heat tint discoloration colors on stainless steel pipe weld showing straw, gold, blue, purple, and gray oxidation zones
Why Removing Heat Tint Matters for Performance and Compliance
That colorful oxide layer isn’t just ugly. It’s a direct indicator of chromium depletion in the underlying metal. When heat tint forms, chromium migrates to the surface and bonds with oxygen, leaving a thin subsurface zone stripped of the very element that makes stainless steel “stainless.” The result? A localized weak point where pitting corrosion can initiate in weeks rather than years, especially in chloride-rich or acidic environments.
Research published by ASTM International in standard A380 outlines cleaning and descaling practices specifically because untreated heat tint compromises the passive chromium oxide film that protects stainless steel. In sanitary piping systems—think dairy processing, pharmaceutical water-for-injection loops, or semiconductor ultrapure water lines—weld discoloration creates microscopic surface roughness where bacteria and particulates lodge. Biofilm formation in these crevices can render a system non-compliant overnight.
Industry specifications draw hard lines on acceptable discoloration. ASME BPE (Bioprocessing Equipment) uses a color-based acceptance chart where anything darker than a light straw color on the interior of a weld joint fails inspection for high-purity service. That means shades of blue, purple, and gray—common outcomes without adequate shielding gas—are automatic rejects. Knowing how to clean colored welds on stainless steel pipe becomes a production-critical skill, not a finishing afterthought, because a failed weld inspection can delay an entire project by days while rework is completed.
The financial stakes are concrete. A single contaminated batch in a pharma facility can cost upward of $500,000. Corrosion-related pipe failures in chemical plants trigger unplanned shutdowns averaging $50,000 to $250,000 per incident depending on system complexity. Removing heat tint properly isn’t optional—it’s the cheapest insurance against both regulatory rejection and premature material failure.

Stainless steel pipe weld heat tint comparison showing acceptable versus rejected discoloration levels per ASME BPE standards
Pickling Paste Method for Removing Weld Discoloration
Pickling paste is the workhorse solution when figuring out how to clean colored welds on stainless steel pipe. These gels—typically a blend of 8–20% nitric acid and 1–8% hydrofluoric acid suspended in a silica carrier—chemically dissolve the chromium-depleted oxide layer that forms during welding. The paste format clings to curved pipe surfaces, making it far more practical than immersion baths for field work.
Application and Dwell Time
Apply the paste with an acid-resistant brush in a uniform layer roughly 3–6 mm thick. Thinner coats dry out too fast; thicker ones waste product without improving results. For light straw-yellow discoloration (AWS D18.2 Level 1–2), a dwell time of 30–60 minutes at ambient temperature usually suffices. Dark blue or black oxide—Level 4 and above—demands 60–120 minutes, sometimes longer in cold weather below 15°C where reaction kinetics slow considerably.
Temperature matters more than most operators realize. At 35°C, you might cut dwell time nearly in half. Below 10°C, expect to double it. Monitor the surface: when the heat tint disappears and the base metal shows a uniformly matte silver finish, the paste has done its job.
Rinsing and Passivation
Thorough rinsing is non-negotiable. Use clean water at moderate pressure and continue until pH paper reads neutral (pH 6–7) on the rinsed surface. Residual acid left behind will pit the steel within hours. After rinsing, apply a passivation solution—typically 20–25% nitric acid or a citric acid alternative—for 20–30 minutes. This step rebuilds the protective chromium oxide film that the pickling paste stripped away. According to ASTM A967, proper passivation verification can be confirmed through ferroxyl testing or copper sulfate testing to ensure full chromium oxide restoration.
Skip passivation, and you’ve essentially left bare metal exposed. The corrosion resistance you worked to restore won’t fully return on its own for weeks—if it returns at all in aggressive environments.

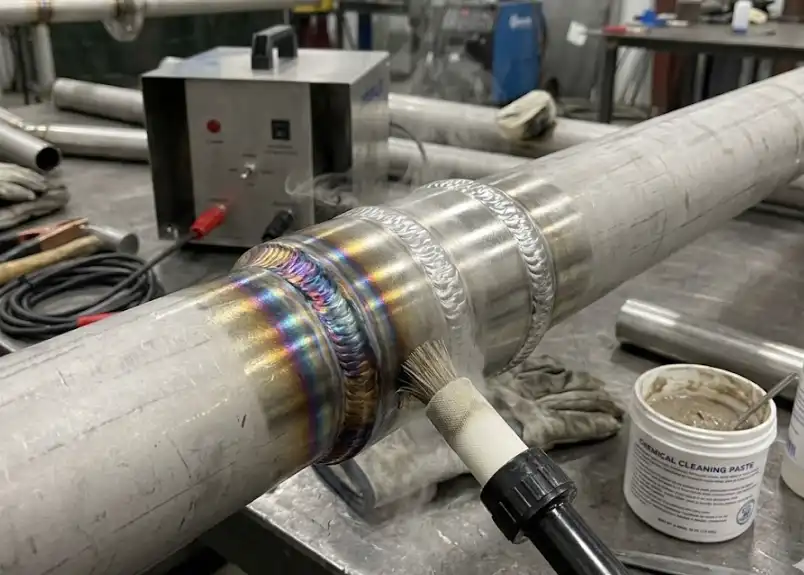
Pickling paste application on discolored stainless steel pipe weld
Electrochemical Weld Cleaning Step by Step
Electrochemical cleaning flips the script on acid-based methods. Instead of smearing hazardous paste and waiting, you run a low-voltage electrical current through an electrolyte-soaked pad or carbon fiber brush directly across the discolored zone. The electrochemical reaction dissolves the chromium-depleted oxide layer in seconds—no immersion tank, no extended dwell times. For anyone figuring out how to clean colored welds on stainless steel pipe in the field, this portability is a game-changer.
Equipment Setup
A typical system includes a power unit (usually 12–60V DC), a wand fitted with a carbon fiber brush or felt pad, a grounding clamp, and a phosphoric acid–based electrolyte solution. Attach the ground clamp to bare metal on the workpiece. Soak the brush pad thoroughly with electrolyte—dry spots cause arcing and surface pitting. Most manufacturers recommend starting at 20–30 amps for standard 304/316 pipe, then adjusting based on oxide severity.
Technique for Pipe Joints
Work the brush in slow, overlapping strokes along the weld toe. Keep the pad moving. Dwelling in one spot for more than 2–3 seconds risks etching the base metal. On tight-access pipe runs—say, a 2-inch line tucked against a wall—swap to a smaller pencil-style brush head. After cleaning, wipe the surface with a neutralizing solution, then rinse with clean water. The entire process on a single weld joint typically takes 30–90 seconds, compared to 20–60 minutes for pickling paste.
This speed advantage, combined with the elimination of bulk hazardous chemicals, explains why electrochemical weld cleaning is rapidly replacing paste methods on pharmaceutical and food-processing jobsites. Systems from brands like Cougartron and Walter have made the technology accessible enough for single-operator crews. The tradeoff: equipment costs run $2,000–$8,000 depending on amperage capacity, versus $50 for a jar of pickling paste.

Electrochemical weld cleaning brush removing heat tint discoloration from stainless steel pipe joint
Mechanical Methods for Cleaning Colored Welds on Pipe
Sometimes chemistry isn’t practical. Tight schedules, outdoor field work, or situations where acid residue disposal is a headache—these push fabricators toward mechanical cleaning. Grinding, brushing, and blending can remove heat tint fast, but the tradeoffs are real and often misunderstood.
The single most critical rule when learning how to clean colored welds on stainless steel pipe mechanically: every abrasive that touches the surface must be iron-free. A carbon steel wire brush or a flap disc previously used on mild steel will embed free iron particles into the stainless surface. Those particles rust within days, creating the exact corrosion problem you were trying to prevent. Dedicated stainless-only tools—clearly labeled and stored separately—aren’t optional. They’re mandatory.
Tool Selection and Grit Progression
Flap discs in 60 or 80 grit handle heavy discoloration and minor weld spatter quickly. Follow with a 120-grit abrasive belt or flap disc to refine scratch patterns, then finish with a Scotch-Brite conditioning pad (typically medium or fine grade) to blend the cleaned zone into the surrounding pipe surface. Skipping grits leaves visible scratches that trap contaminants and look unprofessional.
For sanitary tube work, some fabricators finish at 180 or 220 grit to approximate a #4 brushed finish. Match the surrounding surface texture—a mirror-polished pipe demands finer progression than a mill-finish schedule 40 line.
The Corrosion Resistance Problem
Here’s what mechanical methods cannot do: restore the chromium oxide passive layer. Grinding removes the discolored oxide, yes, but it also removes base metal without addressing the chromium-depleted zone underneath. According to the British Stainless Steel Association, mechanical cleaning alone does not re-passivate the surface. A follow-up passivation step—typically a nitric or citric acid treatment—is essential if corrosion resistance matters for your application.
Mechanical methods shine for structural or non-critical cosmetic work. For process piping in corrosive service, treat them as surface prep, not a standalone solution.
Comparing Cleaning Methods by Cost, Speed, and Finish Quality
Choosing how to clean colored welds on stainless steel pipe comes down to trade-offs. No single method wins across every category. The table below breaks down the three primary approaches using real-world cost ranges and performance benchmarks drawn from fabrication shop data and manufacturer specifications.
| Factor | Pickling Paste | Electrochemical | Mechanical (Flap Disc / Scotch-Brite) |
|---|---|---|---|
| Equipment Cost | $0–$50 (brushes, PPE) | $2,000–$6,000 (weld cleaning unit) | $80–$300 (angle grinder + accessories) |
| Consumable Cost per Weld | $0.50–$2.00 | $0.10–$0.40 (electrolyte + pad) | $0.30–$1.50 |
| Cleaning Speed (per 6″ weld) | 20–45 min (includes dwell time) | 1–4 min | 2–8 min |
| Surface Finish Consistency | Excellent — uniform matte | Excellent — retains original finish | Variable — operator dependent |
| Corrosion Resistance Restoration | Full (passivation included) | Full (simultaneous passivation) | Partial (separate passivation needed) |
| Best Pipe Diameters | All sizes, especially large bore | 2″ and above (probe access) | All sizes, excels on small bore |
A few patterns jump out. Pickling paste has the lowest barrier to entry but the slowest throughput — a real problem when you’re processing 50+ welds per shift. Electrochemical units demand serious upfront investment, yet the per-weld consumable cost is the lowest of the three, and speed is unmatched. For shops running high volumes of sanitary tubing, that $4,000 machine often pays for itself within 3–6 months.
Mechanical methods sit in a tricky middle ground. They’re fast and cheap, but they can’t restore the passive chromium oxide layer on their own. According to ASTM A380, mechanical cleaning must be followed by chemical passivation to meet corrosion resistance standards — an extra step that eats into the time savings. Thin-wall tubing (under 1.5 mm) also demands a careful hand; aggressive grinding removes too much material and creates stress risers.
The right choice depends on your production volume, spec requirements, and pipe geometry. High-mix shops often keep all three methods on hand, switching based on the job.
Safety Precautions When Using Acid-Based and Electrochemical Cleaners
Acid burns don’t announce themselves. Hydrofluoric acid (HF)—the active ingredient in most pickling pastes—penetrates skin painlessly at first, then destroys tissue and leaches calcium from bone hours later. Anyone learning how to clean colored welds on stainless steel pipe needs to treat chemical safety as non-negotiable, not an afterthought tacked onto a job briefing.
PPE for Acid-Based Products
At minimum, wear acid-resistant gloves rated for HF exposure (neoprene or butyl rubber, not standard nitrile), a full-face shield, chemical splash goggles, and a rubber apron. Keep calcium gluconate gel within arm’s reach—this is the frontline antidote for HF skin contact. Apply it immediately and seek emergency medical attention, even if the affected area looks minor. The OSHA hydrofluoric acid safety guidelines specify that delayed treatment of HF burns can result in systemic fluoride poisoning affecting the heart.
Ventilation and Confined Spaces
Pickling generates nitric oxide and fluoride fumes. Working inside or around pipe systems in enclosed areas demands forced-air ventilation or supplied-air respirators—not just a dust mask. If the pipe run sits inside a vessel or trench, treat it as a confined-space entry requiring atmospheric monitoring, a standby attendant, and a written permit.
Electrochemical System Hazards
Electrolyte solutions are less toxic than pickling paste, but the electrical component introduces its own risks. Wet hands plus 40 volts can cause involuntary muscle contraction. Always inspect pad leads for frayed insulation, use a GFCI-protected power source, and never operate the unit while standing in pooled water.
Chemical Disposal
Spent pickling residue is classified as hazardous waste in most jurisdictions. Neutralize rinse water with sodium bicarbonate until pH reaches 6–9 before disposal, and collect paste residue in labeled, acid-resistant containers for licensed hazardous waste haulers. Dumping rinse water into storm drains carries fines that can exceed $25,000 per violation under the Clean Water Act.
How to Prevent Weld Discoloration with Proper Back Purging
Prevention beats correction every time. Knowing how to clean colored welds on stainless steel pipe is valuable, but eliminating the discoloration before it forms saves hours of post-weld labor and preserves the chromium oxide layer that gives stainless its corrosion resistance. Back purging is the single most effective preventive measure, and getting it right comes down to gas selection, flow control, and zone isolation.
Gas Selection and Flow Rate Setup
Argon is the default back purge gas for stainless steel pipe welding—it’s heavier than air, inert, and widely available. Nitrogen works too, particularly on austenitic grades like 304 and 316, and costs roughly 60% less per cubic foot. For duplex or super duplex stainless, stick with argon exclusively; nitrogen can alter the ferrite-austenite balance in those alloys. Flow rates between 20–35 CFH work for most pipe diameters under 6 inches, though you should reduce flow once the arc starts to avoid turbulence that pulls ambient air into the purge zone.
Oxygen Thresholds and Dam Construction
The magic number is oxygen concentration. For critical pharmaceutical or semiconductor work, you need below 50 ppm before striking an arc. General industrial applications can tolerate up to 500 ppm, but anything above that produces visible heat tint. An inline oxygen analyzer—not guesswork—is the only reliable way to confirm levels. Purge dams made from water-soluble paper or inflatable silicone plugs isolate the weld zone, keeping purge volume small and gas consumption manageable. Position dams 6–12 inches from either side of the joint, and tape any gaps at pipe fit-ups with aluminum foil tape. The American Welding Society provides detailed guidance on acceptable oxygen levels for various service environments.
Solar Flux as a Secondary Shield
Solar flux paste, brushed onto the root side before welding, acts as a backup oxygen barrier. It melts during welding and forms a protective glass-like barrier that peels off after cooling. The result isn’t perfect, but it typically limits discoloration to light straw or gold tones instead of heavy blue or black oxide. That difference matters: light tint responds to a quick electrochemical pass, while dark tint often demands full pickling treatment. Think of it as insurance, not a substitute.
Which Cleaning Method Meets Food-Grade and Pharmaceutical Standards
Regulated industries don’t leave weld quality to interpretation. The ASME BPE (Bioprocessing Equipment) standard defines acceptable heat tint levels using a color chart that ranges from straw yellow (acceptable in some zones) to blue and black (rejected outright). Specifically, ASME BPE Table DT-3 sets the threshold: welds in product-contact zones must show no discoloration darker than a light straw, roughly corresponding to an oxide thickness under 30 nanometers. Anything beyond that signals chromium depletion severe enough to compromise the passive layer.
FDA expectations reinforce this. Surface finishes on product-contact areas typically require 20–25 Ra µin (0.5–0.6 Ra µm) or better, electropolished. 3-A Sanitary Standards go further by mandating that all surfaces be “free of pits, crevices, and imperfections that could harbor bacteria.” A mechanically abraded weld—even one that looks clean—can leave micro-scratches that trap biofilm. That’s the core reason mechanical methods alone fail these audits.
When figuring out how to clean colored welds on stainless steel pipe destined for dairy, pharma, or biotech service, chemical treatment is essentially non-negotiable. Pickling followed by passivation restores the chromium-to-iron ratio at the surface, rebuilding the passive oxide that mechanical grinding destroys. Electrochemical cleaning achieves similar chemistry with tighter process control and less surface disruption, making it popular for orbital-welded tubing where surface roughness budgets are razor-thin.
Mechanical polishing can serve as a preliminary step—removing heavy scale before chemical treatment—but it cannot stand alone. Auditors verify passivation results through ferroxyl testing (ASTM A380) or XPS analysis, both of which detect residual free iron that grinding leaves behind. Skip the chemistry, and you’ll fail the test. It’s that binary.
Frequently Asked Questions About Cleaning Weld Discoloration on Stainless Steel
Does vinegar or household acid remove heat tint from stainless steel?
Not effectively. White vinegar (about 5% acetic acid) and citric acid solutions can remove light surface staining, but they lack the strength to dissolve the chromium-depleted oxide layer underneath heat tint. Pickling requires a mix of nitric and hydrofluoric acid at concentrations far beyond anything in your kitchen. Household acids might make the color less visible, but the compromised passive layer stays intact—meaning corrosion risk remains.
How do you clean discoloration inside a pipe bore?
This is one of the trickiest aspects of learning how to clean colored welds on stainless steel pipe. For small-diameter pipe (under 2″), circulating a pickling solution through the bore for 20–60 minutes is the most reliable approach. Larger bores allow access with electrochemical wand extensions or flexible abrasive tools. In pharmaceutical applications, some fabricators use specialized internal electropolishing rigs that reach weld joints deep inside piping systems.
Does light straw color actually need removal?
It depends on the application. A light straw tint (AWS D18.2 Level 1) indicates minimal oxidation and retains most of its corrosion resistance. General industrial service? Probably fine. But food-grade, pharma, or high-purity gas systems governed by ASME BPE standards typically require complete removal of any visible discoloration, straw included.
How long does passivation take after pickling?
Natural passivation begins immediately on contact with oxygen and reaches a functional protective layer within 24–48 hours. Accelerated passivation using nitric or citric acid baths typically runs 20–30 minutes at ambient temperature. Most specs call for a minimum 30-minute immersion to ensure consistent chromium oxide reformation across the cleaned surface.
Is laser cleaning viable for stainless steel pipe welds?
Laser ablation systems can remove heat tint without chemicals or abrasives, and they’re gaining traction in aerospace and precision manufacturing. The catch: equipment costs start around $50,000–$80,000, and access geometry on pipe welds—especially small diameters or tight elbows—limits practical use. For high-volume shop work on accessible joints, laser cleaning is genuinely promising. For field work or complex piping, it’s not there yet.
See also
Is Electrolytic Weld Cleaning Safe for Stainless Steel?
Single pendulum and double pendulum laser welding joints
How to Weld 304 Stainless Steel Thin Sheet: Step-by-Step Guide


