Heat tint on a stainless steel weld isn’t just cosmetic — even a light straw-colored oxide layer can reduce corrosion resistance by up to 80%, according to testing aligned with ASTM A380 cleaning standards. If you’re looking for how to remove heat tint from stainless steel weld zones, the core options are chemical pickling, electrochemical cleaning, or mechanical abrasion — each with trade-offs in speed, cost, and how well they restore the passive chromium oxide layer. This guide breaks down every method step by step, explains the science behind why heat tint damages your steel, and helps you pick the right approach for your specific application.
What Causes Heat Tint on Stainless Steel Welds
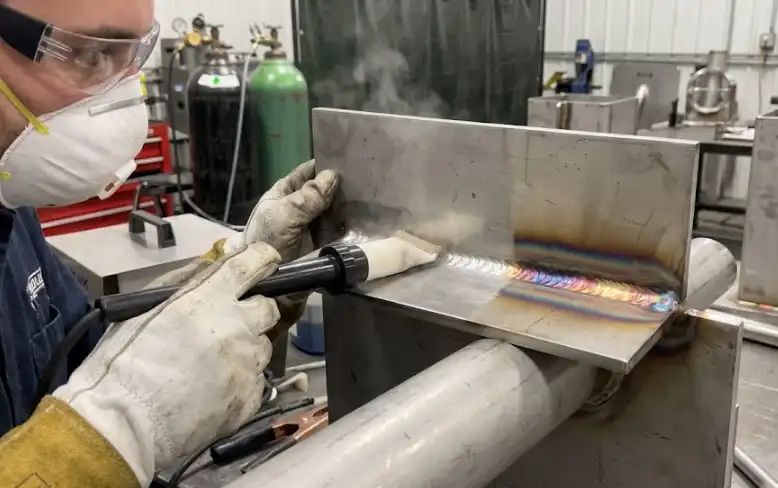
Stainless steel gets its corrosion resistance from a thin, invisible chromium oxide layer — roughly 1 to 5 nanometers thick. During welding, the heat-affected zone (HAZ) reaches temperatures well above 300°C, and atmospheric oxygen reacts aggressively with the exposed metal surface. The result is a thickened, discolored oxide layer that we call heat tint. This isn’t a surface coating sitting on top of the steel; it’s a chemically altered zone where the protective passive layer has been fundamentally disrupted.
The color you see tells you exactly how hot the metal got. Straw yellow appears around 290–370°C. Gold shifts in at roughly 370–450°C. As temperatures climb past 450°C, you’ll see purple, then deep blue above 540°C, and eventually a dull gray past 600°C. Each color corresponds to a specific oxide thickness and composition, with the darker shades indicating a progressively chromium-depleted zone beneath the surface. According to research published by the British Stainless Steel Association, the chromium content in the oxide layer drops significantly as tint color darkens — sometimes falling below the 10.5% threshold needed for effective passivation.
This matters far beyond aesthetics. The depleted zone under a dark blue or gray tint has measurably less chromium available to reform a stable passive film. That’s the core reason anyone searching for how to remove heat tint from stainless steel weld needs to understand what’s actually happening beneath the discoloration. You’re not just cleaning up color. You’re dealing with compromised metallurgy.
Oxygen exposure is the key variable. Proper back-purging with argon during TIG welding can keep the root side nearly silver, while the same weld without purge gas turns dark blue in seconds. The difference in long-term corrosion performance between those two outcomes is dramatic — and it’s why removal method selection matters so much.
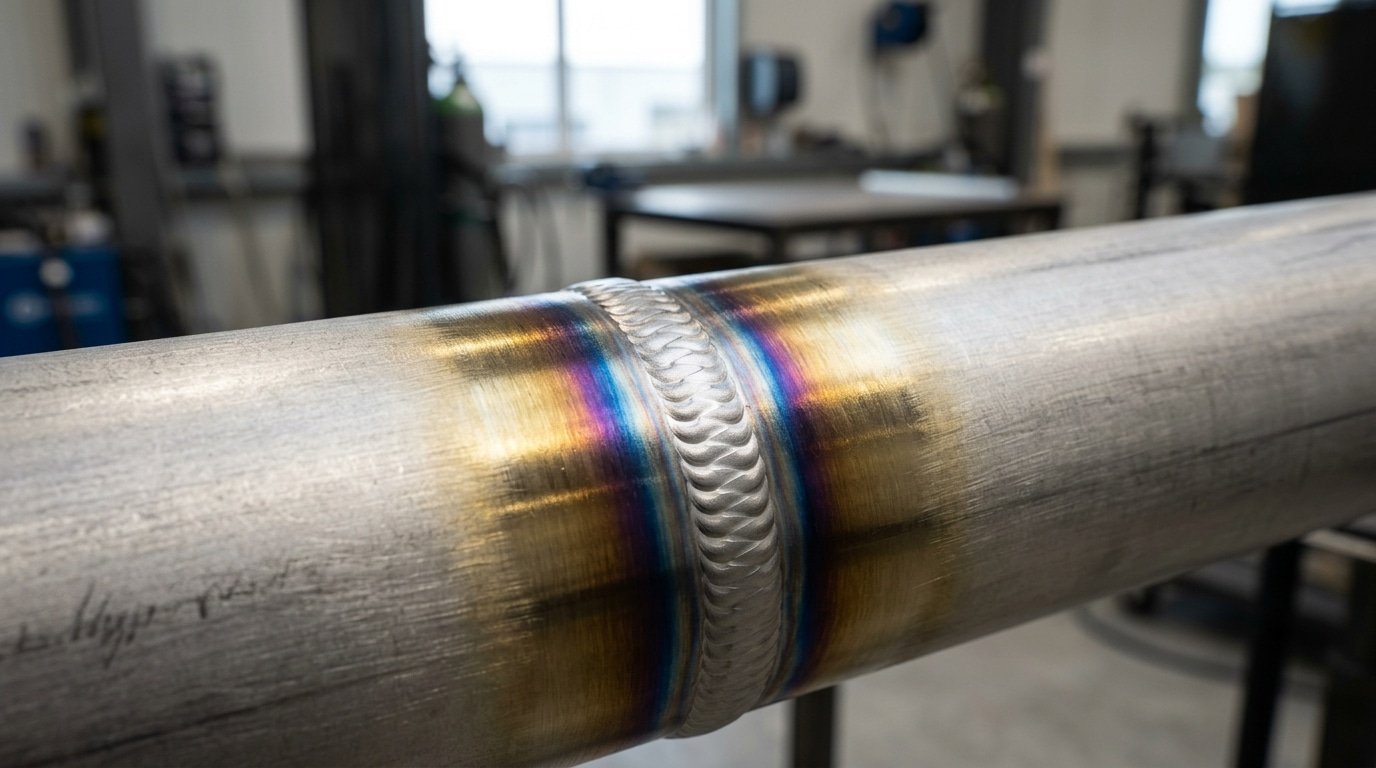
Heat tint color spectrum on stainless steel weld showing straw yellow to dark blue discoloration
Why Heat Tint Compromises Corrosion Resistance
That rainbow discoloration isn’t just cosmetic damage. Beneath every visible heat tint sits a chromium-depleted zone where the base metal has sacrificed its protective chromium to form thick, defective oxides on the surface. This depleted layer can extend 20–30 micrometers deep, and the chromium concentration in that zone can drop well below the 10.5% minimum needed to maintain passivity. The result? Bare, reactive iron exposed to whatever environment the steel was designed to resist.
Pitting corrosion strikes first. Chloride ions — present in everything from seawater to cleaning chemicals — penetrate the weakened oxide and attack the iron-rich substrate underneath. Crevice corrosion follows a similar mechanism but accelerates in tight geometries near weld joints where stagnant fluid traps aggressive chemistry against the compromised surface. Stress corrosion cracking is the most dangerous failure mode: it propagates silently through the chromium-depleted grain boundaries under tensile load, sometimes causing catastrophic rupture with zero visible warning.
Industry standards treat this threat seriously. ASTM A380 provides detailed guidance on cleaning and descaling stainless steel surfaces, explicitly addressing heat tint removal as essential for restoring corrosion performance. ASME BPE goes further — in pharmaceutical and bioprocessing systems, it specifies acceptable discoloration levels on a numbered scale, and anything beyond a light straw color (typically level 4 or darker) requires remediation before the system can be qualified.
Food processing and chemical plants operate under similar mandates. A heat-tinted weld in a CIP (clean-in-place) system becomes a harbor for bacterial biofilm. In a chlorinated process line, it becomes a future leak. Understanding how to remove heat tint from stainless steel weld zones isn’t optional in these industries — it’s a compliance requirement backed by documented inspection and testing protocols.
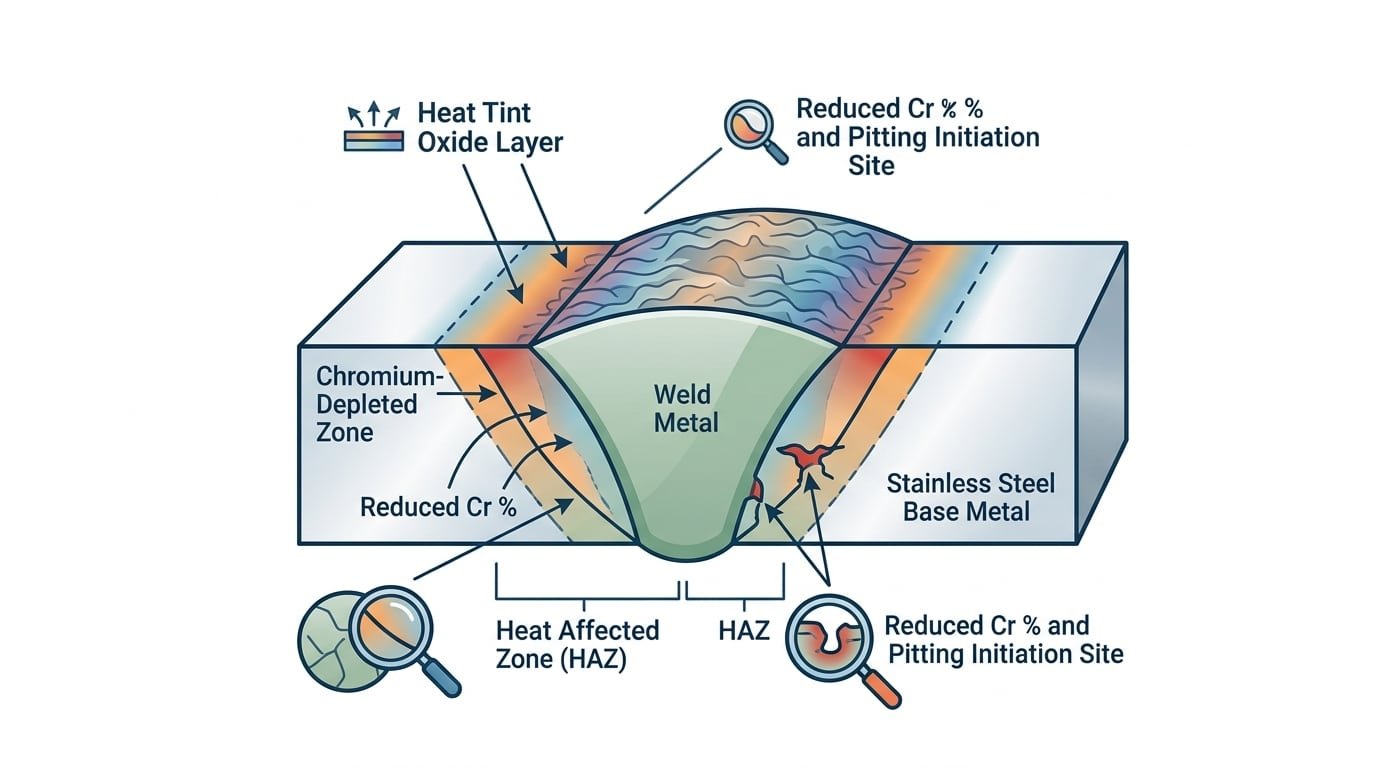
Diagram of chromium-depleted zone beneath stainless steel weld heat tint showing corrosion vulnerability
Chemical Removal Methods — Pickling Paste and Acid Solutions
Pickling remains the gold standard for how to remove heat tint from stainless steel weld zones when corrosion performance matters. The chemistry is straightforward: a blend of nitric acid (HNO₃) and hydrofluoric acid (HF) dissolves the chromium-depleted oxide layer, strips embedded iron, and allows a fresh passive film to regenerate on clean base metal. Most commercial pickling pastes use roughly 8–20% HNO₃ and 1–5% HF by weight, though exact formulations vary by manufacturer.
Step-by-Step Pickling Paste Application
Start by degreasing the weld area with a solvent or alkaline cleaner — residual oil prevents acid contact and creates uneven results. Apply the paste in a thick, even coat (about 3 mm) using a nylon brush, covering the heat-affected zone plus at least 25 mm beyond the visible tint boundary. Light straw-colored tint typically needs 15–30 minutes of dwell time. Darker blues and grays demand 45–60 minutes, sometimes longer at ambient temperatures below 15 °C.
Don’t let the paste dry out. On vertical surfaces or in warm shops, reapply or mist lightly with water to keep the acid active. Once dwell time is up, scrub the residue off with a nylon brush under running water, then rinse thoroughly — ASTM A380 recommends achieving a rinse water pH above 4.0 before stopping.
Immersion Acid Baths for Larger Components
For fittings, small assemblies, or pipe spools, immersion in a pickling tank (typically 10–15% HNO₃ + 1–3% HF at 40–60 °C) offers more uniform results than paste. Soak times range from 10 minutes for light discoloration to 30+ minutes for heavy tint. After removal, parts go into a neutralizing rinse — a dilute sodium bicarbonate solution works — followed by a final deionized water rinse to prevent chloride spotting.
One critical detail: always passivate after pickling. A 20–30 minute soak in 20–25% nitric acid solution rebuilds the chromium oxide layer to its full protective thickness. Skip this step and you’ve done half the job.
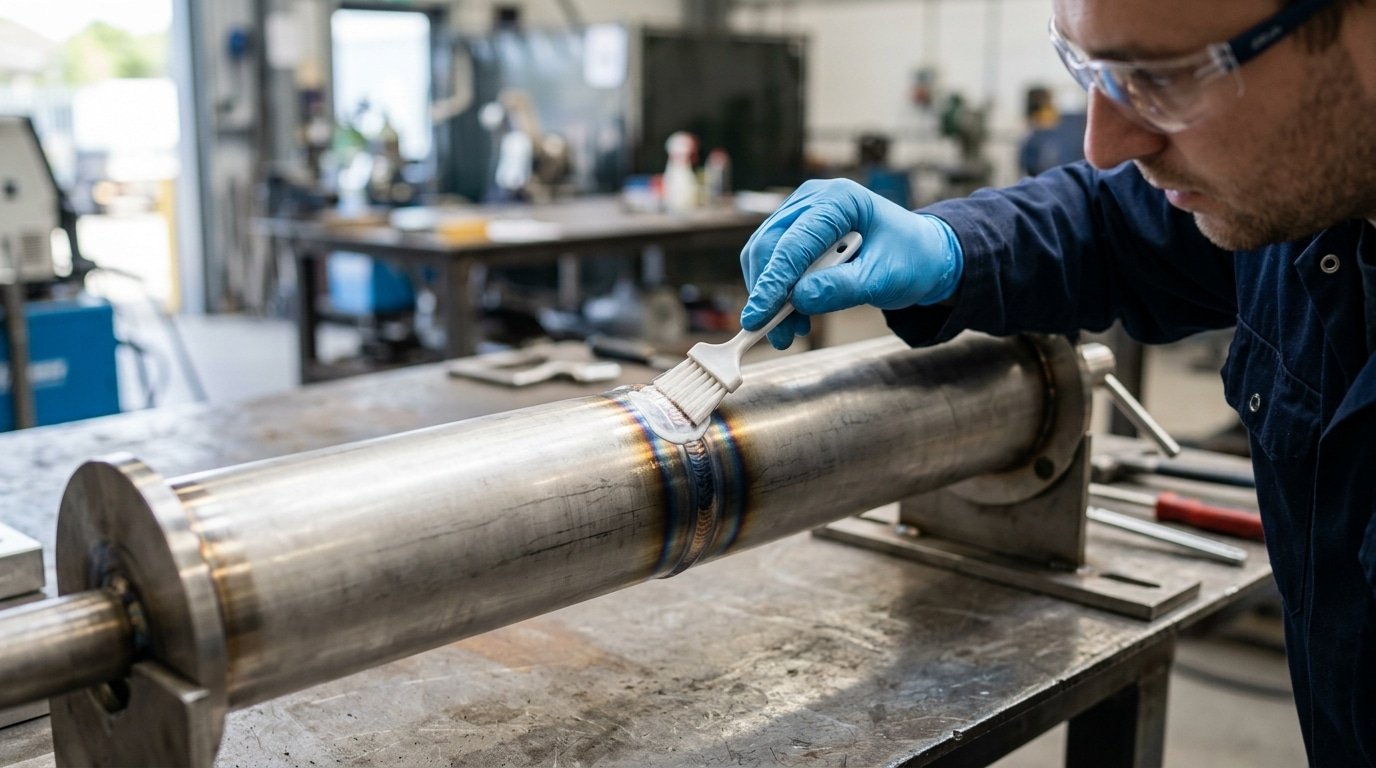
Applying pickling paste to remove heat tint from stainless steel weld on pipe
Electrochemical Weld Cleaning — How It Works and When to Use It
Electrochemical cleaning flips the script on traditional acid pickling. Instead of slathering paste and waiting 30–60 minutes, you drag a carbon fiber brush across the weld zone while low-voltage current and a phosphoric acid–based electrolyte do the heavy lifting. The process dissolves the chromium-depleted oxide layer in seconds, then immediately passivates the fresh surface underneath. One pass. No rinse-and-repeat cycle.
Here’s the basic mechanism: the machine supplies 10–40 volts AC through the brush tip, which is saturated with electrolyte solution. Contact with the stainless steel surface triggers a controlled electrochemical reaction that strips discolored oxides at the molecular level. The AC waveform matters — it alternates between a cleaning phase (removing contaminated oxide) and a passivation phase (rebuilding the protective chromium oxide film). Machines from manufacturers like Cougartron and Walter typically complete both steps in a single operation.
So when does electrochemical cleaning beat pickling? Thin-gauge stainless — 22 gauge or thinner — is the clearest use case. Prolonged acid exposure on material under 1 mm thick risks etching through or causing pitting. Electrochemical brushes give you precise, localized control. Field work is another strong scenario; carrying a 5 kg portable unit onto a job site is far simpler than managing open containers of hydrofluoric acid mixtures. The chemical hazard profile drops dramatically since phosphoric acid electrolytes are far less aggressive than HF/HNO₃ pickling blends.
For anyone figuring out how to remove heat tint from stainless steel weld joints on food-grade equipment, pharmaceutical piping, or architectural panels, electrochemical cleaning delivers a bright, uniform finish without the aggressive surface texture that pickling sometimes leaves behind. The tradeoff? Equipment cost. Entry-level units start around $2,000, and professional-grade systems run $4,000–$8,000. Electrolyte fluid adds ongoing expense at roughly $40–$80 per liter. For high-volume production shops, the per-weld cost drops quickly. For a one-off repair, renting or outsourcing makes more sense.

Electrochemical weld cleaning brush removing heat tint from a stainless steel weld using electrolyte solution
Mechanical Methods — Grinding, Flap Discs, and Scotch-Brite Finishing
Sometimes chemistry isn’t practical. Tight deadlines, field conditions, or client specs that prohibit acid use all push fabricators toward mechanical approaches for how to remove heat tint from stainless steel weld zones. Mechanical methods work fast, but they demand discipline — one wrong abrasive can do more harm than the heat tint itself.
The Cardinal Rule: Dedicated Stainless Abrasives Only
Every grinding disc, flap wheel, and wire brush that touches stainless must be reserved exclusively for stainless. A flap disc previously used on carbon steel embeds microscopic iron particles into the surface, creating rust spots within days. Mark your stainless tools clearly. Store them separately. No exceptions.
Grit Progression for Flap Discs
Start at 60-grit only if the tint is heavy and accompanied by thick oxide scale. For typical light-to-moderate discoloration, 80-grit is aggressive enough. Step through 120, then finish at 180 or 220 to restore a uniform grain pattern. Skipping grits leaves deep scratches that trap contaminants and reduce fatigue life. Each pass should remove the scratch pattern of the previous grit — nothing more.
Over-grinding is a real risk. On 1.5 mm wall tubing, removing just 0.2 mm per side drops your effective thickness by over 25%. Use a light touch and let the abrasive do the cutting. The British Stainless Steel Association recommends measuring wall thickness before and after mechanical finishing on critical applications.
Non-Woven Pads and Wire Brushes
Scotch-Brite-style pads (medium or fine grade) excel at blending light straw-colored tint without altering the surface profile. They’re ideal for final cosmetic passes. Stainless steel wire brushes can remove loose oxide, but they burnish rather than cut — meaning they may smear contamination over the surface instead of removing it. Use wire brushes for prep, not as a standalone solution.
Comparing Removal Methods by Speed, Cost, Surface Finish, and Corrosion Performance
Choosing how to remove heat tint from stainless steel weld zones comes down to four variables: how fast you need it done, what you can spend, how the surface needs to look, and whether the joint must survive aggressive service environments. No single method wins across every category.
| Factor | Pickling Paste | Electrochemical | Mechanical (Flap Disc / Scotch-Brite) |
|---|---|---|---|
| Speed per weld joint | 20–60 min dwell + rinse | 3–8 min per linear foot | 1–5 min per linear foot |
| Equipment cost | $30–$80 per jar of paste | $2,000–$6,000 for a unit | $15–$50 per disc/pad |
| Consumable cost per joint | ~$1–$3 | ~$0.50–$1.50 (electrolyte + pads) | ~$0.75–$2 |
| Surface finish quality | Excellent — preserves mill finish | Very good — slight etching possible | Variable — risk of scratches or directional marks |
| Post-treatment corrosion resistance | Highest — full passivation restored | High — passivation occurs simultaneously | Lowest — no chemical passivation unless followed by acid treatment |
A few patterns jump out. Mechanical methods are the fastest and cheapest upfront, but they leave the chromium-depleted zone largely intact beneath a polished surface. That’s a problem for pharmaceutical, food-grade, or marine applications where pitting resistance actually matters. Pickling paste delivers the best corrosion performance yet demands patience — and safe acid handling. Electrochemical cleaning sits in the middle: fast enough for production work, gentle on the surface, and it passivates in one step. The International Molybdenum Association notes that electrochemical methods can restore pitting resistance to near-parent-metal levels when used correctly.
Budget-conscious shops often combine approaches. Grind the heavy scale first, then hit the weld with pickling paste or an electrochemical brush. This hybrid workflow cuts dwell time roughly in half while still achieving full passivation — a practical compromise when neither speed nor corrosion performance can be sacrificed.
Safety Precautions When Using Pickling Acids on Stainless Steel
Pickling paste kills. That’s not hyperbole. Most formulations contain 5–20% hydrofluoric acid (HF) alongside nitric acid, and HF penetrates skin without immediate pain. A splash covering just 2% of body surface area — roughly the size of your palm — can cause fatal hypocalcemia by binding calcium ions in your bloodstream. Knowing how to remove heat tint from stainless steel weld zones means nothing if you skip the safety protocols that keep you alive.
Required PPE and Ventilation
Full-face shield, chemical splash goggles, acid-resistant gloves (neoprene or butyl rubber, not latex), and a chemical-resistant apron over long sleeves are non-negotiable. In enclosed spaces, forced-air ventilation must maintain airborne HF concentrations below OSHA’s permissible exposure limit of 3 ppm as an 8-hour TWA. Field work often demands supplied-air respirators because natural ventilation alone rarely meets that threshold near active pickling operations.
Spill Containment and Waste Disposal
Keep calcium gluconate gel within arm’s reach — it’s the frontline antidote for HF skin contact. Contain all rinse water and spent acid in secondary containment trays. Neutralize waste to a pH between 6 and 9 using soda ash or lime before disposal, and never pour acid waste into storm drains. Under EPA RCRA regulations, spent pickling solutions containing fluoride above 150 mg/L classify as hazardous waste, requiring licensed haulers and manifest documentation.
Emergency First-Aid Steps
If HF contacts skin, flush immediately with water for 5 minutes, then apply 2.5% calcium gluconate gel liberally and massage it into the affected area. Don’t wait for symptoms — delayed pain is HF’s most dangerous trait. Call emergency services even for small exposures. For eye contact, irrigate continuously for at least 15 minutes while someone dials 911. Every shop running pickling operations should post an HF-specific safety data sheet at the workstation, not buried in a filing cabinet.
How to Verify Corrosion Resistance After Heat Tint Removal
Removing the discoloration is only half the job. The real question: did the passive chromium oxide layer actually reform? Visual cleanliness doesn’t guarantee corrosion resistance, and plenty of welds that look perfect fail within months because nobody tested the surface. After you remove heat tint from stainless steel weld zones, verification testing separates guesswork from documented proof.
The Ferroxyl Test (ASTM A380)
This is the most widely specified field test for free iron contamination. You apply a potassium ferricyanide solution to the cleaned surface and watch for blue spots, which indicate iron particles embedded in or on the stainless steel. Results appear within 15–30 seconds. Any blue reaction means the passive layer is compromised at that location, and retreatment is necessary. ASTM A380 outlines the full procedure, including solution preparation and acceptance criteria.
Copper Sulfate Test
Less common but still useful. A copper sulfate solution applied to the surface deposits a copper-colored film wherever free iron exists. It’s cheaper than ferroxyl testing and requires no specialized reagents beyond basic lab-grade copper sulfate. The downside? Slightly lower sensitivity compared to ferroxyl, so it’s better suited for non-critical applications.
Visual Inspection and Documentation
For code-compliant work — pharmaceutical piping, food-grade vessels, nuclear components — visual inspection follows specific color-chart standards. AWS D18.2, for instance, requires heat tint no darker than a light straw color (sample 4 or lighter on the Sandvik color chart) on the weld root side. Document everything: test method used, location, date, pass/fail result, and the inspector’s credentials. Electrochemical testing with handheld probes that measure open-circuit potential offers a quantitative alternative, giving millivolt readings that correlate directly to passive layer integrity. Readings above +100 mV (vs. SCE) generally indicate adequate passivation.
Skip verification, and you’re gambling. A 30-second ferroxyl test costs almost nothing. A corrosion failure in service costs everything.
Pro Tips for Minimizing Heat Tint During Welding
Prevention beats cleanup every time. The less oxidation you create during welding, the less time and money you spend figuring out how to remove heat tint from stainless steel weld joints afterward. A few deliberate adjustments to your welding setup can slash post-weld treatment time by 80% or more.
Back Purging Is Non-Negotiable
Flooding the weld root side with inert gas — typically argon at 99.995% purity — prevents atmospheric oxygen from reaching the heated zone. For pipe welding, seal both ends with purge dams and maintain a flow rate of 20–30 CFH until the joint cools below 300°F. Oxygen levels inside the purge zone should stay below 50 ppm for critical applications; a weld purge monitor pays for itself fast. Nitrogen works as a cheaper alternative on austenitic grades like 304 and 316, though argon remains the safer universal choice.
Trailing Shields and Heat Management
A trailing shield attaches behind your TIG torch and blankets the freshly welded bead with argon as it cools. This alone eliminates most topside discoloration. Pair it with disciplined heat input — keep interpass temperatures under 350°F for austenitic stainless, and use pulse settings to reduce overall energy delivered to the joint. Faster travel speeds with tighter arc lengths also help. According to Lincoln Electric’s stainless steel welding guide, controlling heat input is the single most effective variable for reducing oxidation.
Solar Flux and Backing Paste
When back purging isn’t feasible — think open root welds on installed piping — solar flux paste applied to the backside acts as a chemical shield. It melts during welding and forms a protective glass-like barrier that peels off after cooling. The result isn’t perfect, but it typically limits discoloration to light straw or gold tones instead of heavy blue or black oxide. That difference matters: light tint responds to a quick electrochemical pass, while dark tint often demands full pickling treatment.
Frequently Asked Questions About Removing Heat Tint from Stainless Steel
Does light straw-colored tint actually need removal?
It depends on the environment. A pale straw tint (around 300°C oxide) causes minimal chromium depletion — typically less than 2% loss in the affected zone. For indoor, dry-service applications, many fabricators leave it alone. But if the weld faces chlorides, moisture, or temperatures above 60°C, even that thin oxide layer reduces pitting resistance enough to matter. The British Stainless Steel Association recommends removal for any service classified as moderately or highly corrosive.
Can vinegar or household acids remove heat tint?
White vinegar (about 5% acetic acid) can lighten very faint discoloration on 304 stainless with extended soaking — think 12+ hours. It won’t touch blue or dark purple tint. Citric acid at 10% concentration performs better, but still falls far short of nitric-hydrofluoric pickling paste. If you’re figuring out how to remove heat tint from stainless steel weld areas on a critical application, household acids aren’t the answer.
How do you clean heat tint inside tubes?
Recirculating pickling solution is the standard approach. A dilute nitric-HF acid mix gets pumped through the tube at controlled flow rates, dissolving the oxide layer uniformly. For small-diameter tubing under 25 mm, some shops fill and cap the tube, rotating it periodically. Purging with argon during welding remains the far easier solution — prevention eliminates the problem entirely.
Is passivation alone enough?
No. Passivation rebuilds the chromium oxide layer but cannot remove the thick, chromium-depleted scale that constitutes heat tint. You need to pickle first, then passivate. Skipping the pickling step is like painting over rust.
What happens if heat tint stays on outdoor stainless?
Pitting corrosion typically initiates within 6–18 months in coastal or industrial atmospheres. The chromium-depleted zone beneath the tint acts as an anode, and once a pit nucleates, it accelerates. Left long enough, through-wall perforation follows — an expensive failure that proper post-weld cleaning prevents for a fraction of the repair cost.
See also
What is the average width of the heat affected zone for steel welding
The Complete Guide to Stainless Steel Welding Techniques
Laser Welding of 304 vs 316 Stainless Steel
How to Tell Aluminum from Stainless Steel: Shop Guide
Weld Cleaning Machine for Carbon Steel – How to Choose the Right One


