Visual inspection is the most used welding inspection method. Welders and inspectors like this method because it is easy and works well. Many experts say to use visual inspection for every weld in some jobs. This helps find surface problems early.
Knowing about this method is important. It saves money, finds problems early, and lowers risks.
| Evidence Point | Explanation |
|---|---|
| Cost-effectiveness | Visual inspection finds defects first. This stops expensive repairs. |
| Early detection | It spots surface problems before they get worse. |
| Human oversight | Skilled inspectors check everything. This is key for good quality. |
If you learn to use visual inspection, you help keep welds safe and strong.
Key Takeaways
- Visual inspection is the most used welding inspection method. It is simple to do and helps spot surface problems fast. This method saves money because it finds issues early. It stops expensive repairs from happening later. Inspectors must get the area ready before they start. They should use the right tools like magnifying glasses and flashlights. These tools help them check welds well. Inspectors look for defects like cracks, undercuts, and porosity. Finding these problems early keeps welds safe and strong. Inspectors should keep learning and follow set rules. This makes their inspections better and more correct.
Overview of Welding Inspection Methods
Main Types of Inspection
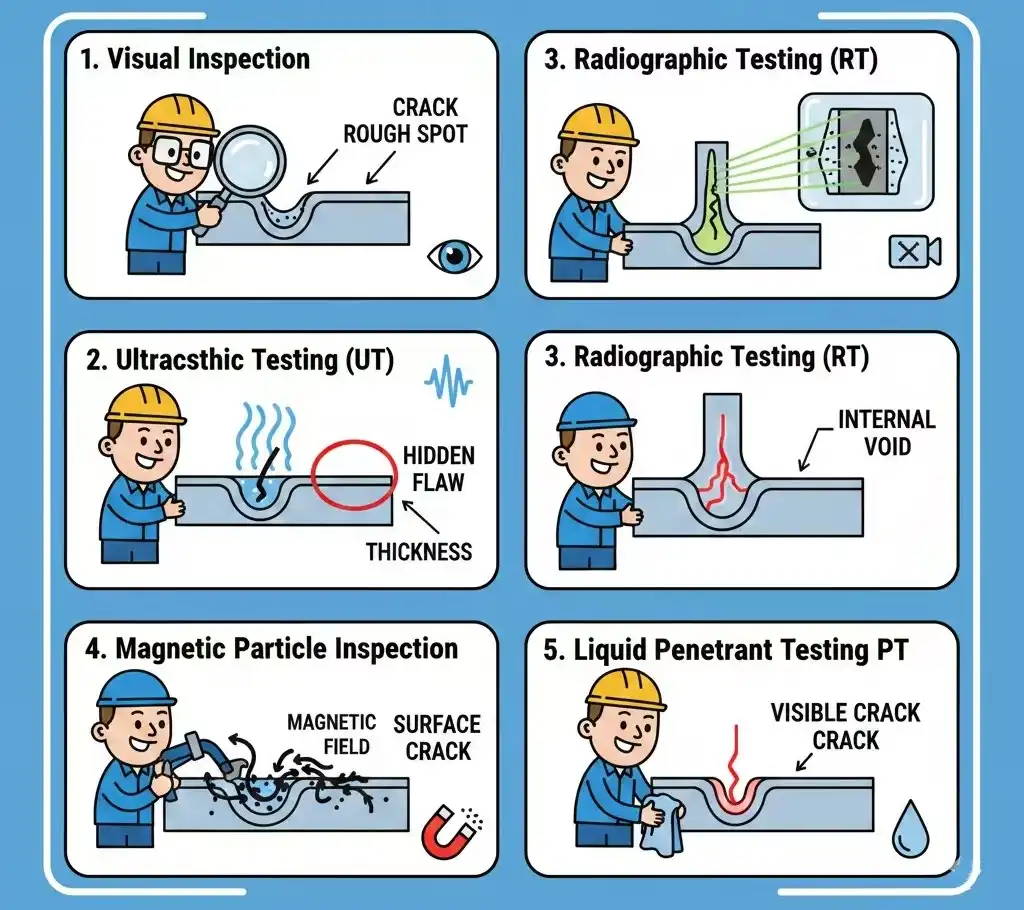
When you check welds, you use different methods. Each method helps you find problems and keep things safe. There are five main types:
- Visual Inspection: You look at the weld with your eyes or simple tools. You check for cracks or rough spots. This is usually the first thing you do.
- Ultrasonic Testing (UT): You use sound waves to look inside the weld. This helps you find hidden problems or measure how thick it is.
- Radiographic Testing (RT): You use X-rays or gamma rays to make pictures of the inside. This shows you problems you cannot see from the outside.
- Magnetic Particle Inspection: You make the weld magnetic and put iron dust on it. If there are cracks, the dust gathers there and shows you the spot.
- Liquid Penetrant Testing (PT): You put colored liquid on the weld. The liquid goes into tiny cracks. When you wipe the weld, you can see the cracks.
You can see how these methods compare in the table below:
| NDT Method | Description | Advantages/Limitations |
|---|---|---|
| Visual Inspection (VT) | Uses your eyes or tools to find surface problems. | Cheap and easy; only finds problems on the surface. |
| Ultrasonic Testing (UT) | Uses sound waves to find inside problems and measure thickness. | Good for inside problems; needs someone trained to use it. |
| Radiographic Testing (RT) | Uses X-rays or gamma rays to make pictures of the inside. | Finds inside problems; needs safety steps and special pictures. |
| Magnetic Particle Testing | Uses magnets to find cracks on or near the surface. | Very good for surface cracks; only works on some metals. |
| Penetrant Testing (PT) | Uses liquid to show cracks on the surface. | Works on many metals; can give wrong results on rough welds. |
Why Visual Inspection Leads
People use visual inspection more than other methods. There are many reasons for this:
- Visual inspection does not hurt the weld. You can check it fast.
- You can see cracks, holes, or rough spots right away.
- Inspectors learn how to spot small problems.
- Visual inspection helps keep welds strong and safe.
- Many jobs use this method because it is quick and cheap.
- Trained inspectors in places like oil and gas find most problems before using harder tests.
VT is commonly used as a first-line surface check, useful for spotting visible defects early and guiding whether follow-up nondestructive tests (e.g., UT or RT) are needed.
Visual Welding Inspection Method
Inspection Steps
You can use a simple process for the visual welding inspection method. This helps you spot problems and keep welds safe.
- Prepare the Area
Clean the weld. Remove dirt or paint. Use good lighting to see well. - Check the Weld Appearance
Look at the weld for cracks or holes. Check for rough or uneven spots. The weld should look smooth and even. - Measure the Weld Size
Use gauges or rulers to check the weld size. Make sure it matches the specifications. - Inspect for Surface Defects
Use magnifiers or mirrors to find small defects. Look at places that are hard to reach. - Record Your Findings
Write down any problems you see. Take photos if you need to.
Tip: Always pass a vision test before inspecting. This helps you see small defects.
Inspectors need the right qualifications for the welding inspection method. You can see what is needed in the table below:
| Education Level | Required Work Experience |
|---|---|
| High school diploma or equivalent | 2 years |
| At least 8th grade education | 4 years |
| Less than 8th grade education | 6 years |
| 8th grade + 1 year vocational training | 3 years |
| 2 years post-high school education | 6 months |
You must also do these things:
- Pass a vision test.
- Show proof of your education and work experience.
- Get training in weld inspection.
- Show you can see well.
- Pass written and hands-on exams.
- Keep working in the field.
- Retest every nine years.
- Hold one of these certifications: CAWI, CWI, or SCWI.
For traceable authority, refer to major codes and qualification standards: AWS D1.1 Structural Welding Code — Steel (see Clause 6 visual acceptance; Clause 8 NDT acceptance, D1.1 — 2020/2025 editions), AWS QC1 / AWS B5.1 for Certified Welding Inspector (CWI) qualification and re‑certification guidance, ISO 17635: Non‑destructive testing of welds — General rules for NDT practices, and ASME BPVC Section V: Nondestructive Examination for method and procedure requirements. Check the publishers’ official pages (AWS, ISO, ASME) for the exact clause text and latest edition (accessed Feb 2026).
Tools and Equipment
You need the right tools for a good visual welding inspection method. These tools help you find defects and measure welds.
- Magnifying glasses and borescopes help you see tiny cracks or holes.
- Calipers, fillet weld gauges, and weld size gauges help you measure welds.
- Flashlights help you see in dark places.
- Magnifiers let you look closely at the weld.
- Mirrors help you check hard-to-reach spots.
Some advanced tools make inspections better. You can use the WiKi-SCAN 2.0 Laser Weld Gauge and the ZEISS INSPECT’s Weld Check app. These tools give accurate measurements and find defects automatically.
| Tool | Functionality |
|---|---|
| WiKi-SCAN 2.0 Laser Weld Gauge | Measures weld joints and finds defects automatically. |
| ZEISS INSPECT’s Weld Check app | Uses a standard process and gives clear results for inspection. |
The Weld Check app gives reliable results. It uses a standard process so there is no guessing.
You get these benefits:
- Small and easy to use design.
- Accurate checks of weld joints.
- Finds defects automatically with little training.
- Fewer repairs and less extra welding.
Magnifying glasses and rulers help you look closely at welds. You can check if the weld is strong and meets the rules. These tools make the welding inspection method more trustworthy.
Common Surface Defects
You can find many surface defects with the visual welding inspection method. Here are the most common ones:
- Cracks
- Undercuts
- Overlaps
- Porosity
- Spatter
- Burn-through
You should look for these defects every time you inspect. If you find them early, you can fix problems before they get worse. This keeps welds strong and safe.
Benefits and Drawbacks
Advantages of Visual Inspection
Visual inspection has many good points for welds. This welding inspection method is easy and works well. You do not need fancy tools or lots of training. You can check welds fast and keep work going.
Here is a table with the main good points:
Inspectors should complete baseline training and hold the qualifications required by the project or applicable standards (for example, AWS or ISO), rather than implying that little or informal training is sufficient.
You can look at how visual inspection compares to other ways:
| Inspection Method | Cost | Speed | Reliability |
|---|---|---|---|
| Visual Inspection | Low | Fast | Depends on person |
| Ultrasound Inspection | High | Slow | Trustworthy |
| X-ray Inspection | High | Slow | Very trustworthy |
| Dye Penetrant/MAG Particle | Low | Slow | Works well |
Tip: Try visual inspection first. It helps you find most surface problems before harder tests.
Limitations and When to Use Other Methods
Visual inspection cannot find every problem. You only see what is on the outside. You cannot spot hidden problems inside the weld. Good lighting is needed. If it is dark, you might miss things. People can get tired or make mistakes and miss defects.
Here are the main limits:
- You only check what you see on the outside.
- You cannot find deep or hidden problems.
- You need bright light to see well.
- People can make mistakes when inspecting.
Sometimes, you need other ways to find all problems. Use ultrasonic testing to look inside the weld. Use radiographic testing to see how deep cracks go. Magnetic particle testing helps find surface and near-surface problems in special metals. Penetrant testing shows tiny cracks you cannot see with your eyes.
Note: Use advanced tests if you need to find hidden or big problems.
Practical Tips for Inspectors
Best Practices
You can follow some simple steps to make your visual welding inspections better. There are rules that tell you what to look for and how to check welds. The American Welding Society (AWS) and the International Organization for Standardization (ISO) make these rules. These rules help you know what to check and why it is important.
| Standard | Description | Importance |
|---|---|---|
| AWS D1.1 | Covers welding of structural steel for buildings and bridges. | Guides design, inspection, and qualification of welds. |
| ISO 9606-1 | Focuses on welder certification and general fabrication standards. | Ensures welders meet global safety and quality requirements. |
You should always use the right rule for your job. This makes your inspections fair and correct.
Avoiding Common Mistakes
Many inspectors make the same mistakes when they check welds. If you know these mistakes, you can stop them from happening. The table below shows mistakes and how to avoid them.
| Common Mistakes | How to Avoid It |
|---|---|
| Inadequate Pre-Weld Inspection | Check material compatibility, joint design, and cleanliness before welding. |
| Overlooking Heat-Affected Zone (HAZ) Issues | Use proper methods to assess the HAZ for weaknesses. |
| Relying Solely on Visual Inspection | Use other testing methods to find hidden defects. |
| Ignoring Welding Procedure Specification (WPS) Compliance | Make sure welders follow the approved WPS and all parameters. |
| Lack of Proper Documentation & Reporting | Keep detailed records of inspections and results. |
Tip: Always check your work twice and write down what you find. This helps you catch mistakes early.
Improving Accuracy
You can do a better job by learning more, using good tools, and working with others. Training teaches you how to find problems and not miss anything. Tools like drones and borescopes help you see places that are hard to reach. Special software helps you keep track of what you find.
- Make a learning plan for new inspectors.
- Let inspectors help make training guides.
- Give new inspectors a mentor to help them.
- Only let trained inspectors check welds.
- Keep learning new things to stay up to date.
📚 Keep learning and use the right tools. This helps you become a better inspector. You will help make welds safer and stronger.
Visual inspection is the most used welding inspection method. You can find surface defects fast and easily. This helps keep welds safe and strong. You look for cracks, undercut, and porosity. These are common problems in welds. The table below shows why this method is important:
Adjusted reliability wording (replace lines 154–156)
Reliability: The effectiveness of visual inspection is primarily determined by inspector qualification, written procedures, and inspection conditions—proper training and formal procedures greatly improve VT reliability.
Replaced table row (replace lines 220–221)
| Aspect | Description |
|---|---|
| Effectiveness | Suitable for indicating surface-level issues; not appropriate for reliably detecting internal defects. |
Use other tests like ultrasonic or X-ray to find hidden defects. Always use bright light and clean the weld before checking. Write down what you find each time. Keep learning new things and follow these steps to do better inspections.
FAQ
What is visual welding inspection?
Visual welding inspection means you look at the weld with your eyes or simple tools. You check for cracks, holes, or rough spots. This method helps you find problems early.
What tools do you need for visual inspection?
You need a flashlight, magnifying glass, ruler, and weld gauge. These tools help you see small defects and measure the weld size.
Tip: Clean the weld before you inspect.
What defects can you find with visual inspection?
You can find cracks, undercuts, porosity, spatter, and burn-through. These are surface problems.
- Cracks
- Holes
- Uneven welds
What should you do if you find a defect?
You should record the defect and tell your supervisor. Take a photo if possible.
Always follow your company’s rules for reporting problems.


