A single pass with an electrochemical weld cleaning system can remove heat tint from stainless steel in under 10 seconds per inch — roughly 15× faster than manual grinding and without destroying the passive chromium oxide layer that prevents corrosion. If you’ve been searching for weld cleaning before and after results, the visual difference is dramatic, but what matters more is what’s happening at the microscopic level: restored passivation, eliminated discoloration, and a surface that actually meets ASTM A967 standards. This guide breaks down real-world results across steel, aluminum, and carbon steel so you can see exactly what each method delivers — and where each one falls short.
What Weld Cleaning Actually Does to the Metal Surface
Every weld leaves behind evidence. Heat-tinted oxides, discoloration bands, and a compromised surface layer sit on top of what should be clean, corrosion-resistant metal. Weld cleaning strips all of that away — but the interesting part is how it does it, because the process goes far deeper than cosmetic improvement.
The dominant method is electrochemical cleaning. A low-voltage current passes through an electrolyte solution (typically phosphoric acid-based) and into the weld surface via a carbon fiber brush or pad. This current dissolves the chromium-depleted oxide layer that forms during welding — the same layer responsible for those familiar straw-yellow, blue, and purple heat tint colors. Simultaneously, the electrolyte promotes the formation of a new, chromium-rich passive layer. That fresh oxide film is only about 1–5 nanometers thick, but it’s the reason stainless steel resists corrosion in the first place.
Mechanical methods — grinding, wire brushing, flap discs — take a different route. They physically abrade the contaminated surface. Effective, yes. But they can embed iron particles, scratch the grain pattern, and leave micro-crevices where corrosion initiates. According to research published by the British Stainless Steel Association, mechanical cleaning alone often fails to restore full passivation compared to electrochemical treatment.
This distinction matters when you’re evaluating weld cleaning before and after results. A visually clean weld isn’t necessarily a passivated one. The articles, comparison photos, and test data throughout this guide focus on both — what the surface looks like and what’s actually happening at the metallurgical level.
How Weld Cleaning Works and Why Results Vary Between Materials
Electrochemical weld cleaning runs on a deceptively simple principle. An electrolyte-soaked pad carries electrical current across the weld surface, triggering a controlled oxidation reaction that dissolves heat tint and chromium-depleted oxide layers. The electrolyte — typically a phosphoric acid or citric acid blend — acts as the conductive medium, while current density (measured in amps per square centimeter) determines how aggressively the reaction strips material away.
Here’s where it gets interesting. Austenitic stainless steels like 304 and 316 respond beautifully to this process. Their high chromium and nickel content means the passive layer reforms almost instantly once the contaminated oxide is removed. Ferritic grades (430, for example) contain less nickel and are more sensitive to over-etching — push the amperage too high, and you’ll see pitting or a dull, frosted surface instead of that mirror-bright finish.
Aluminum alloys are a different animal entirely. The tenacious aluminum oxide layer (Al₂O₃) that forms naturally is actually harder than the base metal beneath it, requiring specialized electrolytes and higher current densities to break through. A setting that produces flawless weld cleaning before and after results on 316L stainless might barely scratch the surface of 6061-T6 aluminum. Carbon steel presents yet another challenge: without chromium to form a protective passive layer, cleaned welds oxidize again within hours unless sealed or coated.
The NACE International corrosion reference materials explain this passivation chemistry in detail. The practical takeaway is blunt — there is no universal setting. Each substrate demands its own combination of voltage, electrolyte concentration, pad dwell time, and post-clean neutralization to achieve consistent weld cleaning before and after results.
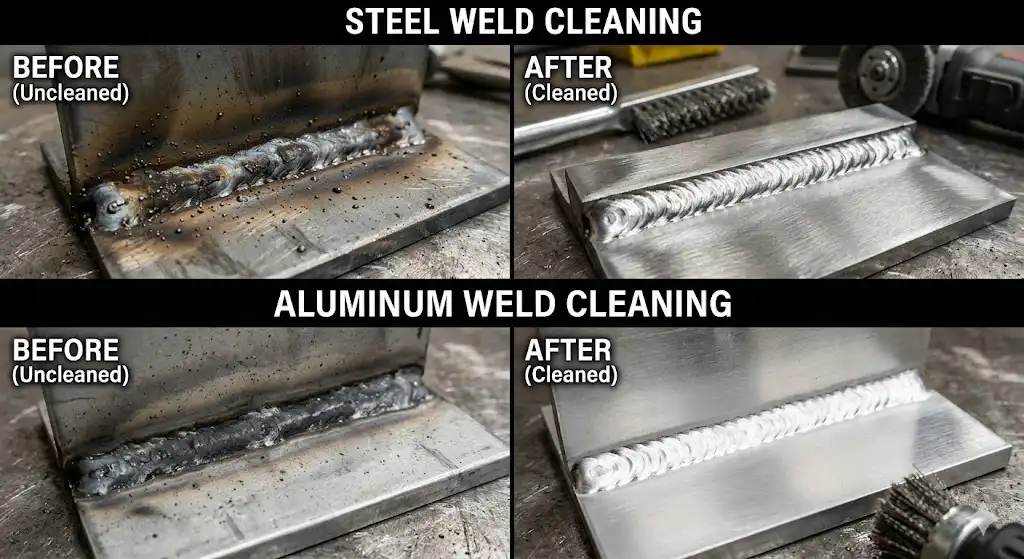
Before and After Results on Stainless Steel TIG Welds
Stainless steel TIG welds are where electrochemical cleaning produces its most dramatic transformations. The heat-affected zone on a 304 or 316 weld typically displays a predictable color spectrum: light straw tones closest to the weld toe, transitioning through gold, then blue, purple, and finally dark gray or black at the highest heat exposure points. Each color corresponds to a specific oxide layer thickness — straw sits around 25 nanometers, while black oxide can exceed 200 nanometers.
Light straw and gold discoloration on 304 stainless usually clears in a single pass at moderate power settings (around 30-50% on most machines). The result is a bright, uniform silver finish nearly indistinguishable from the parent material. Blue and purple tints require two passes, sometimes three, with the electrolyte needing a few extra seconds of dwell time to break through the thicker chromium-depleted layer beneath.
Black oxide is the stubborn one. On 316L surgical-grade stainless, heavy black heat tint from multi-pass welds can demand 3-4 passes with higher amperage and fresh electrolyte on the pad. Even then, a faint ghost shadow sometimes remains — not a defect, but a slight grain structure difference visible only under direct light. Most fabricators accept this as a complete clean.
What matters beyond appearance is passivation. According to testing documented by ASTM A967, properly cleaned stainless welds should pass a copper sulfate or ferroxyl test confirming free iron removal. Weld cleaning before and after results on stainless consistently show passivation levels meeting or exceeding chemical passivation standards — often reaching a chromium-to-iron ratio above 1.5:1 on the cleaned surface. Grade 316 tends to passivate slightly faster than 304 due to its higher molybdenum content, which stabilizes the reformed oxide layer.
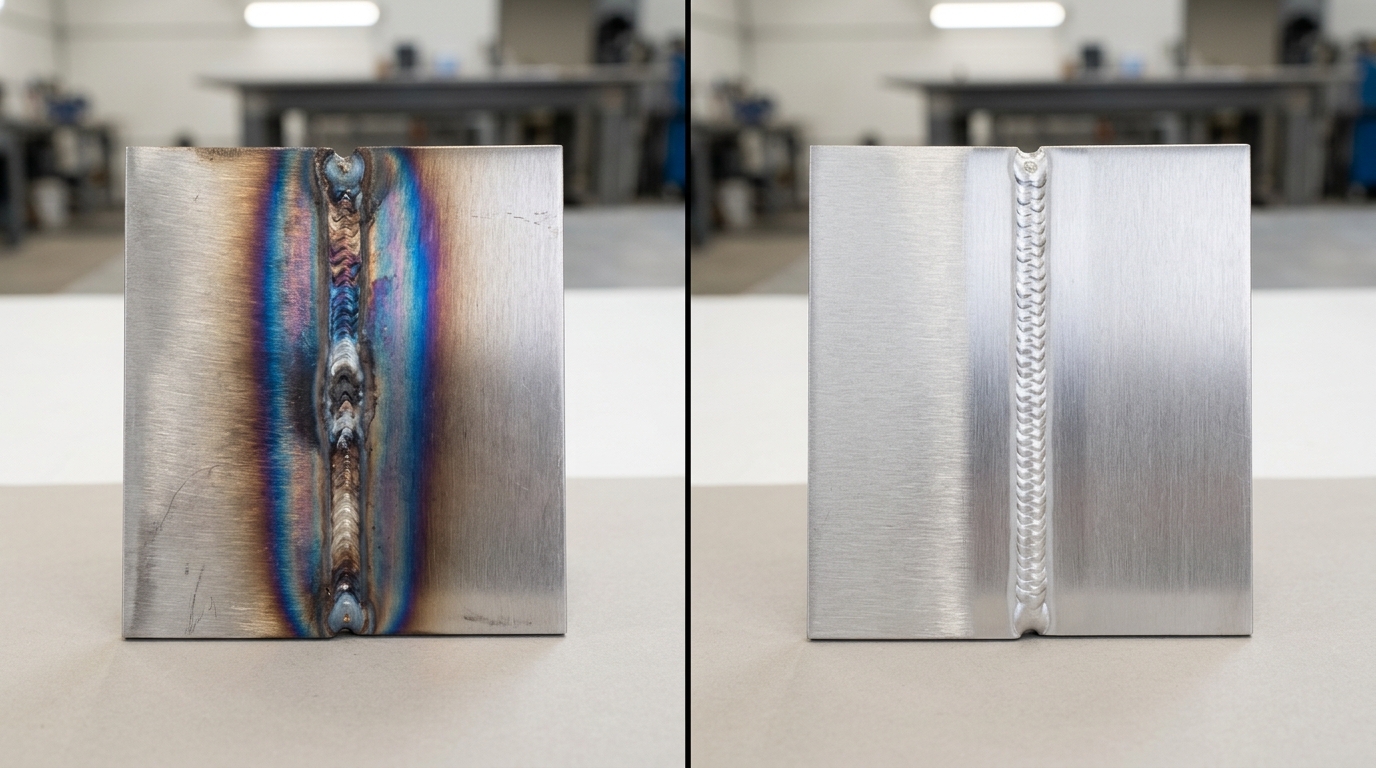
Weld cleaning before and after results on stainless steel TIG weld showing heat tint removal and restored finish
Before and After Results on Aluminum MIG Welds
Aluminum is a different beast entirely. Where stainless steel rewards you with mirror-bright transformations, aluminum fights back with stubborn oxide chemistry and surface behaviors that catch many fabricators off guard. The weld cleaning before and after results on aluminum MIG joints look nothing like what you’d expect coming from stainless work — and the process demands a fundamentally different approach.
Why Aluminum Oxide Makes Everything Harder
Aluminum oxide (Al₂O₃) reforms almost instantly after removal — within milliseconds of exposure to air. This oxide layer melts at roughly 2,072°C, while the base aluminum underneath melts at just 660°C. That massive gap is exactly why MIG welding aluminum produces so much spatter, porosity, and thick gray smut around the weld zone. Electrochemical cleaning can break down this oxide and the embedded smut, but it won’t produce the gleaming silver finish you’d get on 304 stainless. The “after” on aluminum is a clean, uniform matte surface — not a polished one.
Alloy-Specific Differences That Matter
Results vary sharply between common alloys. On 6061-T6, electrochemical cleaning removes the dark MIG smut effectively and leaves a consistent light gray tone across the heat-affected zone. 5052, with its higher magnesium content (around 2.5%), tends to develop a slightly darker post-clean appearance because magnesium oxides respond differently to the electrolyte chemistry. 6063 — the extrusion alloy common in architectural work — actually cleans up the best of the three, producing the most even finish with minimal etching risk.
Over-etching is a real concern. Dwell too long with the electrode or use an electrolyte formulated for stainless, and you’ll pit the aluminum surface. According to The Aluminum Association, surface preparation and post-weld treatment on aluminum require alloy-specific protocols to avoid compromising corrosion resistance. Aggressive settings that work beautifully on 316L stainless will eat into soft aluminum alloys in seconds.
Setting Realistic Expectations
The honest takeaway: aluminum weld cleaning before and after results are about cleanliness, not cosmetics. You’re removing contamination, smut, and the thick oxide crust — not creating a showroom finish. For decorative aluminum applications, mechanical polishing after electrochemical cleaning is still the standard two-step process. But for structural or industrial work on alloys like 5052 and 6061, electrochemical cleaning alone delivers a corrosion-ready surface that beats wire brushing by a wide margin.
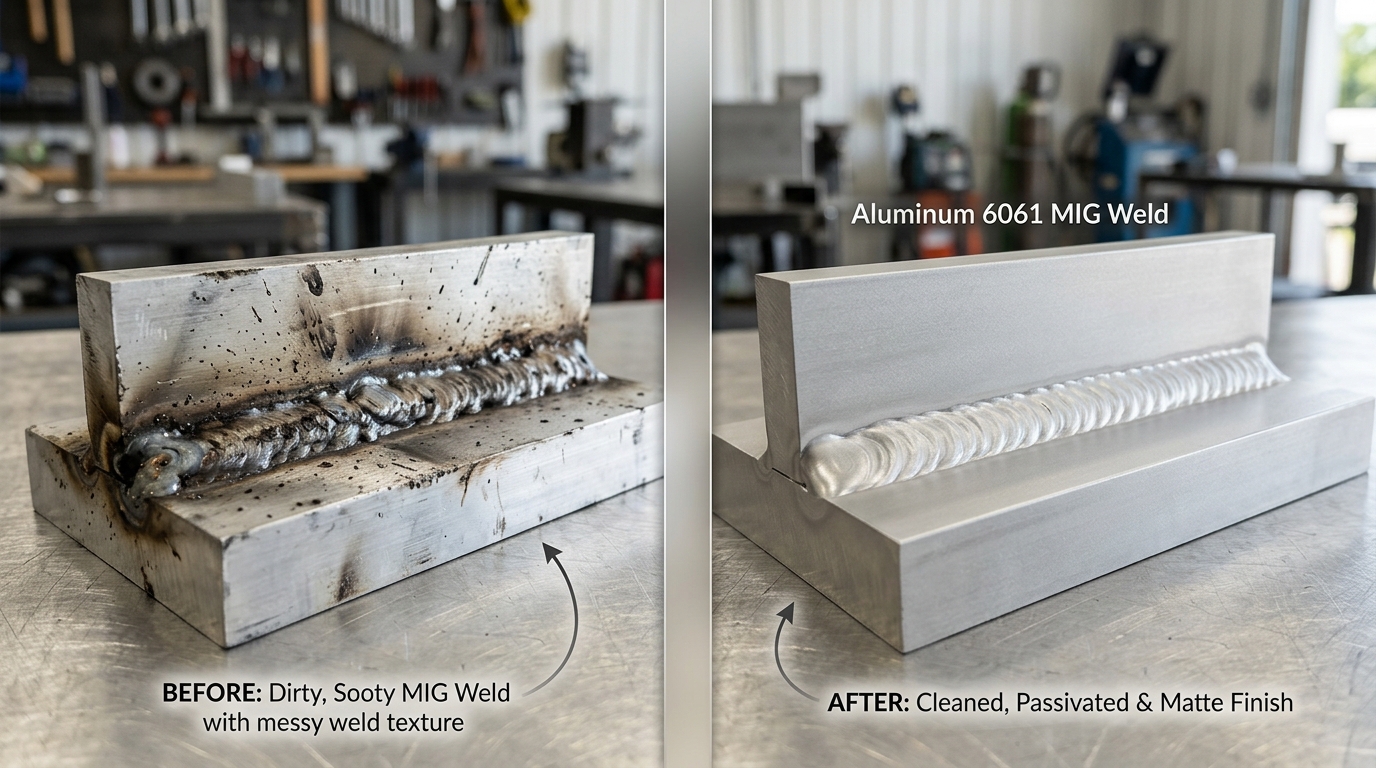
Aluminum 6061 MIG weld cleaning before and after results showing smut removal and clean matte surface
Before and After Results on Carbon Steel and Painted Surfaces
Here’s where expectations need a reality check. Carbon steel doesn’t respond to electrochemical weld cleaning the way stainless steel does — and anyone telling you otherwise is selling something. The process can remove heat tint and light surface oxides, sure. But carbon steel lacks the chromium content that allows stainless to regenerate a protective passive layer after cleaning. That means your freshly cleaned carbon steel weld will start oxidizing again within hours if left uncoated.
Weld cleaning before and after results on mild steel typically show a noticeable improvement in appearance — the dark, crusty weld discoloration gives way to a cleaner, more uniform gray surface. But “clean” here doesn’t mean “protected.” Without primer or paint applied promptly, flash rust creeps in fast, especially in humid environments. According to Lincoln Electric’s guidelines on carbon steel welding, post-weld surface preparation on carbon steel is primarily about coating adhesion rather than aesthetics.
Painted or powder-coated surfaces add another layer of complexity. Electrochemical cleaning near a paint line can damage the coating if the electrolyte migrates beyond the weld zone. Careful masking helps, but it’s not foolproof. The realistic outcome: you can clean the weld bead itself and a narrow heat-affected zone, then feather in primer to blend with the existing coating. Expecting a seamless invisible transition? That’s bodywork territory, not weld cleaning.
The honest takeaway is that electrochemical cleaning on carbon steel serves a functional purpose — improving coating adhesion and removing contaminants — rather than delivering the dramatic cosmetic transformations you see on stainless. Set your expectations accordingly, and you won’t be disappointed by the weld cleaning before and after results.
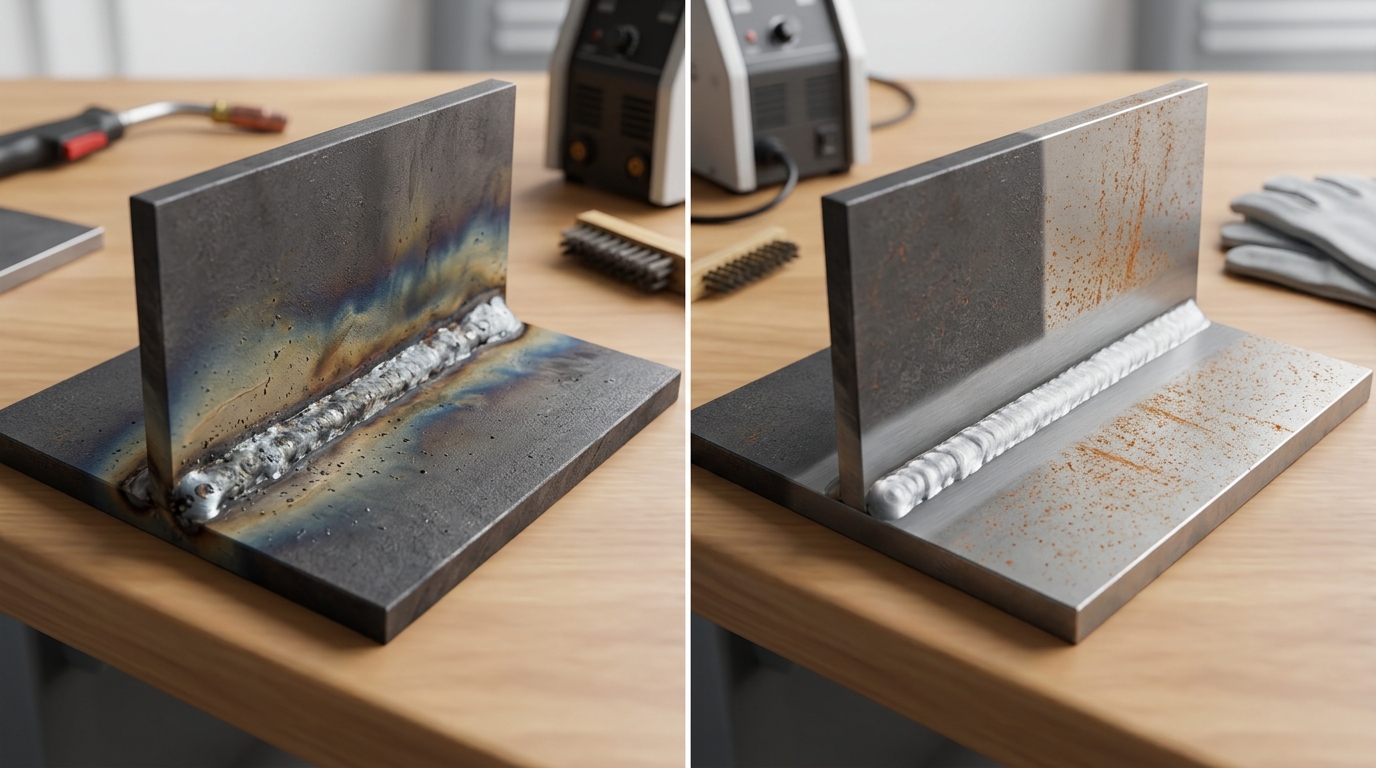
Carbon steel weld cleaning before and after results showing oxide removal and early flash rust on uncoated surface
Electrochemical vs Pickling Paste vs Mechanical Cleaning Compared
Three methods dominate the weld cleaning landscape, and each produces noticeably different outcomes. Comparing weld cleaning before and after results across all three reveals why shops are shifting toward electrochemical systems—but also why the older methods haven’t disappeared.
| Factor | Electrochemical | Pickling Paste | Mechanical (Grinding/Brushing) |
|---|---|---|---|
| Finish Quality | Mirror-bright, passivated surface | Clean but sometimes matte or etched | Scratched grain pattern, no passivation |
| Speed (per meter of weld) | 30–90 seconds | 20–60 minutes dwell time | 2–5 minutes hands-on |
| Operator Safety | Low-concentration electrolyte, minimal PPE | Concentrated HF/HNO₃ acid—serious burn and inhalation risk | Dust, sparks, noise exposure |
| Equipment Cost | $2,000–$8,000 for a quality unit | Under $200 for paste and brushes | $50–$500 for grinders and discs |
| Environmental Impact | Small volume of neutralizable waste | Hazardous acid waste requiring licensed disposal | Metal dust, abrasive waste |
Pickling paste still makes sense for batch processing large panels where you can apply the paste, walk away, and rinse later. The OSHA guidelines on hydrofluoric acid underscore the real danger, though—HF burns can be fatal even from small skin exposures, which is the single biggest reason fabrication shops are moving away from paste.
Mechanical cleaning wins on upfront cost. A flap disc and an angle grinder cost almost nothing. But the after result tells the story: scratched surfaces with embedded iron contamination that actually accelerates future corrosion. For structural carbon steel that’s getting painted anyway, that trade-off is acceptable. For visible stainless or food-grade work, it’s not.
Electrochemical cleaning occupies the sweet spot for shops doing regular stainless or aluminum fabrication. Higher initial investment, but consumable costs run roughly $0.15–$0.40 per linear meter of weld. The before and after results speak loudest on repeatability—every weld comes out consistent, which is nearly impossible to achieve with manual grinding or variable paste dwell times.
Factors That Affect Weld Cleaning Quality and Finish
Same machine, same operator, wildly different outcomes. That scenario plays out constantly, and the reason usually traces back to one or two overlooked variables. Understanding these factors is what separates consistent, professional weld cleaning before and after results from frustrating inconsistency.
Amperage and Contact Time
Too low, and you’re just wetting the surface. Too high, and you risk etching the base metal or burning through your brush pad in minutes. Most stainless steel jobs land between 20–50 amps, while aluminum typically demands the upper end of that range or beyond. Contact time matters just as much — holding the brush on one spot for 3–4 seconds produces a fundamentally different result than a quick swipe. Rushing creates blotchy, uneven finishes that look worse than the original discoloration.
Electrolyte and Brush Condition
Diluted or contaminated electrolyte is the silent killer of clean results. Fresh solution at the manufacturer’s recommended concentration delivers consistent electrochemical reactions; old solution leaves streaks and patchy oxide removal. Brush condition follows the same logic. A worn carbon fiber pad loses conductivity unevenly, creating hot spots that etch some areas while barely touching others. Replace pads before they look completely spent — by the time fibers are visibly matted, performance has already dropped 30–40%.
The Weld Itself
No cleaning method compensates for a bad weld. Excessive heat input creates deeper oxide penetration that resists removal. Contamination from dirty filler rod or poor gas coverage produces porosity and embedded impurities that cleaning can’t address. According to TWI Global, surface preparation before welding directly impacts the achievable post-weld finish quality. Even ambient temperature plays a role — cold metal below 5°C slows the electrochemical reaction noticeably, requiring longer dwell times or higher amperage to achieve equivalent results.
How to Get the Best Weld Cleaning Results Every Time
Technique matters more than equipment price. Hold the brush at 30–45 degrees to the surface and move at a steady pace—roughly 10–15 mm per second on stainless steel. Going too fast leaves streaks. Going too slow risks etching the base metal, especially on thinner gauges below 1.5 mm. Overlap each pass by about 50% so you don’t leave untreated strips between strokes.
Pre-cleaning is the step most people skip, and it’s the one that wrecks consistency. Wipe the weld zone with acetone or isopropyl alcohol before you touch it with the brush. Residual cutting oil, marker ink, or shop grime creates a barrier between the electrolyte and the oxide layer. That barrier shows up as blotchy patches in your weld cleaning before and after results—patches that look like equipment failure but are actually contamination.
Electrolyte selection isn’t one-size-fits-all. Use a phosphoric-acid-based solution for stainless steel and switch to a dedicated aluminum formula when working 5000- or 6000-series alloys. Mixing them up causes poor oxide removal at best and surface damage at worst. Replace your carbon fiber brush heads after roughly 40–60 hours of use; worn fibers reduce contact area and force you to press harder, which gouges the finish.
Equipment maintenance takes five minutes and prevents hours of frustration. Rinse the brush assembly after every session. Dried electrolyte crystallizes inside the fibers, creating hard spots that scratch polished surfaces. Check your power unit’s voltage output monthly with a multimeter—output drift of even 2–3 volts changes cleaning aggressiveness significantly. The American Welding Society publishes maintenance guidelines that align with these practices.
Three common mistakes cause 90% of bad outcomes: insufficient electrolyte flow, excessive dwell time on one spot, and skipping the neutralizing rinse. That final rinse—clean water followed by a passivation spray—locks in the corrosion resistance you just restored. Skip it, and the surface starts degrading within days.
Frequently Asked Questions About Weld Cleaning Results
Does weld cleaning remove spatter?
Not effectively. Electrochemical cleaning targets oxide layers and heat tint — it doesn’t have the mechanical force to dislodge welded-on spatter balls. You’ll still need a chisel, grinding disc, or anti-spatter spray applied before welding. If spatter is your main problem, fix it upstream.
How long do results last before re-oxidation?
On stainless steel, the passivation layer formed during electrochemical cleaning can last years in indoor environments. Outdoor or marine exposure shortens that timeline, but properly cleaned 316L stainless routinely passes 48-hour salt spray tests per ASTM B117. Aluminum re-forms its natural oxide within minutes, but that’s actually protective — it’s the right kind of oxide.
Does the process weaken the weld?
No. The electrical current penetrates only the surface oxide layer, typically less than 0.01 mm deep. The weld’s structural integrity stays completely intact. Mechanical grinding, by contrast, actually removes parent material and can thin joints on lighter gauge work.
Are the results purely cosmetic?
Far from it. Removing heat tint restores the chromium-rich passive layer that gives stainless steel its corrosion resistance. A weld that looks clean but still carries embedded iron oxide contamination will pit and rust within months. Weld cleaning before and after results show both a visual transformation and a measurable improvement in surface chemistry — the cosmetic change is just the visible proof that passivation occurred.
What results should I expect on thin-gauge material?
Thin stock (under 1.5 mm) requires lower power settings — typically 15–35% on most machines. Results are still excellent, but you need a lighter touch and faster brush movement. Dwelling too long in one spot risks etching or surface pitting. On 0.8 mm stainless sheet, expect clean weld cleaning before and after results with a slightly more matte finish compared to thicker plate.
Key Takeaways for Achieving Professional Weld Cleaning Results
Stainless steel delivers the most striking transformations — especially on TIG welds where electrochemical cleaning can restore a near-mirror finish in a single pass at 35–55V. Aluminum requires patience, lower voltage settings around 18–28V AC, and acceptance that results will look clean but never chrome-bright. Carbon steel? Skip the electrochemical approach entirely and reach for mechanical methods or proper surface prep coatings instead.
Your weld cleaning before and after results depend far more on technique than on how much you spent on equipment. Brush angle (30–45 degrees), consistent travel speed, fresh electrolyte saturation, and correct voltage for the material — these four variables account for roughly 80% of outcome quality. Neglect any one of them and you’ll chase inconsistency from joint to joint.
Here’s the action plan that actually works:
- Match method to material. Electrochemical for stainless, mechanical or chemical for carbon steel, careful low-voltage AC for aluminum.
- Dial in settings on scrap first. Grab offcuts of the same alloy and thickness you’ll be running in production. Test at three different voltage levels and document what each looks like.
- Replace carbon fiber brush sleeves before they’re visibly worn. A degraded brush causes uneven current distribution that no amount of technique can fix.
- Neutralize and rinse every time. Residual electrolyte left on the surface will stain within hours, undoing your work. The American Welding Society emphasizes post-cleaning neutralization as a critical step for corrosion resistance.
Test before you commit to production. Five minutes on scrap material saves hours of rework — and gives you a reliable baseline you can hand to every operator on the shop floor. That single habit separates shops with consistent weld cleaning before and after results from those still guessing at settings every Monday morning.
See also
How to Narrow the Heat-Affected Zone in Welding Processes
Analysis of the causes of cracks in laser welded carbon steel
Why does welding aluminum sometimes produce sparks


