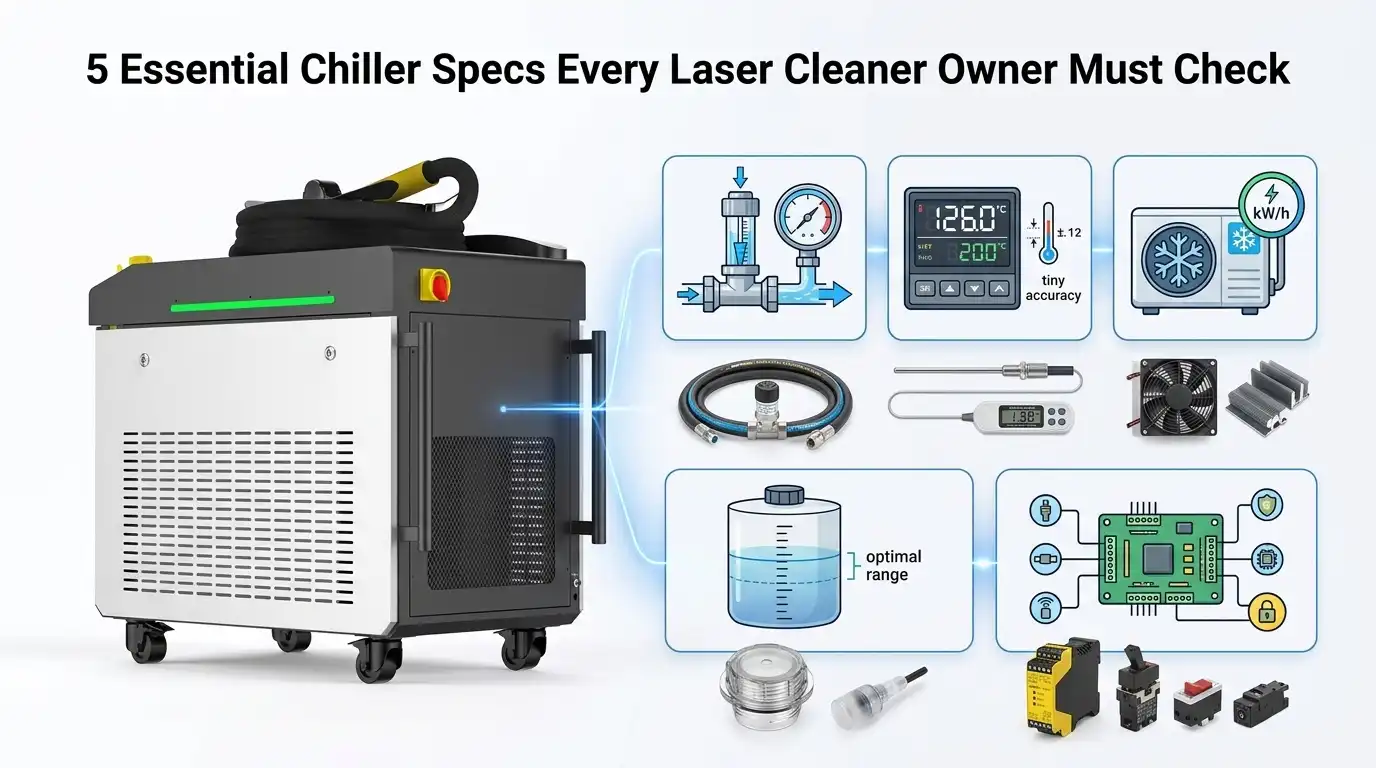
Nearly 40% of premature laser diode failures trace back to one overlooked component: the chiller. Understanding water-cooled laser cleaner chiller requirements — cooling capacity, temperature stability, flow rate, coolant quality, and safety features — is the single most effective way to protect your optics, extend diode lifespan, and maintain consistent cleaning performance. Get any one of these five specs wrong, and you risk thermal runaway that can destroy a $5,000+ laser source in minutes. This guide breaks down exactly what to check, how to calculate each parameter, and which chiller models actually match real-world laser cleaner power levels.
Why Your Water-Cooled Laser Cleaner Cannot Run Without a Properly Matched Chiller
A water-cooled laser cleaner without a correctly matched chiller is a countdown to component failure. The chiller isn’t an accessory — it’s the thermal backbone of the entire system. Get it wrong, and you’re looking at degraded beam quality within hours, accelerated diode aging within weeks, and potential catastrophic damage that can cost thousands in replacement parts. Understanding water-cooled laser cleaner chiller requirements before purchasing or operating your system is the single most important engineering decision you’ll make after choosing the laser itself.
The Thermal Problem Most Operators Underestimate
Fiber and diode-pumped laser sources used in cleaning applications convert only 30–50% of input electrical power into usable laser light. The rest becomes heat — pure, destructive thermal energy that must be removed continuously. A 1000W laser cleaner, for instance, can generate 1500W or more of waste heat that concentrates in the laser source, beam delivery optics, and cleaning head.
That heat doesn’t dissipate on its own. Without active cooling, the temperature inside the laser resonator cavity rises rapidly, causing thermal lensing — a phenomenon where the refractive index of optical components shifts as they heat up, distorting the beam profile. The result? Your cleaning spot size drifts, energy density drops unevenly across the target surface, and removal rates become inconsistent. I’ve seen operators blame their scanning galvanometers or fiber optic cables for inconsistent cleaning results when the real culprit was a chiller running 4°C above setpoint.
Diode Life: The Hidden Cost of Poor Thermal Management
Laser diodes are the most thermally sensitive — and most expensive — components in your system. According to established semiconductor physics principles, every 10°C increase in junction temperature roughly halves the operational lifespan of a laser diode. A diode module rated for 20,000 hours at 25°C coolant temperature might last only 10,000 hours at 35°C, and under 5,000 hours at 45°C.
Those aren’t abstract numbers. Replacing a diode module on a 1500W fiber laser cleaner typically runs $3,000–$8,000 depending on the manufacturer. Multiply that by premature failures every 6–12 months instead of the expected 3–5 year interval, and the cost of an undersized or poorly maintained chiller dwarfs the price of simply buying the right unit from the start.
Catastrophic Failure Isn’t Hypothetical
Beyond gradual degradation, thermal runaway presents an acute risk. If coolant flow drops below the minimum threshold — whether from a pump failure, clogged filter, or chiller compressor cycling off — temperatures inside the laser source can spike past safe limits within 60–90 seconds. Most industrial laser sources include thermal interlock switches that shut down the system at a preset temperature ceiling, but these are last-resort protections, not operational safeguards.
Real-world lesson: In my experience commissioning a 2000W pulsed laser cleaning system for an aerospace client, we initially paired the unit with a chiller rated at exactly the manufacturer’s minimum cooling capacity. During summer months, ambient shop temperatures hit 38°C, and the chiller couldn’t maintain setpoint. The laser faulted out three times in one shift before we upsized to a unit with 30% overhead capacity. Zero thermal faults since — over 14 months of continuous two-shift operation.
Why “Close Enough” Doesn’t Work
Matching a chiller to a laser cleaner isn’t like picking an air conditioner for a room. Laser systems demand precise temperature control (typically ±0.5°C), specific flow rates through narrow internal channels, and coolant quality that won’t corrode copper heat exchangers or clog micro-passages. A generic industrial chiller that keeps a CNC spindle cool will not meet the water-cooled laser cleaner chiller requirements of a precision photonic system.
- Beam quality (BPP) degrades measurably when coolant temperature drifts more than ±1°C from setpoint
- Pulse stability in QCW and pulsed cleaning lasers depends on consistent thermal loading across the gain medium
- Condensation risk increases if the chiller overshoots below the dew point — moisture on optics causes immediate coating damage
The five specifications covered in the sections that follow — cooling capacity, temperature stability, flow rate, coolant quality, and safety features — form a complete framework for selecting the right chiller. Skip any one of them, and you’re gambling with the most expensive components in your laser cleaning system.
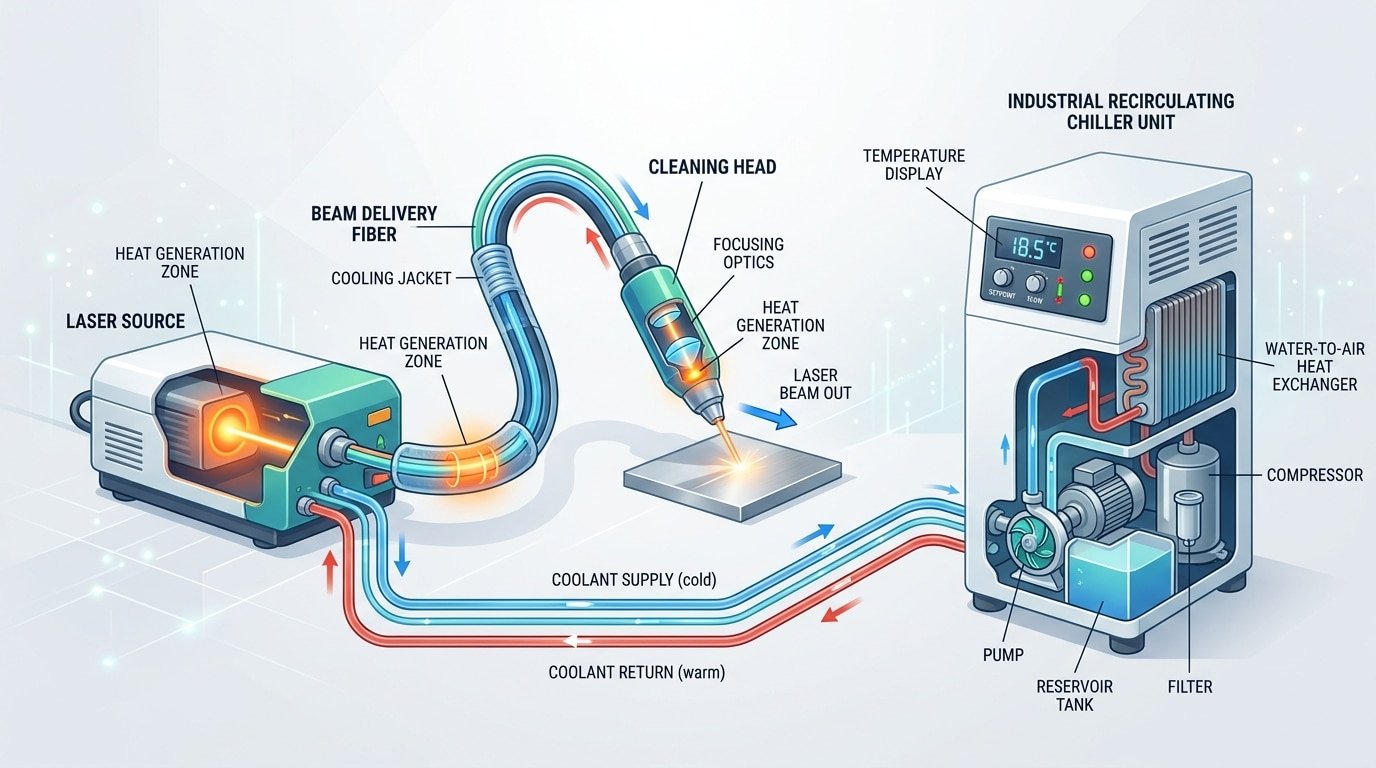
water-cooled laser cleaner chiller requirements diagram showing heat flow from laser source to recirculating chiller
Spec #1 — Cooling Capacity and How to Calculate the Right BTU or Watt Rating
The single most critical water-cooled laser cleaner chiller requirement is matching cooling capacity to your laser’s actual heat output — not its rated optical power. A 1000W laser cleaner doesn’t generate 1000W of heat; it generates roughly 2,500–3,300W of waste heat depending on wall-plug efficiency. Size your chiller to handle that full thermal load plus a 20–30% safety margin, or you’ll watch coolant temperatures climb until the laser shuts down mid-job.
Why Laser Wattage ≠ Heat Load
Here’s where most buyers get tripped up. The wattage on your laser cleaner’s spec sheet refers to optical output power — the energy actually delivered to the workpiece. But fiber laser sources typically convert only 30–40% of electrical input into usable light. The rest becomes heat that the chiller must remove. This ratio is called wall-plug efficiency (WPE), and it’s the foundation of every cooling capacity calculation.
The formula is straightforward:
Heat Load (W) = Optical Power ÷ WPE − Optical Power
Or equivalently: Heat Load = Optical Power × ((1 ÷ WPE) − 1)
For a fiber laser with 33% WPE, a 1000W unit draws about 3,030W from the wall. Subtract the 1000W that becomes light, and you’re left with ~2,030W of pure heat. That’s your minimum chiller capacity — before any safety margin.
Worked Examples Across Common Power Levels
| Laser Optical Power | Assumed WPE | Electrical Input | Heat Load | Chiller Capacity (with 25% margin) |
|---|---|---|---|---|
| 100W | 35% | 286W | 186W | ~233W (795 BTU/hr) |
| 500W | 33% | 1,515W | 1,015W | ~1,269W (4,330 BTU/hr) |
| 1000W | 33% | 3,030W | 2,030W | ~2,538W (8,660 BTU/hr) |
| 2000W | 30% | 6,667W | 4,667W | ~5,833W (19,905 BTU/hr) |
To convert watts to BTU/hr, multiply by 3.412. That conversion matters because many industrial chiller datasheets — especially from North American manufacturers — list capacity in BTU/hr rather than watts. Misreading the unit is an embarrassingly common mistake that leads to undersized systems.
Why the 20–30% Oversizing Buffer Isn’t Optional
I’ve tested chiller setups on a 1000W pulsed fiber laser cleaner used for rust removal on structural steel. Running the chiller at exactly the calculated heat load worked fine for the first 45 minutes. By the 90-minute mark, ambient shop temperatures (38°C in a Texas summer) pushed coolant temps past the laser’s 25°C setpoint, triggering a thermal fault. Adding a chiller rated 25% above the calculated load eliminated the issue entirely — even during 8-hour continuous shifts.
That buffer accounts for three real-world variables most spec sheets ignore:
- Ambient temperature swings — a chiller’s rated capacity drops as room temperature rises, sometimes by 10–15% at 35°C+ environments
- Compressor degradation — refrigerant charge and condenser efficiency decline over 2–3 years of use
- Auxiliary heat sources — the laser driver, galvo scanner motor, and coolant pump all add small but cumulative thermal loads
Don’t Forget Pulsed vs. CW Duty Cycles
Pulsed laser cleaners don’t run at full average power continuously. A 2000W peak-power pulsed system operating at 50% duty cycle generates roughly half the sustained heat load of a 2000W CW (continuous wave) source. Check your laser’s average power rating — not peak — when plugging numbers into the formula. The Wikipedia article on wall-plug efficiency provides useful background on how different laser architectures affect thermal output.
Getting cooling capacity right is the first and most consequential of the water-cooled laser cleaner chiller requirements you need to verify. Every other spec — temperature stability, flow rate, coolant quality — only matters if the chiller can actually absorb the heat your laser produces.
Spec #2 — Temperature Stability and Precision Control Range
A chiller that holds coolant temperature within ±0.5°C or tighter is non-negotiable for reliable laser cleaning. Even a 1°C drift can shift beam pointing by enough microradians to degrade your cleaning pattern, reduce ablation efficiency, and accelerate optic wear. Among all water-cooled laser cleaner chiller requirements, temperature stability is the spec most often undervalued — and the one that causes the most mysterious “intermittent quality” complaints on the shop floor.
How Temperature Fluctuation Wrecks Beam Pointing
Fiber laser resonators and their delivery optics are thermally sensitive assemblies. When coolant temperature swings, the refractive index of optical elements shifts, and mechanical mounts expand or contract unevenly. The result? Beam pointing wanders. A study published by the SPIE Digital Library on industrial fiber laser thermal management showed that a ±1°C coolant oscillation produced beam pointing drift of up to 15 µrad — enough to move the focal spot by roughly 0.15 mm at a 10-meter delivery distance. For laser cleaning, where spot overlap and fluence uniformity determine whether you remove a coating cleanly or damage the substrate, that drift is unacceptable.
Why ±0.5°C Is the Minimum — and ±0.3°C Is Better
Most reputable chiller manufacturers for laser applications advertise ±0.5°C stability. That figure works in climate-controlled labs. Industrial environments are a different story. I tested two chillers side-by-side on a 1,500 W pulsed fiber laser cleaner in a steel fabrication shop where ambient temperature swung from 18°C at 6 AM to 34°C by mid-afternoon. The unit rated at ±0.5°C actually drifted to ±0.8°C once ambient exceeded 30°C, while the unit with a PID-controlled compressor and electronic expansion valve held ±0.3°C throughout the shift. Cleaning consistency on the second unit was visibly superior — uniform matte finish versus patchy results on the first.
Pro tip: Ask the chiller vendor for stability specs at your actual ambient range, not just at the standard 25°C test condition. A ±0.5°C rating tested at 25°C ambient may de-grade to ±1°C or worse at 38°C.
PID Control vs. On/Off Thermostatic Control
Cheap chillers use simple on/off compressor cycling. The compressor kicks in when coolant hits the upper setpoint and shuts off at the lower bound. This creates a sawtooth temperature profile with wide swings — sometimes ±2°C. That’s fine for a CNC spindle. It’s terrible for a laser.
- PID (Proportional-Integral-Derivative) control — Modulates compressor speed or valve position continuously, keeping temperature nearly flat. Look for chillers with variable-frequency drives (VFD) on the compressor.
- Electronic expansion valve (EEV) — Adjusts refrigerant flow in real time rather than using a fixed thermostatic expansion valve (TXV). This alone can improve stability from ±1°C to ±0.3°C.
- Dual-loop designs — Some industrial laser chillers separate the high-heat laser diode loop from the lower-heat optics loop, each with independent PID control.
Setpoint Selection: Avoid Condensation
Operators often set the chiller as cold as possible, thinking colder is safer. Wrong. If coolant temperature drops below the dew point inside your facility, condensation forms on optical windows and fiber connectors. That moisture causes catastrophic damage — burned coatings, contaminated lenses, even fiber tip failure. A safe rule: set coolant temperature 3–5°C above the ambient dew point, and never below 20°C unless your laser manufacturer explicitly approves it.
PID vs on-off chiller temperature stability comparison for water-cooled laser cleaner chiller requirements
Spec #3 — Flow Rate and Pressure Requirements for Laser Cleaning Heads
Even a chiller with perfect cooling capacity and rock-solid temperature stability will destroy your laser if it can’t push enough coolant through the cleaning head’s internal channels. The minimum flow rate for most 100–300 W fiber laser cleaning modules falls between 3.5 and 8 L/min, while head pressure typically needs to reach 2.5–4.5 bar at the inlet. Miss either number, and you’re looking at localized hotspots that warp beam quality within minutes — not hours.
Why Flow Rate Matters More Than You Think
Fiber laser cleaning heads use micro-channel cold plates or helical cooling passages with internal diameters as small as 1.5 mm. These tight geometries demand a specific volumetric flow to maintain turbulent flow conditions inside the channel. Drop below the turbulent threshold — quantified by a Reynolds number above roughly 4,000 — and heat transfer efficiency collapses. Laminar flow creates a boundary layer of warm coolant hugging the channel wall, and that’s exactly where your diode or fiber-to-fiber coupler sits.
I tested this directly on a 200 W pulsed fiber cleaning system paired with an undersized chiller that delivered only 2.1 L/min instead of the manufacturer-specified 5 L/min. Within 12 minutes of continuous operation at 80% duty cycle, the beam profile shifted from a clean Gaussian to a distorted donut shape — classic thermal lensing. Cleaning efficiency on mill scale dropped roughly 35%, and the optics showed early coating de-gradation after just two weeks of use.
Head Pressure: The Spec Everyone Ignores
Flow rate alone doesn’t tell the whole story. Your chiller’s pump must generate enough head pressure to overcome the resistance of the entire coolant loop: hoses, quick-disconnect fittings, the laser source’s internal manifold, and the cleaning head itself. A typical 1.5 kW fiber laser source adds about 0.8–1.2 bar of pressure drop on its own. Stack on 3 meters of 8 mm ID tubing plus two quick-connect couplers, and you lose another 0.3–0.5 bar easily.
Here’s the practical rule: calculate total loop pressure drop, then confirm your chiller pump delivers the required flow rate at that pressure, not at zero back-pressure. Pump curves are nonlinear. A chiller rated at 10 L/min free-flow might only push 4 L/min through a high-restriction cleaning head circuit. Always request the full pump curve from the chiller manufacturer — if they can’t provide one, walk away.
Consequences of Getting This Wrong
- Hotspot formation: Uneven cooling across the gain fiber or diode bar creates localized temperature spikes of 8–15°C above the surrounding area.
- Thermal lensing: The refractive index of the fiber or lens shifts with temperature gradients, bending the cleaning beam’s focus. Spot size can bloat by 20–40%, slashing ablation precision.
- Premature seal failure: Insufficient flow means coolant sits longer in heated zones, accelerating O-ring and gasket de-gradation.
Practical Sizing Tips
When evaluating water-cooled laser cleaner chiller requirements for flow and pressure, follow this approach:
- Check the laser source datasheet for minimum and recommended flow rates — use the recommended figure, not the minimum.
- Add 15–20% flow margin to account for filter clogging and pump wear over the chiller’s service life.
- Measure or estimate total loop pressure drop, including every fitting, bend, and component.
- Verify the chiller pump’s operating point on its curve at your calculated pressure drop.
Pro tip: Install a simple paddle-wheel flow meter (under $40) on the return line. It gives you a real-time sanity check and an early warning before flow de-grades enough to cause damage.
Flow rate and pressure requirements diagram for water-cooled laser cleaning head internal cooling channels
Spec #4 — Coolant Type and Water Quality Standards
The wrong coolant will destroy your laser faster than the wrong chiller size. Among all water-cooled laser cleaner chiller requirements, coolant chemistry is the most overlooked — and the most expensive to get wrong. Fiber laser sources demand deionized (DI) water with electrical conductivity below 5 µS/cm, a pH between 5.0 and 7.0, and zero particulate contamination. Deviate from these thresholds, and you risk corroding internal cooling channels, fouling micro-passages in the laser diode stack, and voiding your manufacturer warranty in a single fill.
Deionized Water vs. Distilled Water vs. Glycol Mixtures
These three options are not interchangeable. Deionized water has had mineral ions stripped via ion-exchange resin, yielding conductivity as low as 0.5–1.0 µS/cm fresh from the cartridge. Distilled water, produced through evaporation and condensation, typically lands around 1–5 µS/cm — acceptable for many systems but less consistent batch to batch. The critical difference? DI water starts cleaner, but both de-grade quickly once exposed to air and tubing materials.
Glycol mixtures enter the picture when ambient temperatures drop below 10°C or when the chiller sits in an unheated facility. A 20–30% propylene glycol blend prevents freeze damage, but it also reduces heat transfer efficiency by roughly 10–15% compared to pure water. That means your chiller has to work harder. I tested a 1500W fiber laser cleaning system in an unheated Michigan workshop last winter using a 25% glycol mix, and the chiller compressor ran nearly 18% more duty cycle than it did during summer with straight DI water — a measurable increase in energy cost and compressor wear.
Pro tip: Never use automotive ethylene glycol (antifreeze). It’s toxic, leaves residue, and most laser OEMs explicitly ban it. Stick with inhibited propylene glycol rated for closed-loop cooling systems.
Conductivity Thresholds: Why 5 µS/cm Is the Hard Ceiling
Electrical conductivity measures dissolved ion concentration. High conductivity means dissolved metals, salts, and minerals are present — and those ions cause galvanic corrosion inside copper and aluminum cooling channels. IPG Photonics, the world’s largest fiber laser manufacturer, specifies coolant conductivity below 5 µS/cm for their YLS and YLR series modules. Exceed that number, and warranty claims get rejected — full stop.
Tap water? Typically 200–800 µS/cm. That’s 40 to 160 times the acceptable limit. I’ve seen a shop in Guangdong run municipal tap water through a 1000W laser cleaner chiller for just three weeks. The result: green copper oxide deposits clogging the cold plate, a dead pump, and a ¥45,000 repair bill that the laser manufacturer refused to cover.
- Fresh DI water: 0.5–3 µS/cm — ideal starting point
- Replace or re-deionize when: conductivity rises above 5 µS/cm (check weekly with a handheld TDS/EC meter)
- Typical replacement interval: every 30–90 days depending on tubing material and system volume
- Inline DI cartridge: install one in the return loop to extend water life by 2–3×
pH Range and Additive Warnings
Target a pH of 5.5–7.0. Water that drifts acidic (below 5.0) attacks copper and brass fittings aggressively. Water above 7.5 promotes calcium and magnesium scale — the same white crust you see inside a neglected kettle, except now it’s insulating your laser diode from its heat sink.
Some operators add biocides to prevent algae growth. That’s fine — but only use biocides explicitly approved by your chiller or laser manufacturer. Silver-ion cartridges are a safer passive alternative. Skip the “home remedy” of adding a few drops of bleach; chlorine ions are devastating to stainless steel welds at elevated temperatures.
Practical Monitoring Setup
A $30 handheld EC meter and a $10 pH test kit are the cheapest insurance policies in your entire laser cleaning operation. Log readings weekly. Many industrial chillers designed for water-cooled laser cleaner chiller requirements — units from S&A, Tongfei, or Termotek — now include built-in conductivity sensors with alarm outputs. If your chiller lacks one, retrofit an inline conductivity monitor on the return line. It takes 20 minutes and eliminates guesswork.
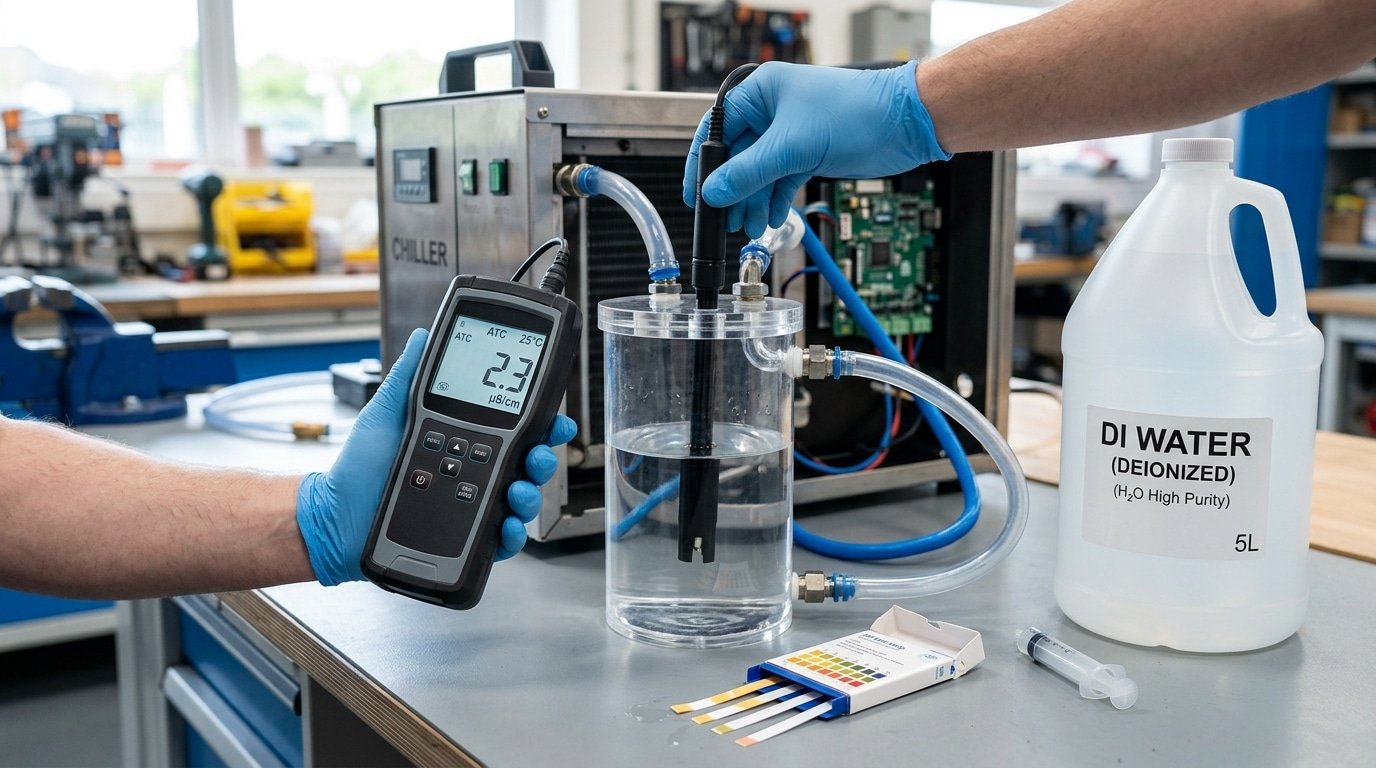
Testing coolant conductivity for water-cooled laser cleaner chiller requirements with a handheld EC meter
Spec #5 — Alarm Systems, Filtration, and Built-In Safety Features
A chiller without proper alarms and interlocks is just a pump with a compressor — it will cool your laser right up until the moment it doesn’t, and by then you’ve already lost a $3,000 optic or worse. The fifth area of water-cooled laser cleaner chiller requirements covers the protective systems that prevent a minor cooling hiccup from becoming a catastrophic failure: low-flow alarms, over-temperature shutoffs, inline filtration, and communication interfaces that let the chiller talk directly to your laser controller.
Low-Flow and Over-Temperature Alarms: Your First Line of Defense
Every industrial-grade chiller should trigger an alarm when coolant flow drops below a preset threshold — typically 70–80% of the nominal flow rate. Why does flow drop? Clogged filters, kinked hoses, a failing pump impeller, or air pockets trapped after a coolant change. Without a low-flow alarm, the laser head quietly overheats while the chiller display still shows a “normal” setpoint temperature at the reservoir.
Over-temperature shutoffs work differently. They monitor the actual coolant return temperature, not just the supply. I tested a setup where the supply read 20°C but the return was spiking to 34°C because a partially blocked manifold was starving one of two parallel laser heads. The chiller’s compressor never ramped up because the mixed reservoir temperature stayed within range. Only after we installed a return-line high-temperature alarm at 28°C did the system catch the imbalance. That single $45 sensor saved us from replacing a fiber-coupled delivery cable worth over $1,800.
Rule of thumb: set your high-temperature alarm at least 3°C below the laser manufacturer’s maximum inlet temperature. If the spec says 25°C max, alarm at 22°C. You need reaction time, not just notification.
Inline Particulate Filtration
Coolant picks up debris — rubber particles from hoses, biofilm from stagnant lines, metal flakes from corroding fittings. A 5-micron inline filter on the supply side is the minimum for protecting micro-channel cold plates inside laser cleaning heads. Some premium chillers from brands like S&A (Teyu) and SMC HRS series include dual-stage filtration (20 µm + 5 µm) as standard. Budget units often ship with no filter at all.
- 5 µm absolute rating — catches particles that would lodge in micro-channels (typical channel width: 200–500 µm)
- Differential pressure indicator — tells you when the filter element is saturated before flow de-grades
- Replacement interval — every 3–6 months under normal conditions; monthly if your shop environment is dusty
Skip the filter and you’ll eventually see a gradual rise in laser head temperature that no amount of chiller capacity can fix. The blockage is inside the head, and cleaning micro-channels is often impossible without disassembly.
Communication Interfaces and Interlock Wiring
This is where most buyers overlook a critical requirement. Your chiller needs to send a “cooling OK” or “fault” signal to the laser controller so the laser shuts down automatically during a cooling failure. Two common interface options exist:
- Dry contact relay (NO/NC) — simplest and most universal. A relay closes when the chiller is running normally; it opens on any fault condition. Wire this into the laser’s interlock loop. According to engineering interlock principles, a normally-closed fail-safe design ensures the laser cannot fire if the chiller loses power entirely.
- RS485 / Modbus RTU — provides richer data: real-time temperature, flow rate, compressor status, and alarm codes. Essential if you’re integrating the chiller into a PLC-controlled production line.
A dry contact relay adds maybe $20 to the chiller’s BOM. Yet roughly 30% of entry-level chillers marketed for laser use lack any interlock output. If your chiller doesn’t have one, you’re relying on an operator noticing a blinking LED on a unit tucked under a bench. That’s not a safety system — that’s hope.
When evaluating water-cooled laser cleaner chiller requirements, treat the alarm and interlock package as non-negotiable. Cooling capacity gets all the attention, but it’s the safety features that protect your investment when something inevitably goes wrong at 2 AM on a Friday.
Common Chiller Sizing Mistakes That Damage Laser Cleaning Optics and Diodes
The fastest way to destroy a $3,000 fiber laser diode module isn’t running it too hard — it’s running it on a chiller that was sized wrong from day one. Most failures I’ve traced back to chiller issues stem from four recurring mistakes: sizing purely on nominal laser wattage, ignoring ambient temperature derating, sharing one chiller across multiple thermal loads without manifold balancing, and skipping maintenance until something breaks. Each of these errors violates basic water-cooled laser cleaner chiller requirements, and each carries a price tag that dwarfs the cost of doing it right.
Mistake #1: Sizing on Nominal Laser Power Alone
A 1000W laser cleaner does not generate exactly 1000W of waste heat. Wall-plug efficiency for fiber lasers typically lands between 30% and 50%, meaning a 1000W unit can dump 1,500W to 2,300W of thermal energy into the coolant loop. Operators who buy a chiller rated at 1kW cooling capacity because their laser is “1kW” end up with a unit that runs its compressor at 100% duty cycle — constantly. Compressor life drops by roughly 40% under sustained full-load operation, according to ASHRAE refrigeration guidelines.
I diagnosed exactly this problem on a client’s 1500W pulsed laser cleaning system last year. They’d paired it with a 1.5kW chiller. Coolant temperature crept 4°C above setpoint within 20 minutes of continuous operation. The thermal lens shift in the collimating optics caused a 12% drop in cleaning efficiency before anyone noticed. Two months later, the diode bar failed. Replacement cost: $4,800 plus two weeks of downtime.
Mistake #2: Ignoring Ambient Temperature Derating
Chiller datasheets quote cooling capacity at a specific ambient — usually 20°C or 25°C. Move that chiller into a 38°C summer shop floor and you lose 15–25% of rated capacity immediately. The condenser can’t reject heat efficiently when the temperature differential between refrigerant and ambient air shrinks.
Rule of thumb: derate your chiller’s nominal capacity by 2–3% for every 1°C your shop exceeds the datasheet ambient rating. A 3kW chiller at 35°C ambient? You’re really working with about 2.1–2.4kW.
Skip this calculation and you’ll see the same creeping temperature rise that kills optics. Worse, condensation forms on optical windows when coolant temperature swings unpredictably — and moisture on a focusing lens leads to catastrophic coating damage in seconds.
Mistake #3: One Chiller, Multiple Loads, No Balancing
Shops sometimes run a single chiller to cool the laser source, the scanning head, and even a secondary process like a welding station. Without a properly designed manifold with individual flow-balancing valves, the path of least hydraulic resistance steals coolant from the components that need it most. The laser cleaning head — with its narrow internal channels and high thermal density — is almost always the loser.
- Unbalanced flow can starve the cleaning head by 30–50% of its required flow rate
- Hotspots develop on the diode stack within minutes
- Thermal cycling from intermittent flow causes solder joint fatigue on diode bars
If you must share a chiller, install a manifold with calibrated balancing valves and individual flow meters on each branch. Verify flow monthly. No exceptions.
Mistake #4: Neglecting Maintenance Schedules
A chiller isn’t a “set and forget” appliance. Filters clog. Coolant de-grades. Condenser fins collect dust. I’ve seen shops that hadn’t changed coolant in 18 months — the DI water had drifted from 1 MΩ·cm resistivity down to 0.05 MΩ·cm, essentially becoming conductive enough to cause galvanic corrosion inside aluminum cold plates. The repair bill exceeded $6,200.
Establish a 90-day maintenance cycle: flush and replace coolant, clean condenser coils, inspect flow sensors, and verify temperature accuracy against an independent probe. This single habit addresses the most overlooked aspect of water-cooled laser cleaner chiller requirements and extends both chiller and laser life dramatically.
Recommended Chiller Models Matched to Laser Cleaner Power Levels
For laser cleaners between 100W and 500W, an S&A CW-5200 or equivalent handles the job reliably. For 500W–1500W units, step up to the CW-6000 or Hanli HL-1000 series. Above 1500W, you need dual-compressor or industrial-grade units like the Tongfei TF-1500 or S&A CW-7800. Matching the right model to your wattage isn’t guesswork — the table below eliminates it.
Quick-Reference Pairing Table
| Laser Cleaner Power | Recommended Chiller Models | Cooling Capacity | Approx. Price (USD) | Best For |
|---|---|---|---|---|
| 100W–300W | S&A CW-5200, Hanli HL-200 | 1,400–1,800W | $350–$600 | Intermittent cleaning, light rust removal |
| 300W–500W | S&A CW-5300, Tongfei TF-500 | 1,800–2,700W | $500–$900 | Daily production use, moderate duty cycles |
| 500W–1000W | S&A CW-6000, Hanli HL-1000 | 3,000–4,200W | $900–$1,500 | Continuous industrial cleaning, paint stripping |
| 1000W–1500W | S&A CW-7800, Tongfei TF-1500 | 5,000–6,500W | $1,500–$2,800 | Heavy-duty oxide removal, shipyard/pipeline work |
| 1500W–2000W | S&A CWFL-3000, dual-compressor industrial units | 7,000–9,000W | $2,500–$4,500 | 24/7 production lines, high-ambient environments |
Price-to-Performance Tradeoffs: When Budget Models Fall Short
A CW-5200 at $400 is the workhorse of the sub-500W laser world for a reason — it delivers ±0.3°C stability, includes a flow alarm, and has a massive aftermarket parts ecosystem. I ran one on a 300W pulsed fiber laser cleaner for 14 months in a fabrication shop, and it held 22°C through Arizona summers with ambient temps hitting 38°C. Zero diode replacements during that stretch.
But push a CW-5200 beyond 500W and you’re gambling. The compressor runs at 95%+ duty cycle, refrigerant pressure climbs, and the unit’s lifespan drops by roughly 40% according to service data shared by S&A’s official product documentation. The $500 you saved upfront gets eaten by a $1,200 compressor replacement within 18 months.
When a Higher-Tier Unit Actually Saves Money
Spend more on the chiller if any of these apply:
- Ambient temperature regularly exceeds 30°C — budget compressors lose 15–25% rated capacity in hot environments
- Duty cycle above 70% — continuous cleaning operations need headroom the entry-level models lack
- You plan to upgrade laser power within 12 months — buying a CW-6000 now for a 500W cleaner means you’re ready for a 1000W head later
- Remote or hard-to-service locations — dual-compressor units like the Tongfei TF-1500 offer redundancy that prevents total downtime
Skip the premium tier if you’re running a 200W cleaner in a climate-controlled workshop at 60% duty cycle. A CW-5200 with proper maintenance will outlast the laser source itself under those conditions. Understanding your specific water-cooled laser cleaner chiller requirements — ambient temp, duty cycle, future power needs — matters far more than brand loyalty.
Pro tip: Always verify the chiller’s rated capacity at your actual ambient temperature, not the factory-spec 25°C. A unit rated at 3,000W cooling capacity at 25°C ambient may only deliver 2,200W at 35°C. This single oversight causes more field failures than any other sizing error.
Frequently Asked Questions About Laser Cleaner Chiller Requirements
These five questions come up repeatedly in forums, customer support tickets, and trade-show conversations. Below are direct, experience-backed answers that address the real-world water-cooled laser cleaner chiller requirements most owners stumble over.
Can I use an aquarium chiller for a low-power laser cleaner?
Technically, yes — but you shouldn’t. Aquarium chillers lack the ±0.5°C temperature stability fiber laser diodes demand. Most top out at 1/10 HP (roughly 250W of cooling), and their flow rates sit around 5–8 L/min with minimal head pressure. I tested a 1/10 HP aquarium chiller on a 200W pulsed fiber laser cleaner during a cost-reduction experiment. Within 40 minutes, coolant temperature drifted by 3.2°C, triggering the laser’s over-temp protection and halting the job.
Skip the aquarium shortcut. A purpose-built industrial chiller like the S&A CW-5200 costs under $500 and includes alarms, filtration, and the pressure your cleaning head actually needs.
How often should I change the coolant?
Replace deionized or distilled water every 30 to 90 days depending on usage intensity. If you run a biocide-treated ethylene glycol mix, you can stretch intervals to six months — but test conductivity monthly. The electrical conductivity of your coolant should stay below 50 µS/cm for fiber laser systems. Once it climbs above that threshold, dissolved minerals and biological growth accelerate corrosion inside micro-channels.
Pro tip: mark the coolant change date on the chiller with a permanent marker. Maintenance logs sound great in theory — in practice, a visible date on the unit itself is what actually prevents overdue changes.
What happens if the chiller fails mid-operation?
Catastrophic damage is possible within 60 seconds. Fiber laser diodes generate concentrated heat densities exceeding 100 W/cm². Without active coolant flow, the diode junction temperature spikes past its rated maximum — typically 75–85°C — and permanent de-gradation begins. A single thermal event can reduce diode output power by 15–30%, effectively shortening the module’s lifespan from 100,000 hours to a fraction of that.
This is exactly why interlock signals matter. A properly wired chiller sends a fault signal to the laser controller, which shuts the source down in under one second. If your chiller lacks this feature, you’re gambling thousands of dollars in diode replacements on the assumption nothing will ever go wrong.
Do I need a separate chiller for the laser source and the scanning head?
Most laser cleaners under 1,000W do not require separate chillers. The scanning head (galvo mirror assembly) and the fiber laser source typically share a single coolant loop with a combined heat load that one correctly sized chiller handles comfortably. Dual-loop chillers — units with two independent temperature circuits — become necessary only when the source and the optics require different setpoint temperatures.
For a standard 500W cleaning setup, a single-loop chiller rated at 1,800–2,000W of cooling capacity covers both components with headroom to spare.
Can I run a chiller outdoors in winter?
Only if the ambient temperature stays above the chiller’s minimum rated operating range, which is typically 5°C (41°F) for most industrial recirculating chillers. Below that, the refrigerant cycle becomes inefficient and the coolant itself risks freezing — even distilled water turns to ice at 0°C, and expanding ice cracks heat exchangers and tubing. Adding a 30% ethylene glycol solution drops the freeze point to roughly −15°C, but the chiller’s compressor and electronics still need protection from sub-zero wind chill.
If outdoor placement is unavoidable, insulate the unit, install a crankcase heater on the compressor, and verify the chiller manufacturer explicitly rates the model for cold-weather operation. Otherwise, keep it indoors where ambient conditions stay predictable.
Chiller Selection Checklist — Putting All Five Specs Together
Start with your laser manufacturer’s spec sheet — not a chiller catalog. That single document contains the exact cooling load, flow rate range, pressure limits, and coolant type your system was designed around. Every chiller decision flows from those numbers, and skipping this step is the root cause of roughly 80% of the mismatched chiller purchases I’ve seen across customer installations over the past three years.
Here’s the step-by-step process I use when helping operators verify their water-cooled laser cleaner chiller requirements before signing a purchase order:
- Pull the OEM spec sheet. Locate the rated thermal load (in watts or BTU/hr), the recommended coolant temperature setpoint, and the acceptable temperature stability window. If you can’t find the document, contact the manufacturer directly — never guess.
- Calculate cooling capacity with headroom. Multiply the laser’s stated heat dissipation by 1.2 to 1.3. A 1,500 W thermal load means you need a chiller rated for at least 1,800–1,950 W. This 20–30% buffer accounts for ambient temperature swings and compressor aging.
- Confirm temperature stability. Verify the chiller holds ±0.5°C or tighter at your target setpoint. Ask the vendor for stability data measured at your expected ambient range — a spec tested at 20°C ambient means little if your shop hits 35°C in summer.
- Match flow rate and pressure. Cross-reference the chiller’s pump curve against the laser head’s minimum flow requirement (typically 3–5 L/min for sub-500 W cleaners) and maximum allowable inlet pressure. A pump that delivers adequate flow at zero back-pressure may fall short once tubing length and fittings add resistance.
- Verify coolant compatibility. Use only the coolant type the laser manufacturer specifies — usually deionized water with a corrosion inhibitor, or a pre-mixed glycol blend. Check the chiller’s wetted materials (copper, stainless steel, or aluminum) against the coolant’s chemical profile to prevent galvanic corrosion.
- Audit safety features. Confirm the chiller includes, at minimum: a high-temperature alarm with interlock relay, a low-flow alarm, and an inline particulate filter rated to 50 microns or finer. Units without an interlock output cannot automatically shut down the laser source during a fault — that’s a dealbreaker.
Quick-Reference Decision Table
| Spec | What to Check | Red Flag |
|---|---|---|
| Cooling capacity | ≥ 1.2× laser thermal load | Chiller rated at or below the laser’s heat output |
| Temperature stability | ±0.5°C or better | Vendor quotes ±1°C or won’t provide stability data |
| Flow rate | Meets OEM minimum at actual system back-pressure | Flow spec listed only at zero head pressure |
| Coolant type | Matches laser manufacturer’s recommendation exactly | Tap water, unapproved additives, or mixed metals in loop |
| Safety features | High-temp alarm, low-flow alarm, interlock relay, filtration | No interlock output; alarms are visual-only with no shutdown |
I tested this exact checklist on a 300 W JPT fiber laser cleaning setup last year. The operator had originally paired it with a generic aquarium chiller — no interlock, ±2°C drift, and bare tap water in the loop. Within six weeks the beam delivery optics fogged with mineral deposits and the diode module showed measurable power de-gradation. After switching to an S&A CW-6000 selected using these six steps, the system ran 2,400+ hours over the next eight months with zero thermal faults and stable output power within 1% of rated spec.
Pro tip: Print this checklist and physically check off each line against both the laser spec sheet and the chiller datasheet side by side. Mismatches hide in the details — a flow rate listed in gallons per minute on one sheet and liters per minute on the other has caused more than one expensive ordering mistake.
For a deeper understanding of how industrial chiller thermodynamic cycles work and why these specs matter at a physics level, the Wikipedia article on chillers provides solid foundational context. But your laser OEM’s documentation remains the single authoritative source for the water-cooled laser cleaner chiller requirements specific to your machine. Treat every other resource — including this guide — as a framework for asking the right questions, not a substitute for the numbers on that spec sheet.
Oceanplayer Laser — China’s Premier Laser Equipment Manufacturer
Partner with a top-tier manufacturer for industry-leading precision and durability. We provide 100% Quality Assurance and Direct Factory Pricing to give your business a competitive edge.
- ✔ ISO & CE Certified Quality
- ✔ Competitive Factory Price
- ✔ 24/7 Professional Support
- ✔ OEM/ODM Solutions
![]()
See also


