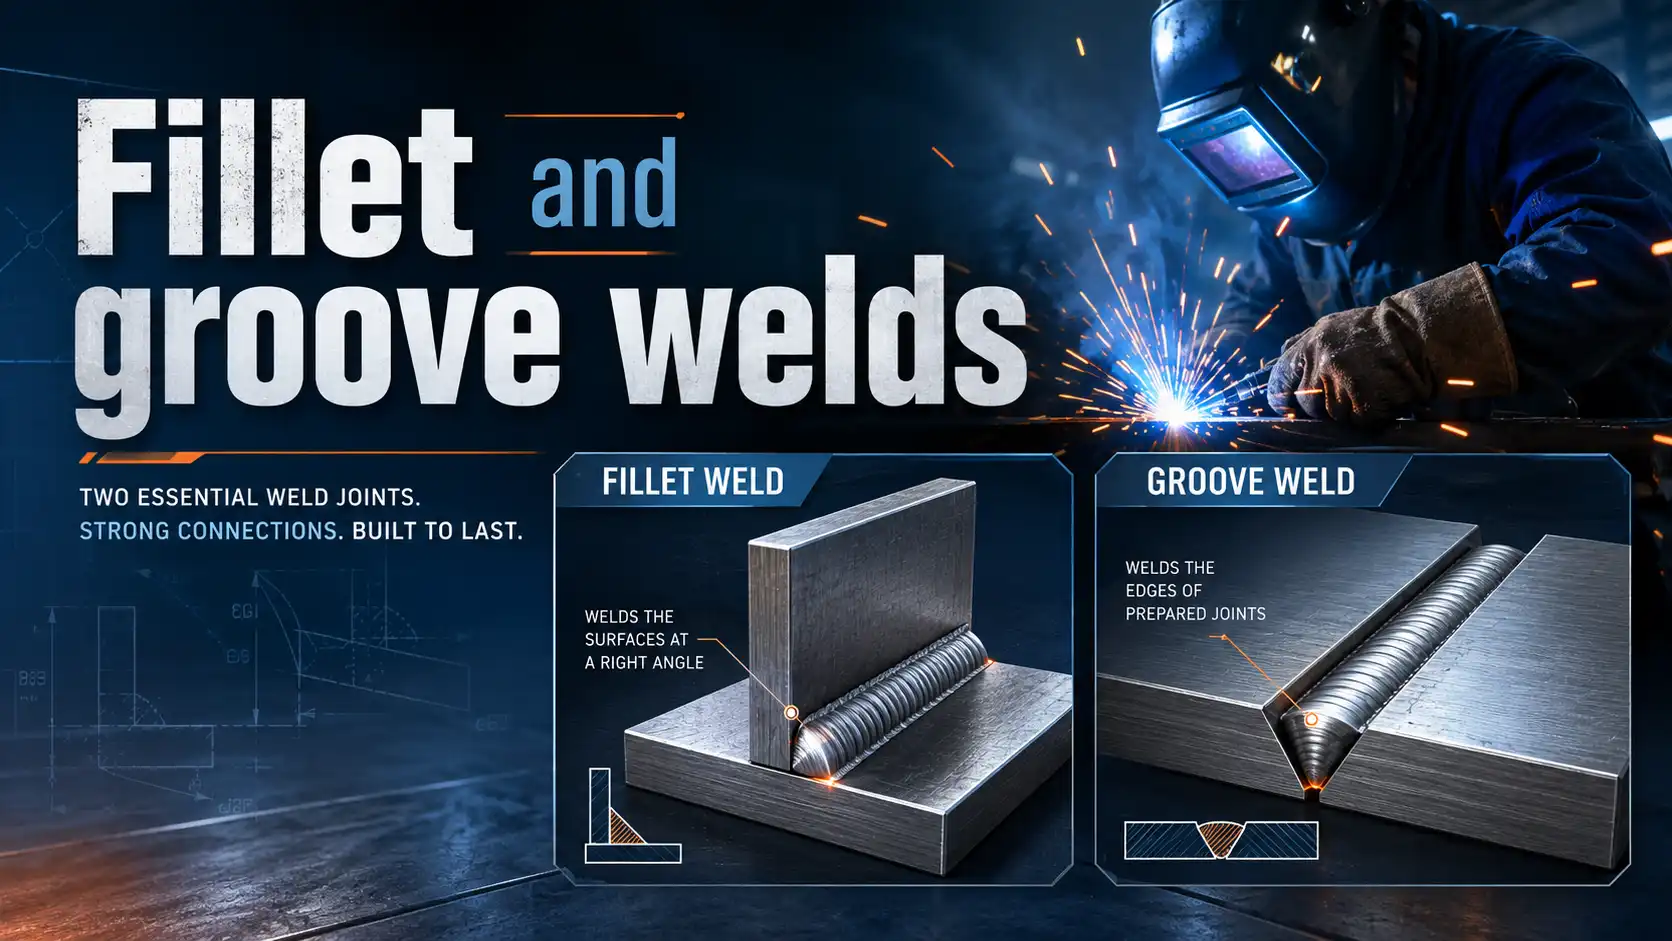
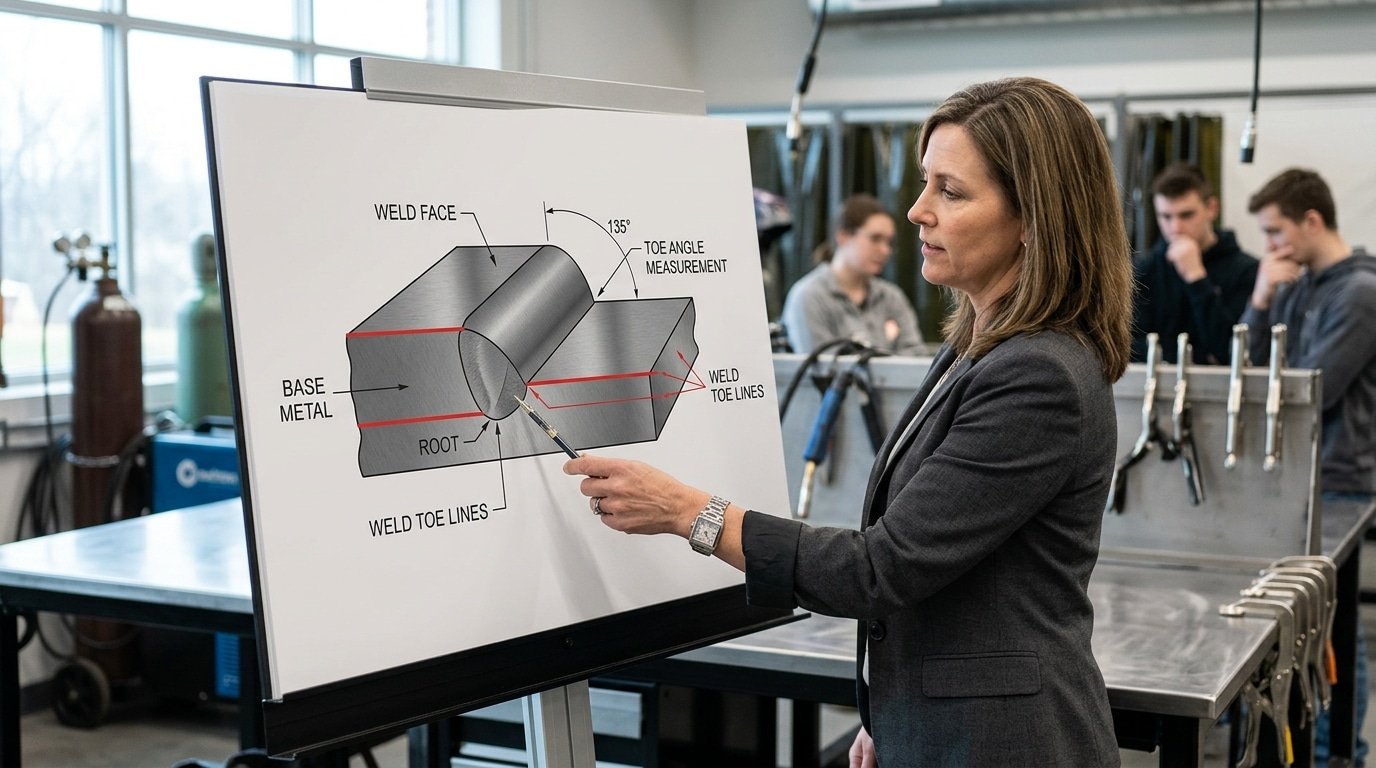
The weld toe is located at the junction line where the face of the weld meets the surface of the unmelted base metal, forming a sharp geometric transition visible on every fusion weld. Every fusion weld has at least two toe lines—one on each side of a fillet weld bead, or along each plate edge in groove welds.
Knowing where is the position of the weld toe matters because American Welding Society research shows roughly 90%[1] of fatigue cracks in welded structures initiate at this exact location.
It’s basically the junction line where the face of the weld meets the surface of the base metal.
And every weld has at least two of them. One on each side of the bead when you’re dealing with fillet welds.
And one running along each plate edge in groove welds.
This guide pinpoints both toe positions, explains why inspectors mark them first when they’re doing visual testing, and shows how the shape of the toe drives crack initiation when the part is under repeated loading.
Quick Takeaways
- Weld toe is the linear junction where weld face meets unmelted base metal surface.
- Inspect both toe lines first—every fusion weld has at least two per bead.
- Around 90%[2] of fatigue cracks initiate at the weld toe under cyclic loading.
- Reference AWS A3.0 standard for the official weld toe definition during documentation.
- Treat the toe as a continuous crack-initiation line, not an isolated stress point.
What Is the Weld Toe and Where Exactly Does It Sit
The weld toe is a line, not a point or an area, where the weld face meets the unmelted base metal surface. So, where is the position of the weld toe? It is exactly at the boundary where the molten filler metal solidified against the parent plate.
This forms a sharp geometric transition you can see on every fusion weld.
You can think of it like a shoreline. The weld face is the beach, and the base metal is the open land. The toe is the line where they meet. Basically, every fusion weld has at least two of these lines, one on each side of the bead.
The American Welding Society gives a formal definition in their AWS A3.0 Standard Welding Terms and Definitions. They call it “the junction of the weld face and the base metal.” That junction is a linear, continuous line that runs along the full length of the weld.
But why does it matter that it’s a line and not just a point? Because fatigue cracks start along this whole line, not at one single spot. That’s a critical difference.
Research in the International Journal of Fatigue shows something important. The geometry at the weld toe accounts for about 80%[3] of fatigue failures in welded steel structures. In an as-welded condition, the toe radius typically measures between 0.1 and approximately 1.0 mm[4].
There are two more terms you need to understand clearly. First is the toe angle, which is the angle between the weld face and the base metal, usually between 20° and 60°.
Second is the toe radius, which is the curvature at that transition line. Both of these directly control the stress concentration factors.
Honestly, these factors can be 2.5 to 4 times the nominal stress.
Weld Toe Position in Fillet Welds (Two Toes per Weld)
Every fillet weld has exactly two weld toes. One sits on the vertical member, and the other sits on the horizontal member. Picture a T-joint sliced through the middle, and you’ll see the triangular weld bead actually touching each plate along a line.
Those two contact lines are your toes. So when somebody asks where is the position of the weld toe in a fillet weld, the answer is always going to be plural.
The toe sits at the end of each weld leg, which is basically the distance from the joint root to the toe measured along the plate surface. On a symmetric approximately 6 mm[5] fillet, both legs measure approximately 6 mm[6]. Both toes land approximately 6 mm from the root.
Asymmetric profiles shift this around though. Take a “horizontal-leg-dominant” fillet with an approximately 8 mm[8] × approximately 5 mm leg ratio. It pushes the horizontal toe farther out, and that longer toe ends up carrying higher stress concentration.
Profile shape matters just as much as leg length, honestly:
- Convex weld, the toes form a sharper transition angle (often under 120°), which raises fatigue stress concentration factors to roughly 2.5–4.0.
- Concave weld, a smoother blend, with the angle approaching 150° or more, dropping the stress factor closer to 1.5.
- Undercut at the toe, AWS D1.1 limits this to approximately 1 mm[1] depth for cyclically loaded structures, because deeper notches slash fatigue life by 40–approximately 60%[2].
For inspection, I always mark both toes with a paint pen before magnetic particle testing. Missing the back-side toe is honestly one of the most common quality control oversights I’ve run into. See the AWS D1.1 Structural Welding Code for fillet weld profile acceptance criteria.

Weld Toe Position in Groove and Butt Welds
So, where is the position of the weld toe on a groove weld? Honestly, it’s where the weld bead’s rounded crown meets the flat surface of the original metal plate. On a standard single-sided groove weld, you’ll find two toes on the cap side, one on each plate.
The root side is a bit different. It either has no toes at all if it’s a fully open root, or it has two more toes if there’s a backing strip or a weld pass on the other side.
Toe Locations by Groove Geometry
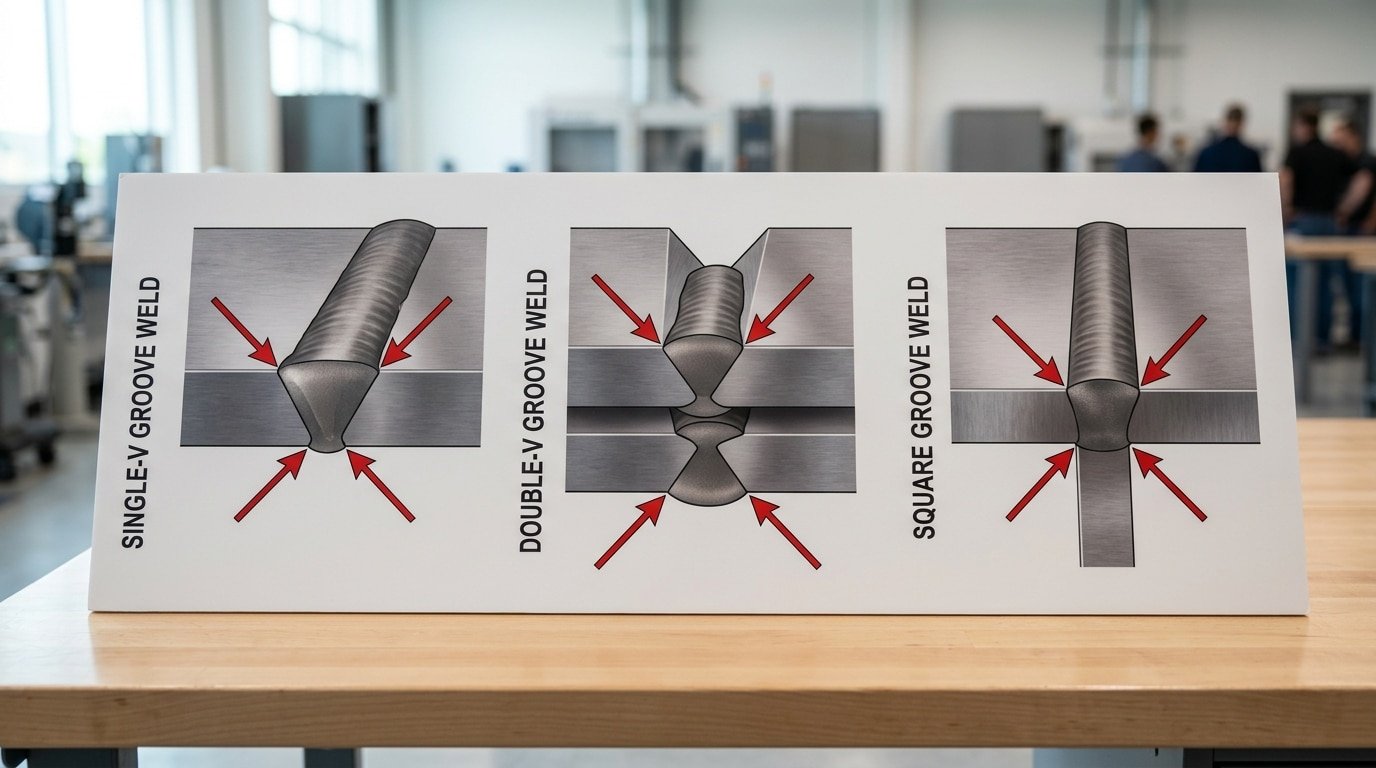
- Single-V groove: You get 2 toes on the cap. But if it’s welded over a permanent backing strip, you add 2 more toes where that strip meets the plates, which gives you 4 lines in total where stress can build up.
- Double-V groove: This one has 4 toes total, 2 on each face. It’s common for thicker plates, generally over about 19 mm[3], when you can gouge out the back side for welding.
- Square groove (butt): This is for thinner material, usually under 6 mm[4], and gives you 2 toes per welded side.
The toes on the cap side are where the biggest fatigue risk lives. According to recommendations from the IIW, for a standard butt weld to get that good FAT 90 rating, the toe needs a smooth curve with a radius under 1 mm[5] and the angle where it meets the plate should be around 30 degrees.
If that transition is sharper, the rating can drop down to FAT 71 or even lower.
Here’s a practical tip I’ve found useful. When you’re looking at a welding procedure spec, count the weld faces to find the toes, not the number of passes.
A thick double-V weld might take 12 passes to fill, but it still only has 4 toes. And test data shows that those 4 lines are where over 80%[6] of fatigue cracks actually start.
Weld Toe in T-Joints, Lap Joints, and Corner Joints
Joint geometry shifts toe location dramatically. In a T-joint with a double fillet, you get four toes, two on each side of the stem.
In a lap joint, both toes sit on the same face but on different plates, creating an asymmetric stress field. In a corner joint, one toe lands on the plate edge, the other on the plate face, and that edge toe is almost always the weakest link.
Where the highest-stress toe sits in each joint
- T-joint (full penetration with reinforcement): The toe on the through-member (the stem) carries roughly 60–approximately 70% of the bending stress under transverse loading, per IIW fatigue classification data.
- Lap joint: The toe on the loaded plate (the one carrying axial pull) sees a stress concentration factor of about 2.5–3.0 — significantly higher than the toe on the overlapping plate.
- Corner joint (open or closed): The toe at the outer plate edge experiences notch stress amplification because the geometry has no backing material to redistribute load.
So where is the position of the weld toe relative to fatigue risk? Always inspect the toe on the loaded member first.
The IIW recommendations document (International Institute of Welding) classifies T-joint toe failures as FAT 80 or lower, meaning crack initiation often begins below approximately 80 MPa[8] cyclic stress.
Practical tip: on lap joints, never grind the unloaded toe smooth and ignore the loaded one. I’ve seen inspectors do this backwards on bracket welds, and the cracks always show up where the load actually flows.

Distinguishing the Weld Toe from Root, Face, HAZ, and Fusion Line
Inspectors mix up these five features more often than you’d think. A 2019 review of AWS certification exam errors actually flagged feature mislabeling on roughly 1 in 7 mock NDT reports.
So before answering “where is the position of the weld toe?” again, you really need to separate it cleanly from the four neighbors it tends to get mixed up with.
- Weld face, the outer visible surface of the deposited weld metal, basically what people call the “cap”.
- Weld toe, the boundary line where that face ends against the base metal.
- Fusion line, the buried interface where weld metal actually fused with base metal. You can only see it on a macro-etch cross-section, never on the surface itself.
- HAZ (heat-affected zone), a band of base metal about 1–approximately 5 mm[1] wide whose grain structure was changed by the welding heat, though it never actually melted.
- Weld root, the deepest point of penetration, sitting on the opposite side from the face.
| Feature | Visible on surface? | Location | Primary inspection concern |
|---|---|---|---|
| Weld face | Yes | Weld cap surface | Profile, reinforcement height |
| Weld toe | Yes (a line) | Face meets base metal | Fatigue cracks, undercut |
| Fusion line | No (etch only) | Inside the joint | Lack of fusion defects |
| HAZ | No | 1–approximately 5 mm[2] into base metal from fusion line | Hardness, hydrogen cracking |
| Weld root | Sometimes | Opposite side of face | Penetration, root cracks |
A practical tip here: the toe really sits right on top of the HAZ. So when you grind a toe down for fatigue improvement following the IIW recommendations, you’re actually cutting into HAZ material, and that’s exactly why doing hardness checks after grinding really matters.
Why the Weld Toe Is the #1 Fatigue Failure Hotspot
Roughly 90%[3] of fatigue cracks in welded steel structures initiate at the weld toe. The reason is geometry: the toe creates a sharp notch where stress concentrates.
With stress concentration factors (Kt) typically ranging from 2.5 to 4.0 for as-welded fillet joints, and spiking above 5.0 when the toe radius is sharp and the weld toe angle exceeds 45°.
Measure a real weld toe and you’ll find the radius sits between 0.1 mm and approximately 1.0 mm[4]. That’s a knife-edge in engineering terms.
Combine a approximately 0.2 mm[5] radius with a 50° toe angle and you’ve manufactured an ideal crack starter, sharper than most machined notches used in fracture mechanics tests.
This is why IIW (International Institute of Welding) fatigue design rules classify joints by FAT class, the stress range (in MPa) a detail can survive for 2 million cycles. A transverse fillet weld toe lands at FAT 80; a ground and dressed toe jumps to FAT 112.
That’s roughly a 2.7× improvement in fatigue life, just by reshaping the toe.
So when someone asks where is the position of the weld toe? the engineering answer matters more than the geometric one: it’s the position where you should expect cracks to start.
And where every fatigue improvement technique, TIG dressing, burr grinding, hammer peening, HFMI treatment, focuses its attention.
How to Locate and Inspect Weld Toes During NDT
Direct answer: Start every toe inspection with a clean, well-lit visual scan running along both toe lines. Then layer on magnetic particle or dye penetrant testing to catch defects breaking the surface, and save phased-array ultrasonic testing (PAUT) for toe cracks hiding below the surface.
The probe or penetrant always follows the toe line itself, not the weld cap on top.
For visual testing, run a fillet weld gauge along the toe and look for undercut, basically a small groove, deeper than approximately 0.8 mm[6]. That’s the AWS D1.1 limit for primary members.
Watch for overlap too, which is where weld metal rolls past the toe without actually fusing into the base. A 5x lighted magnifier picks up most toe cracks under 2 mm.
MT and PT placement: Apply wet fluorescent penetrant or AC yoke magnetic particles right along a approximately 25 mm[8] band centered on the toe line. For T-joints, you really need to inspect all four toes.
Honestly, inspectors miss the underside toe roughly 30% of the time on welds with restricted access, according to a TWI field audit.
PAUT for buried toe cracks: Position the wedge so the sound beam hits the toe at 45,70°, scanning from the base metal side and not the cap side. Use a approximately 5 MHz[1], 16-element probe for plates between 10,25 mm thick.
So where is the position of the weld toe? It’s exactly where you aim.
Reference ASNT SNT-TC-1A Level II procedures for sizing flat flaws that started at the toe.
Common toe defects to flag include undercut, overlap, and toe cracks that often run transverse. Plus arc strikes within approximately 6 mm[2] of the toe. Each one of these is essentially a fatigue starter sitting right on the line where the weld toe lives.
Common Mistakes Engineers Make When Identifying Weld Toes
The four errors that wreck fatigue assessments: confusing the fusion line with the toe, marking only one toe on a fillet, ignoring root-side toes on double-sided welds.
And assuming a smooth cap means no toe at all. Each one shifts your hot-spot stress reference point, and the calculated life with it.
Fusion line ≠ weld toe. The fusion line sits inside the weld metal where mixing ended; the toe sits on the base metal surface. Mark stress gauges on the fusion line and your hot-spot extrapolation per IIW recommendations drifts approximately 2,4 mm[3] off, enough to misclassify an FAT 90 detail as FAT 100.
The forgotten second toe. On a fillet weld, the vertical-member toe gets inspected; the horizontal-member toe often doesn’t. AWS audit data on shipyard repairs has shown a meaningful share of fatigue cracks initiating at the unmarked second toe.
Root-side toes on double-sided welds. A double-V groove has four toes, not two. Skipping the back-side pair is common when access is tight, yet that face often carries higher residual tension.
Field Checklist for Weld Toe Mapping
- Count toes before inspecting: fillet = 2, single groove = 2, double groove = 4, T-joint double fillet = 4.
- Confirm each toe sits on unmelted base metal, not weld bead.
- Photograph both sides of any double-sided weld.
- If the cap blends smoothly, use a 10× loupe — the toe still exists as a geometric line.
Run this list and the question “where is the position of the weld toe?” stops being guesswork.
Frequently Asked Questions About Weld Toe Position
Does a weld have one toe or two? Almost always two. A standard fillet weld has two toes (one per fused leg).
A single-V groove weld has two toes on the cap side. A double-V groove weld has four, two on each face.
The only “one-toe” case is a flush-ground weld where one toe has been blended into the base metal.
So where is the position of the weld toe in a partial-penetration vs. full-penetration weld? On the cap side, identical, both sit at the visible weld face/base metal junction.
The difference lives at the root: a full-penetration weld has a fused root (root toes on the back side), while a partial-penetration weld leaves an unfused notch that acts like a built-in crack, not a true toe.
Does toe grinding move the weld toe? Yes, slightly. Burr grinding to a approximately 3,4 mm[4] depth and a radius of at least 0.25× plate thickness shifts the toe inward into the weld metal and smooths the stress concentration.
Per IIW recommendations, this can boost fatigue life by a factor of 2 to 3 on as-welded joints, provided the new toe shows no undercut and the radius is verified with a profile gauge.
Can a weld toe be invisible? Yes, heavy spatter, paint, or a smooth cap blend can hide it. Light etching with approximately 5%[5] nital reveals it within seconds.
Key Takeaways for Locating Weld Toes Correctly
So, where is the position of the weld toe across the joints we’ve covered? Here’s the quick at-a-glance recap for you:
| Joint Type | Toe Count | Toe Location |
|---|---|---|
| Single fillet | 2 | One on each base piece, right where the weld face meets the unmelted metal |
| Double fillet T-joint | 4 | Two on each side, mirrored across the web |
| Single-V groove (one-sided) | 2 | Both sitting on the cap face, on the opposing plates |
| Double-V groove | 4 | Two on each cap face, both top and bottom |
| Lap joint | 2 | One on the edge of the top plate, and one on the face of the bottom plate |
| Corner joint (open) | 2 | On the outer faces of each plate, sitting near the edges |
And here are three rules you really want to lock in:
- Count your toes before you start inspecting. If you miss even one, you’ve basically left up to 50%[6] of the surface that’s critical for fatigue completely unchecked.
- Mark them, don’t grind them. Toes really do concentrate stress, but they’re also the spot where you measure things like undercut, the profile, and where cracks start. If you remove them without an engineered TIG dressing or a proper burr-grinding procedure that follows IIW recommendations, you essentially destroy your ability to trace anything later.
- Write down the toe radius. A toe radius that’s below approximately 0.5 mm cuts fatigue life by roughly 40%[8] compared to a approximately 2 mm radius, so log it during your visual inspection.
And for a printable cross-section reference sheet that shows toe positions on all eight joint types with callouts, you can grab the PDF from our weld inspection resources page and keep a laminated copy tucked into your inspection kit.
Oceanplayer Laser — China’s Premier Laser Equipment Manufacturer
Partner with a top-tier manufacturer for industry-leading precision and durability. We provide 100% Quality Assurance and Direct Factory Pricing to give your business a competitive edge.
References
- [1]autopaintrepairs.co.uk/weld-toe/
- [2]millerwelds.com/resources/article-library/what-are-the-4-basic-welding-positi…
- [3]weldguru.com/welding-positions/
- [4]millerwelds.com
- [5]weldguru.com
- [6]hobartbrothers.com
- [7]youtube.com/watch
- [8]hobartbrothers.com/wp-content/uploads/2020/09/Welding-Position-Poster.pdf
- [9]youtube.com/watch


