

Weld Toe Position: Fillet vs Groove Welds
A weld toe is the line where the weld face meets the base metal. A single fillet weld normally has one toe on each joined member. A reinforced groove-weld face has one at each cap edge. Follow these lines along the joint; a cross-section shows them as points, not their full length.
Use the diagrams below to find the toes, distinguish them from the root and heat-affected zone, and identify surface conditions that need closer inspection.
View the weld toe diagrams
Where are the weld toes on fillet and groove welds?
First find the exposed weld face. Its two outer edges meet the original member surfaces. Those junctions are the toes—not the center of the bead and not the prepared bevel buried inside a completed groove weld.
Fillet weld: one toe on each member
Groove weld: one toe at each cap edge
Terminology framework: AWS A3.0M/A3.0:2025. Use the terminology edition specified by your project.
On a real T-joint, the toe on the upright plate may be harder to see than the toe on the base plate. Change the viewing angle or use a suitable mirror rather than inspecting only the convenient side. At starts, stops and weld returns, follow the changing geometry instead of assuming the lines remain straight.
Toe position is not a fixed distance. Do not locate a toe by measuring the nominal weld size alone. Actual leg lengths, member angle, fit-up and the deposited profile affect where the face ends.
How many weld toes should you inspect?
Count completed weld faces, not welding passes. Several passes can form one cap with two outer toes. Another weld on the opposite side creates another face to examine.
On a narrow screen, scroll the table sideways to read every column.
| Finished joint | Usual surface toe count | What to trace | Do not overlook |
|---|---|---|---|
| Single fillet | 2 per fillet | One junction on each member | The less accessible toe and weld ends |
| Double-fillet T-joint | 4 across both fillets | Both members on both sides of the upright plate | Different loading or access on the two sides |
| Reinforced groove-weld cap | 2 on that face | Left and right edges of the cap | The root side still needs its specified examination |
| Two reinforced faces | Usually 4 in total | Two toes on each face | The actual reverse-side profile, including root reinforcement |
| Flush-ground groove weld | No raised cap toes if fully blended | The finished blend and former cap region | Remaining thickness, grooves and required inspection after finishing |
These are simplified geometric counts. Backing, corner details, additional attachments and weld returns can change the surfaces present.
A backing bar does not automatically add two toes: its edges are not necessarily weld-face-to-base-metal junctions. Likewise, a smooth cap does not prove that the root has fused. Surface identification and internal weld quality are separate questions.
Weld toe vs root, throat and heat-affected zone
The toe tells you where the weld face ends. It does not tell you the effective throat, penetration or the width of the heat-affected zone.
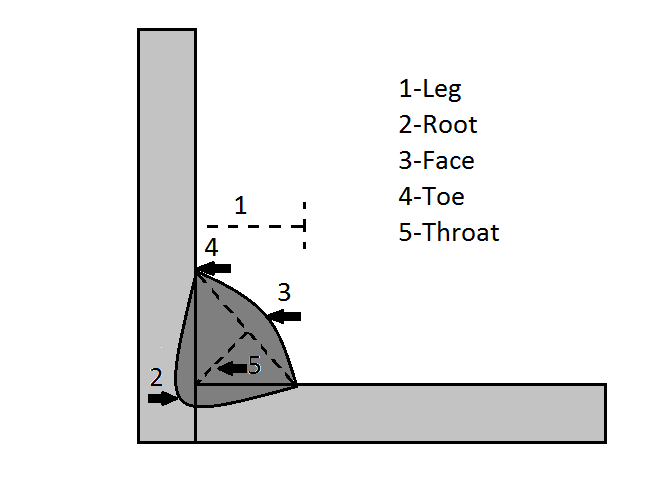
- Face
- The exposed surface of weld metal on the welding side. In these examples, its outer junctions form the toes.
- Root
- The deepest part of the weld relative to its face. In the idealized fillet shown above, it is at the inside corner—not at either orange toe marker.
- Throat
- A through-weld dimension used in weld sizing. Its design definition depends on the joint and applicable rules; it is not the distance between the toes.
- Fusion boundary
- The interface between weld metal and the surrounding base metal. Much of it is internal, unlike the surface toe.
- Heat-affected zone (HAZ)
- Base metal changed by the welding thermal cycle without melting. It occupies a region next to the fusion zone, not a single line.
Heat tint is not a toe marker. On stainless steel, visible oxidation colors do not map the HAZ accurately and do not define the weld-face edge. Locate the toe from the surface shape, not the outer edge of a colored band. TWI explains the distinction between HAZ and heat tint.
If your question concerns the opening between parts before welding, see weld root gap and welding quality. That is a fit-up issue; toe position describes the finished surface.
Why do weld toes matter under repeated loading?
Repeated loading can grow a crack even when one application of the same load would not break the part. A sharp toe transition concentrates stress locally. Undercut and small flaws near that transition can make the situation worse.
This explains why a smooth-looking bead is not enough evidence for a fatigue-loaded joint. Very small cracks can escape visual examination, and fatigue may also start at the root or an internal flaw. The relevant question is which detail carries the cyclic stress—not simply which side looks roughest. TWI fatigue guidance describes these mechanisms.
Example: a stiffener welded to a tension-loaded plate
Imagine a fillet joining an upright stiffener to a plate that repeatedly stretches under load. One toe lies directly on that plate; the other lies on the stiffener. They belong to the same fillet but do not necessarily have the same structural role.
The AWS explanation of the 2025 D1.5 Bridge Welding Code makes this distinction explicit when discussing undercut assessment. This is why an inspection record should identify the member and stress direction rather than report only “undercut on the weld.”
Illustrative geometry, not an Oceanplayer Laser test result. AWS: toe-specific undercut assessment in D1.5:2025.
For fatigue design, give the responsible engineer the joint detail, loading direction and load history. There is no universal “critical toe” that can be selected from the weld name alone.
Is the line a normal weld toe, undercut or a crack?
A toe is a normal weld feature. An imperfection at the toe is a separate finding. Describe what you can actually see and measure before deciding whether it is acceptable.
Scroll the table sideways on smaller screens.
| Surface condition | What it looks like | What to check next |
|---|---|---|
| Normal transition | The weld face meets the plate, with no obvious groove or lip | Required dimensions and profile; appearance alone does not establish internal quality |
| Undercut | A groove in the base metal next to the weld edge, left unfilled | Depth, extent, exact member and the applicable acceptance clause |
| Overlap | Weld metal appears to roll over the plate as a lip rather than blend into it | Possible unfused edge; do not classify it as a harmless wide toe from a photograph |
| Suspected toe crack | A fine line, sometimes extending from or along the transition | Record the indication and refer it for the specified examination before repair or release |
| Spatter, slag or coating | The actual junction is partly obscured | Approved cleaning and access; do not mistake an obstruction for an acceptable surface |
| Grinding groove | A depression or scratch remains after finishing | Remaining section, blend shape and post-treatment inspection requirements |
Do not grind away an unexplained line just to improve appearance. First preserve its location and have it assessed. Cosmetic finishing can remove evidence without resolving the underlying problem.
How should you locate and inspect both toe lines?
Begin with the drawing and inspection plan, then make each required surface visible. The aim is a traceable finding—not simply a close-up photograph of a shiny bead.
- Identify the joint and surfaces. Record the part and weld ID. Check the cap, reverse face and returns where the specified coverage requires them.
- Prepare without altering the evidence. Remove permitted obstructions using the approved preparation method. Record inaccessible areas rather than treating them as inspected.
- Trace each toe. Use suitable lighting, viewing angles and optical aids. Look at the entire junction, including starts and stops, not only the middle of the weld.
- Measure the relevant feature. Use an appropriate gauge or profile method for dimensions such as undercut depth. Record units, extent and location; a photo without scale does not provide a reliable depth measurement.
- Evaluate and document. Compare the finding with the project criteria. Where another test is required, record the method and outcome before release.
This sequence follows the preparation, observation, evaluation and reporting principles described by ASNT for visual testing.
Which examination method fits the question?
Visual testing (VT) helps locate visible imperfections and check the surface profile. It cannot rule out every fine or hidden crack.
Liquid penetrant testing (PT) can reveal discontinuities that open to a suitable nonporous surface. It does not detect sealed subsurface flaws. Preparation and the specified test sequence matter. ASNT PT guidance.
Magnetic particle testing (MT) is for ferromagnetic materials and can detect surface and some near-surface discontinuities. It is not a general substitute for PT on aluminum or austenitic stainless steel. ASNT MT guidance.
Ultrasonic examination may be specified when internal cracking or flaw extent is the concern. Joint geometry, access and procedure suitability matter; the fact that a toe is accessible does not establish ultrasonic coverage. TWI distinguishes surface and internal crack detection.
Make the report reproducible: weld ID → inspected face and member → distance from a fixed reference → indication type and measured size → method and coverage → applicable criterion → disposition. Include a scaled photograph when useful.
What weld toe conditions are acceptable?
Use the governing construction code, edition, drawing and inspection requirements. A single undercut-depth limit copied from another job is not a dependable acceptance rule. The member, thickness and loading category can change how a finding is evaluated.
The AWS D1.5:2025 explanation is a useful example of different treatment by component role and toe location. It is a bridge-code example, not permission to apply bridge limits to every machine frame or sheet-metal product.
A workmanship pass also does not independently establish the required fatigue life. Conversely, a rough appearance is not a measured crack depth. Keep appearance, dimensional acceptance, flaw detection and structural assessment distinct.
Can grinding or dressing improve the toe?
Yes, when the treatment matches the failure mechanism and follows an approved method. Toe grinding changes the local profile and removes material. TIG dressing remelts the transition. Peening or high-frequency mechanical impact can be selected as other treatment routes. These are controlled operations, not interchangeable cosmetic finishes.
TWI's improvement-method guidance calls for detailed methods and trained operators. A toe treatment should not be credited with fixing a root-controlled failure mode.
What a toe-grinding study teaches
In a published TWI study of toe-ground, non-load-carrying transverse fillet joints in S355JR steel, many fatigue cracks still began at flaws on or just below the ground surface. The lesson is not that grinding never helps; it is that a visibly smooth finish does not prove all crack-starting features are gone.
Third-party research: Zhang and Maddox, Fatigue life prediction for toe-ground welded joints, 2009. The specimen results are not a universal improvement factor or a repair recipe.
Before treatment, define the permitted removal, final shape, remaining thickness and inspection. After treatment, verify those requirements. If a crack is suspected, use an authorized repair assessment rather than assuming ordinary toe blending is sufficient.
Other questions about weld toe identification
Does every ripple in a multi-pass cap create another weld toe?
Not in the completed-face sense used here. A ripple or junction between deposited beads is not automatically a junction with base metal. Inspect any specified inter-bead imperfections, but do not count every ripple as another outer cap toe.
Can a weld toe be identified after the cap is ground flush?
The original raised transition may no longer be visible. Use the joint record and finished surface to locate the treated region. A fully blended cap does not erase the weld or remove the need for the specified examination.
Can a photograph prove that a weld toe is acceptable?
A clear photograph can document location and visible shape. Without the relevant measurements, material information, criteria and required testing, it cannot establish acceptance or exclude internal flaws. Include both an overall view and a scaled detail when requesting a review.
Assess the joint, not only the bead appearance
The practical rule is simple: identify each finished face, trace its junctions with the base metal, then evaluate the relevant imperfections against the project requirements.
If you are considering laser welding for a part, send Oceanplayer Laser the material grade, thickness, joint drawing, gap range and the quality checks you need. Include the loading conditions where they affect acceptance, plus overall and close-up photographs.
Discuss a laser-welding application