

Laser Welder Sample Test Checklist: What to Verify Before You Order
Test your actual sheet, joint and product requirement before approving a laser welder. A polished generic coupon can show that a laser makes a bead. It cannot prove your part will be strong, leak-tight, flat, corrosion-ready, safe to produce or repeatable after the demonstration team leaves.

Use the actual grade, thickness, coating, finish, joint, fit-up range, access and fixture—or clearly label the result preliminary.
Photograph and inspect before grinding, polishing, paint or cleaning can hide starts, stops, cracks, pores or burn-through.
Use labeled macrosections and other risk-based tests. Top appearance cannot reveal every internal condition or load response.
Run multiple samples through realistic variation and preserve the exact configuration, method, records and change triggers.
What Should a Laser Welder Sample Test Prove Before You Order?
Before ordering a laser welder, ask the supplier to weld your supplied or fully matched sheet in the actual joint. Record fit-up and machine configuration. Then inspect the untouched weld, cut representative cross-sections, select mechanical or defect tests that match the real failure risk, measure the released part, perform any required leak or corrosion checks, review Class 4 laser and fume controls, and repeat the result.
Use the discipline of a procedure-qualification trial—defined material, joint, variables, tests and records—but call it a commercial feasibility or sample-acceptance result unless the applicable code qualification has actually been completed.
Often uses a flat, easy coupon, ideal fit-up, fresh optics and a specialist operator. It is useful for early feasibility, but its result may not transfer to your formed part.
Uses traceable material, a representative joint and pre-agreed evidence for appearance, fusion, function, dimensions, safety and repeatability.
| Test condition | Decision it can support | Evidence required | Stop boundary |
|---|---|---|---|
| Generic supplier coupon | Early process feasibility only | Material identity, machine configuration, settings and untouched result | Do not release a purchase for a different material, joint or formed part. |
| Production-matched joint coupon | Equipment and process screening | Actual grade, thickness, coating, joint, fit-up range, macrosections and repeated results | Stop if fit-up, surface condition or delivered configuration does not match. |
| Real formed component | Pre-order acceptance or FAT evidence | Functional, dimensional, finish, leak or load checks plus repeatability and handover records | Stop if only one selected or polished part is shown. |
| Code or customer qualification | Formal release only when the governing document is satisfied | Applicable WPS/PQR, qualified personnel, required specimens, methods, records and approvals | Never rename a commercial demonstration as formal qualification. |
What Evidence Should You Request for Your Specific Weld Test?
Choose the closest conditions. The result lists evidence to request—never machine parameters or an automatic pass.
The sample can support a purchase decision only after the missing control and evidence items are assigned and closed.
Planning aid only. It is not a WPS, code acceptance decision, inspection qualification or laser-safety approval.
What Should You Send the Supplier Before the Sample Test?
A supplier can propose the welding solution. The buyer still defines the part and what success must prove. Send these inputs before the test date so the hardest condition is not discovered after the deposit.
State the revision, weld locations, critical dimensions, cosmetic sides and whether the trial uses a coupon or real component.
Provide grade, thickness, temper where relevant, finish, coating, film, lot requirement and allowed cleaning state.
Define edge, overlap, gap, mismatch, alignment, clamping, position, access, starts, stops and corners.
Choose strength, leakage, dimensions, appearance, corrosion, hygiene, fatigue, code or customer evidence.
Share seam length, volume, positions, takt expectation, handling, changeovers, operator count and automation level.
Identify the proposed controlled area, reflective surroundings, extraction, combustibles, electrical supply and training owner.

Thin-sheet laser welding is sensitive to fit-up. Document the real edge condition, overlap, curvature, gun access and clamp method. If production permits a gap or mismatch range, test the nominal condition and agreed realistic boundaries.
- Include: starts, stops, corners, short seams and changes in gun angle.
- Inspect after release: heavy demo clamping can hide production distortion or access limits.
- Keep the whole system: sealant, flange, attachment or mechanical seam may remain part of the final leak path.
Which Checks Should You Use to Accept or Reject a Laser Weld Sample?
The 12 checks are grouped into four release gates. Each gate answers a different buyer question, so one polished sample cannot move the purchase forward by itself.
Does the Sample Represent the Production Part?
Material traceability
Use buyer-supplied or fully matched sheet. Record grade, thickness, coating, finish, temper, surface condition, filler and lot identity.
Joint and fit-up
Copy the real seam, edge, overlap, allowed gap, mismatch, access, position and clamp method. Test critical boundaries without inventing a universal maximum gap.
Exact machine configuration
Identify source, head, optics, nozzle, wire feeder, shielding delivery, fixture, interlocks, software revision and maintenance condition.
Does the Record Preserve the Actual Welding Process?
Tested settings and operator method
Record more than wattage: output mode, travel method, focus or stand-off, oscillation, gas, wire, clamps, starts, stops and corner method as applicable.
As-welded visual condition
Inspect before grinding, polishing, paint or cleaning. Look for cracks, discontinuity, undercut, underfill, overlap, burn-through, holes, spatter, oxidation and weak starts or corners.
Macrosection and fusion
Cut, prepare and examine labeled sections at relevant locations. A macrosection can show fusion geometry, root condition, pores and gross lack of fusion at the cut plane.
Do the Tests Match the Part's Real Failure Risk?
Mechanical behavior
Choose a bend, tensile, peel, break, pull, torsion or functional load method that reflects the real joint and governing requirement. Define specimen, direction and failure rule first.
Relevant defect method
Visual, macro, penetrant, radiography, ultrasonics and leak tests see different conditions. Thin sheet and joint geometry can limit a method, so demonstrate suitability.
Distortion and dimensions
Measure the dimensions the product must hold—flatness, squareness, flange position, hole relation or door fit—before and after welding and after fixture release.
Can the Result Be Repeated in Production?
Leakage and function
For sealed parts, define the approved pressure, vacuum, bubble, decay, tracer or other method, including boundary, medium, condition, stabilization, duration, instrument and acceptance.
Corrosion, finish and EHS
Verify coating loss and repair on galvanized sheet; tint, contamination and specified treatment on stainless; plus source-capture and Class 4 laser-control plans.
Repeatability and handover
Repeat realistic starts, stops, corners, positions and variation. Add a second trained operator where relevant and repeat after any setting or configuration change.
Why Is a Good-Looking Laser Weld Not Enough for Acceptance?
Inspection methods answer different questions. Use the simplest combination that can reveal the failure modes that matter, and write acceptance criteria from the actual product, contract or governing specification.
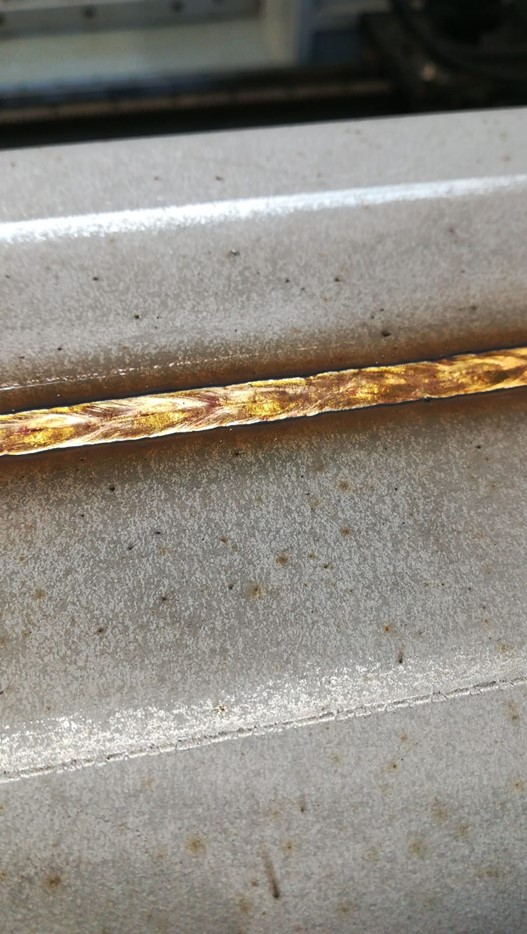
A clean-looking bead can show continuity, oxidation, undercut, spatter and start/stop behavior. It cannot prove every buried pore, fusion boundary, load response or leak path.
Image: LaserTherm, Wikimedia Commons, CC BY-SA 4.0.
An etched section can reveal penetration geometry and internal discontinuities at its location. It is sampled evidence—not proof that every millimeter of a long seam is identical.
Image: LaserTherm, Wikimedia Commons, CC BY-SA 4.0.Which Inspection Method Matches the Part's Failure Risk?
The table is a planning map. The applicable drawing, code, customer specification and qualified technical team set the final method and acceptance values.
| Product priority | Evidence to consider | Important boundary |
|---|---|---|
| Cosmetic enclosure | As-welded visual reference, dimensions after fixture release, macrosections for a new joint, agreed finish route. | A beautiful face cannot prove internal fusion or repeatability. |
| Load-bearing joint | Joint-specific mechanical test, fracture record, macrosections and specified NDE where justified. | Test direction and acceptance must reflect the actual load path. |
| Sealed duct, tank or enclosure | Complete-boundary leak test including corners, starts/stops, attachments and final post-weld condition. | Pressure testing can be hazardous; use the product’s controlled procedure and defined limits. |
| Dimension-critical assembly | Datum-based pre/post measurements across multiple samples after clamp and fixture release. | Do not approve from a single selected photo or an in-fixture reading. |
| Corrosion or hygiene service | Traceable alloy/finish, surface recovery, contamination control, cleanability and service-specific review. | Low tint or passivation alone is not proof that all oxides or contamination were removed. |
How Do Galvanized and Stainless Steel Change the Sample Test?
Do not transfer a clean carbon-steel coupon result to galvanized or stainless production sheet.
What Should You Verify on Galvanized Steel?
Zinc can affect plume, porosity, spatter and fusion stability. Welding also disturbs the original protective layer near the seam.
- Identify the actual coating, surface oil and joint interface.
- Inspect untouched samples and macrosections for pores or unstable fusion.
- Verify source capture for the real workpiece geometry and assess exposure.
- Define any permitted local preparation and post-weld coating repair.
- Inspect the repaired condition for the intended indoor, wet or corrosive service.
What Should You Verify on Stainless Steel?
Heat tint, oxide, spatter and carbon-steel contamination can matter in wet, chloride, chemical, hygienic or cosmetic service.
- Use the actual grade, finish and dedicated clean tooling.
- Agree the permitted tint and the required surface-treatment route.
- Remove weld oxide or contamination as required before the specified passivation step.
- Do not treat passivation as a substitute for removing heat tint or gross contamination.
- Verify the final surface against corrosion, cleanability and appearance needs.
Which Class 4 Laser and Fume Controls Must Be Ready?
How Should You Witness a Laser Welder Sample Test at the Factory?
Witnessing is valuable for a costly machine, new supplier or joint with strength, leakage, corrosion or safety consequences. If travel is impossible, use live views, labeled samples, raw files and shipped physical specimens where the risk justifies it.
Do not let a polished final sample erase how much tuning, rework, cleaning or fixture help was needed to produce it.
Approve the plan before cutting.
Freeze drawings, material, joints, sample set, evidence, pass/fail authority, sample ownership and re-test rules.
Verify identity and pre-weld condition.
Photograph labels, coating, protective film, edges, cleaning, measured thickness, gap, alignment and clamps.
Confirm the quoted configuration.
Record the source, head, optics/nozzle, wire/gas system, fixture, safety package, software/program and maintenance state.
Observe the untouched first pass.
Note starts, stops, corners, travel control, plume direction, extraction, reflections and every adjustment made during tuning.
Preserve and inspect as-welded samples.
Photograph under consistent light and map every visible indication before any grinding, cleaning, polish or coating.
Label cut and test locations.
Select macro, mechanical, NDE and retention specimens before cutting. Keep enough material for independent review where appropriate.
Measure the released assembly.
Remove the fixture, record functional dimensions and run the defined leak, fit or load test on the complete boundary.
Close failures and collect the package.
Record nonconformances, repeat required tests after corrections, preserve raw data, physical samples, final limits and remaining risks.

Record actual sheet thickness, gap, overlap and post-weld dimensions. Nominal values and in-fixture appearance are not enough.
Image: Jeremyida002, Wikimedia Commons, CC BY-SA 4.0.Which Red Flags Mean You Should Stop the Purchase Release?
Each warning means the evidence chain is incomplete. Ask for the missing test rather than accepting a verbal promise.
How Should the Approved Sample Be Written Into the RFQ, FAT, and Purchase Order?
A sample reduces risk only when its identity, configuration, results and limits travel into the quotation, purchase order, factory acceptance and production documents.
- Finds joint and fit-up problems before the deposit or launch.
- Turns marketing claims into evidence for the actual sheet and function.
- Creates one record for supplier, buyer, quality and operations.
- Reveals safety, fume and finishing work before installation.
- A finite trial cannot prove unlimited future material or production variation.
- Testing may require destructive specimens, lab support and extra material.
- The supplier’s demo facility does not replace the buyer’s site review.
- Production changes need defined review and possible re-testing.
Frequently Asked Questions About Laser Welder Sample Testing
Short answers to remaining buyer questions that are not fully resolved by the main checklist.
How many laser-welding samples should a buyer request?
There is no universal number. Request enough to cover the nominal condition, realistic fit-up or material boundaries, critical starts, stops, corners and positions, plus separate pieces for visual review, macrosections, destructive or functional tests and buyer retention. Higher-consequence parts need more evidence and repetition.
Should I ask for a macrosection on every laser-weld sample?
Macrosections are especially valuable for a new joint, thin or coated sheet, critical seam or unfamiliar process. Their number and locations should be risk-based. A section shows only its cut plane, so combine it with visual and functional evidence where the full seam matters.
How do I test a laser-welded sheet-metal part for leaks?
Use the product’s specified method—such as pressure hold, decay, bubble, vacuum or tracer gas—and define the medium, pressure or vacuum, stabilization, duration, temperature, instrument sensitivity, boundary and allowable result. Include corners, starts/stops and attachments. Pressure testing must follow a controlled safe procedure.
Can a generic machine preset be used in production?
Treat it only as a starting point. Production settings must be tested for the actual material, thickness, coating, joint, fit-up, fixture, travel method, shielding or filler arrangement and acceptance need. Record the tested window and changes that trigger review or another trial.
Which Standards Define the Evidence and Safety Boundaries?
- AWS C7.4/C7.4M:2017-AMD1 — laser-beam welding process, quality examination, equipment and operator framework.
- AWS B2.1/B2.1M:2026 — formal procedure and performance qualification, including laser beam welding, when invoked by a referencing document.
- ISO 15614-11:2025 — formal WPS qualification tests for electron and laser beam welding.
- ISO 13919-1:2019 — imperfection quality levels for laser/electron-beam welds in steel, nickel and titanium; levels describe production quality, not fitness for purpose.
- ISO 13919-2:2021 — imperfection quality levels for aluminium, magnesium and pure copper.
- ISO 17637:2016 — visual testing of fusion-welded joints, including pre-weld joint examination.
- ISO 17639:2022 — preparation and procedure for macro- and microscopic examination of welds.
- ISO 3452-1:2021 — penetrant testing principles for surface-open discontinuities; it does not set acceptance criteria.
- ISO 9712:2021 — qualification and certification of NDT personnel where required.
- OSHA Technical Manual: Laser Hazards — controlled areas, beam termination, entry, training and Class 4 controls.
- AWS: Handheld Laser Welding Safety — practical safety issues for high-power handheld systems.
- NIOSH Engineering Controls: Welding LEV — source-capture and material-dependent fume-control context.
- Outokumpu: Post-fabrication treatment — heat tint, cleaning, pickling and passivation context for stainless steel.
What Should You Send for a Trial-Backed Equipment Recommendation?
Share the drawing, actual material and coating, joint section, fit-up range, finish or leak requirement, production volume and site constraints. Oceanplayer Laser can help turn them into a representative test matrix and equipment recommendation.