oceanplayer

Oceanplayer Laser Equipment | Cleaning, Welding, Marking, Automation Sample Testing | Global Shipping | OEM/ODM Support
Medical Device Laser Solutions

Medical Device Laser Solutions for UDI Marking, Precision Welding, Surface Cleaning and Traceability.

Oceanplayer helps medical device manufacturers, surgical instrument suppliers and precision component workshops create durable marks, clean metal surfaces and support controlled welding workflows on stainless steel, titanium, aluminum and polymer components.
  • UDI, serial number, QR code and Data Matrix marking
  • Stainless steel, titanium and medical metal component processing
  • Precision surface preparation, welding support and automated traceability
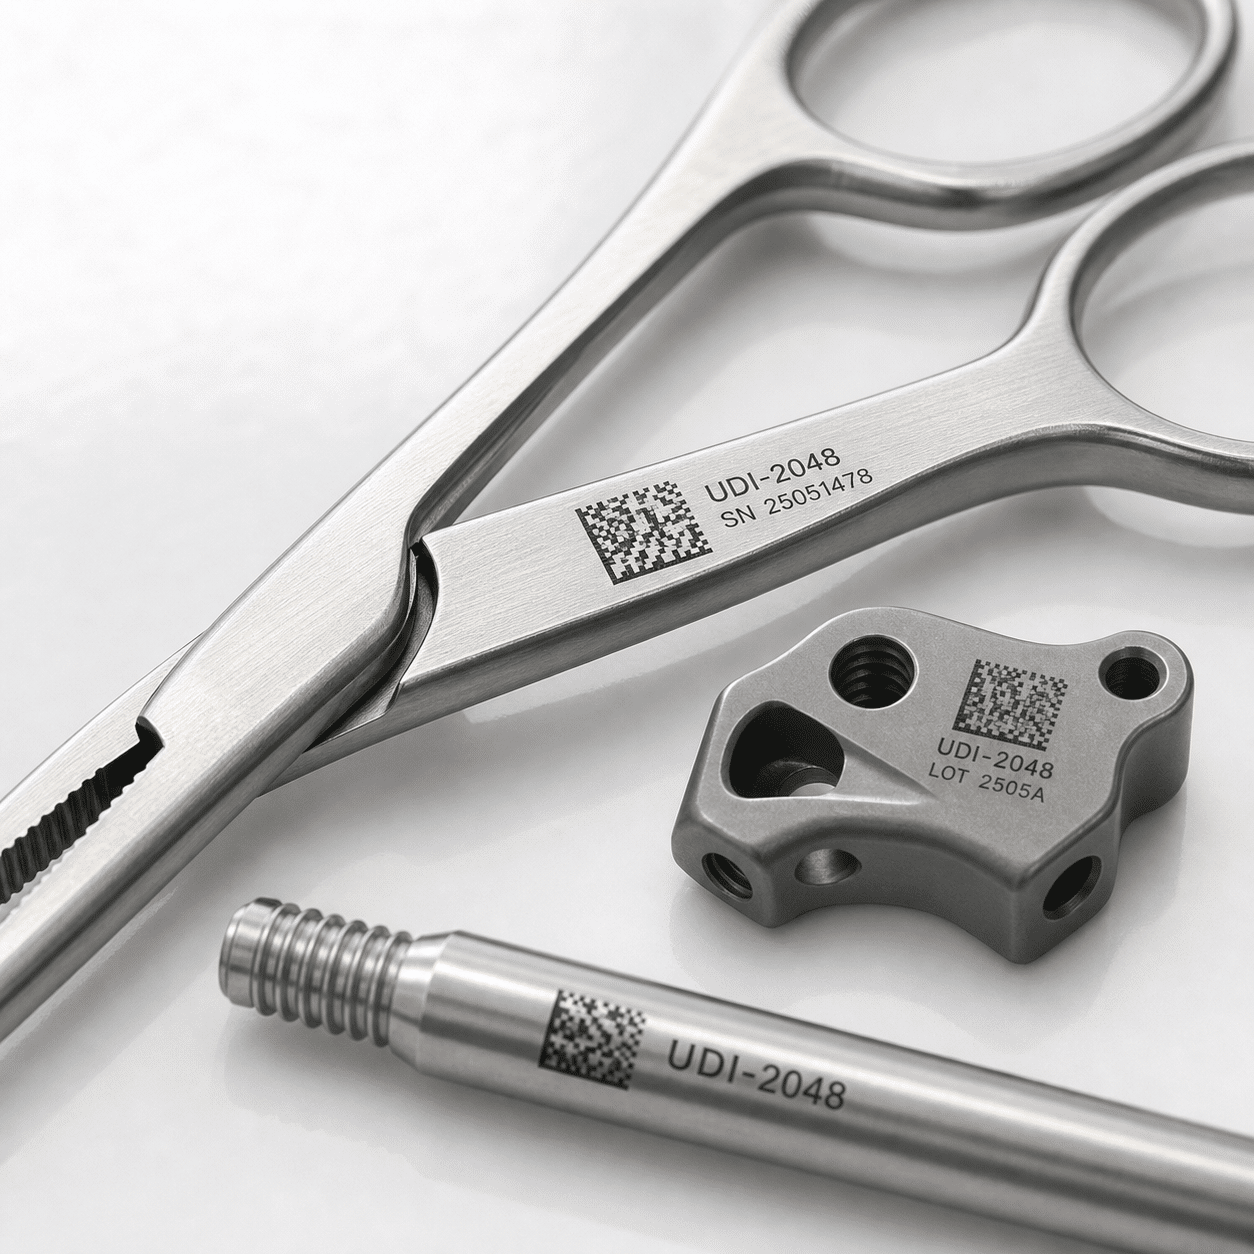
Medical device laser marking welding and cleaning solution for surgical instruments and precision components
Traceable medical parts Readable codes, clean surfaces and controlled processing
UDI Part marking
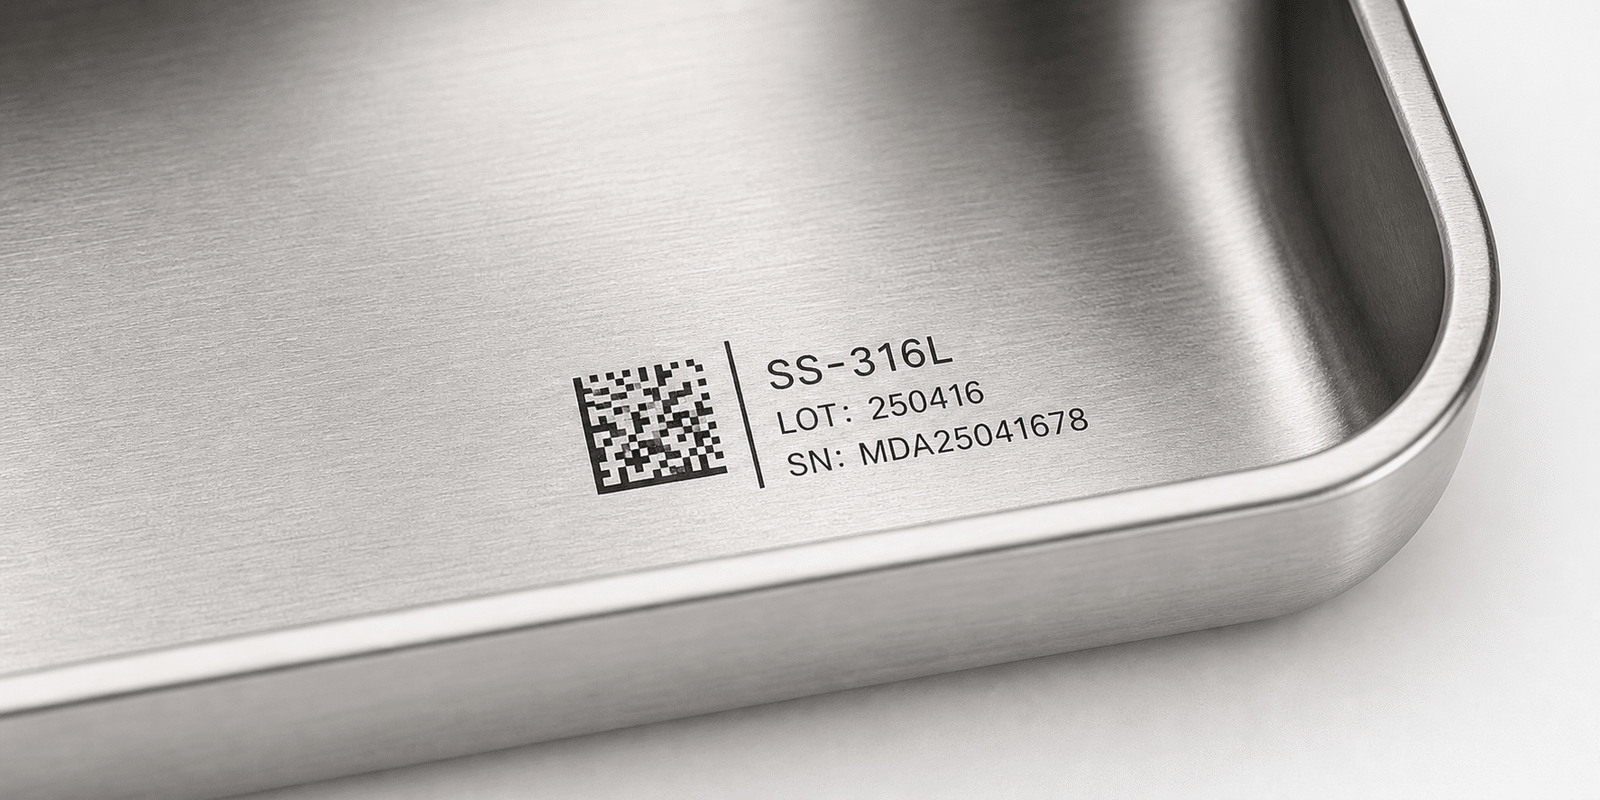
MOPA Black mark
QC Readable codes
Permanent Traceability Codes and serial numbers for device identification workflows
Surface Care Process visible and precision surfaces with controlled settings
Small Part Ready Fixtures, rotary devices and fine marking fields for compact parts
Sample Proof Test real instruments, implants, housings and components
Industry Needs

Medical device manufacturers need laser processes that support clean identification, repeatable quality and delicate surfaces

Medical parts often require readable codes, stable surface appearance, controlled heat input and reliable fixture positioning. A suitable laser solution should match the part material, mark size, cleaning need and production volume.

UDI and Serial Number Marking

Create durable UDI codes, Data Matrix codes, QR codes, serial numbers and batch marks on instruments, implants and device components.

Black Marking on Stainless Steel

Use MOPA laser settings to create high-contrast black marks on stainless steel tools and visible medical components.

Titanium and Implant Part Marking

Mark titanium plates, screws, housings and precision parts with controlled contrast and suitable code size.

Precision Weld Preparation

Clean oxide, oil and handling residue from small metal components before welding, assembly or inspection.

Polymer and Packaging Marks

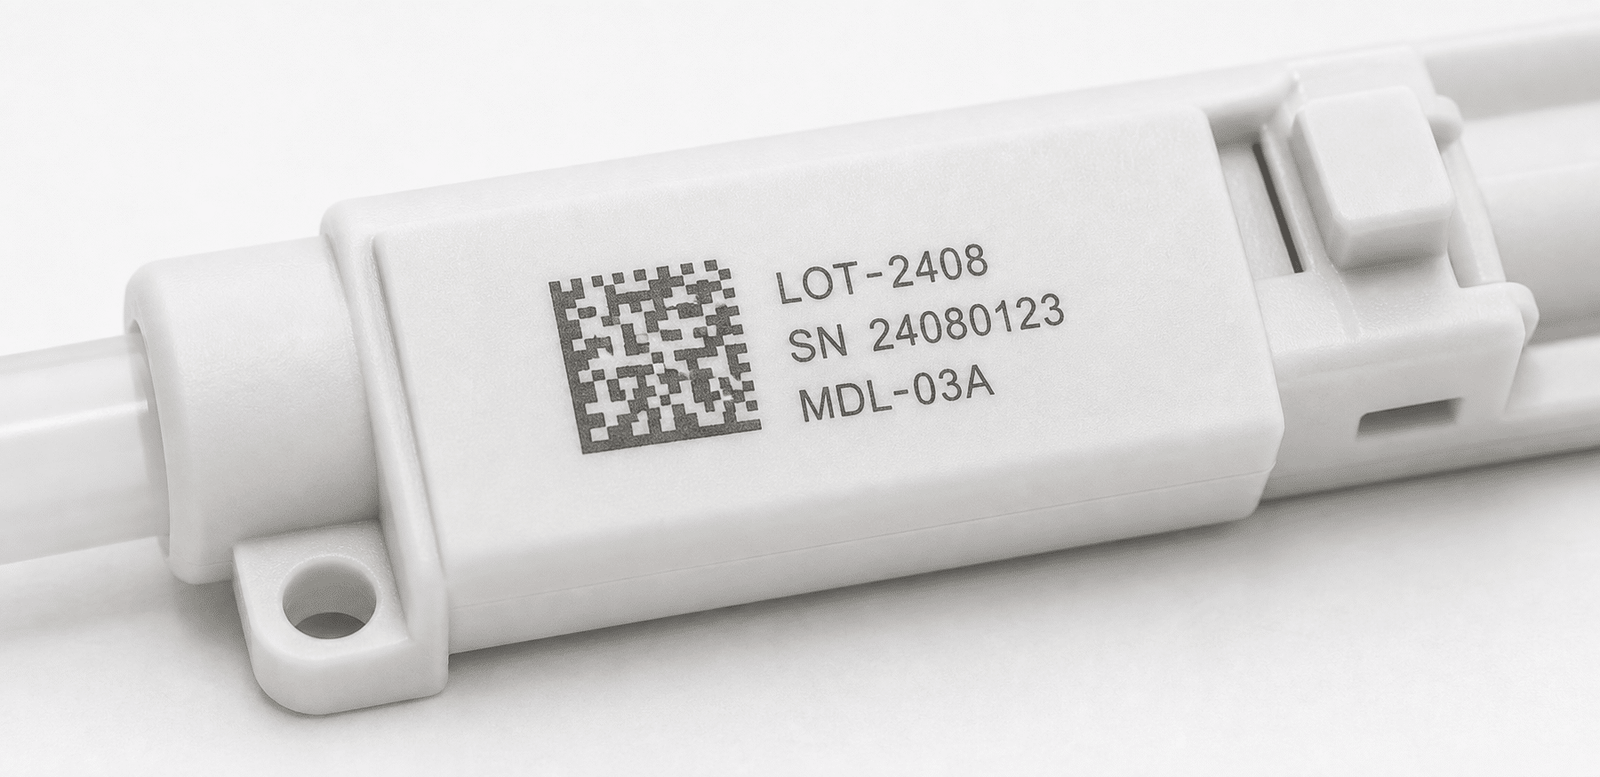
Use UV or CO2 laser options for selected plastics, housings, tubing, labels and medical packaging materials.

Automated Production Records

Integrate marking with fixtures, scanners, code verification and production data for repeated medical part batches.

Device Workflow

Fit laser marking and cleaning into medical device production steps

Laser systems can support incoming part ID, pre-assembly cleaning, final traceability marking and quality checks depending on material and part geometry.

Step 01

Confirm Material

Review stainless steel, titanium, aluminum, polymer or coated component surface before testing.

Step 02

Define Code Requirement

Set code type, mark size, contrast, location, readability and production data needs.

Step 03

Design Fixture and Process

Choose positioning, rotary attachment, scanner, vision check or automation interface.

Step 04

Verify Mark and Surface

Review readability, surface appearance, depth, heat effect and cleaning result before production.

Medical Applications

Use laser systems for medical part identification, surface preparation and controlled assembly

Medical device production often includes small parts, reflective metals, strict readability needs and repeated batches. Laser systems can be configured for both flexible sample work and automated production.

  • Surgical instrument logo, UDI, serial number and Data Matrix marking.
  • Stainless steel black marking for tools, trays and device components.
  • Titanium plate, screw, implant component and housing identification.
  • Catheter, tube, plastic housing and packaging mark testing with UV or CO2 lasers.
  • Cleaning before precision welding, bonding, coating or final inspection.
  • Automated marking cells with fixtures, scanning and code verification support.
Laser marking and cleaning application for medical device instruments and precision components
Solution Matrix

Select equipment by medical material, code type and production workflow

The right laser depends on part material, required code readability, mark contrast, surface finish, cycle time and whether the process needs manual loading or automation.

Medical Device Requirement Recommended Laser Option Best Use What To Check
Black mark on stainless instruments MOPA laser marking machine Surgical tools, trays, handles and visible stainless components Surface finish, mark contrast, readability and corrosion requirement
General metal UDI marking Fiber laser marking machine Serial numbers, QR codes, Data Matrix codes and part IDs Code size, material, depth and scanner readability
Titanium component marking Fiber or MOPA laser marker Plates, screws, housings, implants and precision assemblies Heat effect, contrast, mark location and fixture stability
Plastic or packaging marking UV or CO2 laser marking machine Selected polymers, tubes, housings, labels and packaging materials Material response, contrast, burn effect and mark durability
Automated traceability Automated laser marking system Batch parts, fixtures, barcode scanning and production data marking Cycle time, loading method, code grading and data connection
Quality Focus

Build the laser process around readability, surface control and repeatability

Medical device marking is not only about placing text on a part. The process should support readable codes, stable contrast, fixture repeatability and the surface requirements of the final product.

01

Code Readability

Confirm Data Matrix, QR code and serial marks can be read at the required size and location.

02

Surface Appearance

Match laser parameters to brushed, polished, passivated, blasted or machined surfaces.

03

Small Part Fixtures

Use fixtures, nests and rotary tools for screws, tubes, handles, round parts and tiny components.

04

Batch Consistency

Use saved recipes, data input and verification steps to support repeated production batches.

Results Gallery

Review laser results for medical marking, cleaning and precision components

Result photos help your team compare mark contrast, code readability, surface finish and cleaning effect before selecting equipment.

System Options

Choose the right laser setup for medical materials and production volume

Small parts may need precision fixtures and fine spot control, while batch production may need automated loading, code input and verification support.

Polymer Parts

UV or CO2 Laser Marker

Useful for selected plastics, tubing, housings, labels and packaging where material response must be tested.

Automation

Automated Laser Marking System

Supports fixtures, scanners, code verification and repeated production for medical device batches.

Project Planning

Share these details to get a medical device laser recommendation

Because medical parts can be small, reflective and material-sensitive, sample details help us recommend laser type, lens, fixture, rotary setup and marking parameters more accurately.

Part and Marking Details

Part type Surgical instrument, implant part, screw, plate, tube, housing, tray, tag or packaging.
Material Stainless steel, titanium, aluminum, plastic, coated metal or packaging material.
Code type UDI, Data Matrix, QR code, serial number, logo, batch code or model information.
Target mark Black mark, white mark, deep engraving, subtle logo or high-contrast readable code.

Production and Verification Details

Marking area Flat, curved, round, tiny, recessed, polished or brushed surface.
Batch volume Prototype, small batch, daily production or automated high-volume workflow.
Verification Scanner readability, code grading, visual contrast, positioning tolerance or data logging.
Operation setup Manual loading, fixture, rotary device, conveyor, vision check or automated cell.
Sample Test

Test your real medical device parts before choosing the laser system.

Send your instrument, titanium part, stainless sample, plastic component, code file or marking requirement. We can compare mark contrast, readability, surface effect, fixture options and recommended configuration.

01

Share Part Details

Provide material, surface finish, code type, mark size, drawings and target result.

02

Run Laser Test

Compare contrast, readability, heat effect, surface appearance and cycle time.

03

Confirm Setup

Choose laser type, lens, fixture, rotary tool, scanner and automation plan.

FAQ

Medical device laser solution questions

These answers help your team compare laser marking, cleaning and automation options for medical device production.

Can laser marking create UDI codes on medical devices?
Yes. Fiber and MOPA laser markers can create UDI, Data Matrix, QR code, serial number and batch marks on many metal medical device components. The final setup depends on material, code size and readability needs.
Which laser is better for black marking on stainless steel instruments?
MOPA laser marking is commonly selected for black marking on stainless steel because pulse settings can be adjusted for high contrast and finer surface control.
Can titanium medical parts be laser marked?
Yes. Fiber or MOPA laser systems can mark many titanium components. A sample test helps confirm contrast, heat effect, mark location and fixture stability.
Can plastic medical parts be laser marked?
Some plastic medical parts can be marked with UV or CO2 lasers, depending on polymer type and desired contrast. Material testing is recommended before production.
Can Oceanplayer support automated medical part marking?
Yes. Automated systems can be configured with fixtures, rotary devices, scanners, conveyors, data input and code verification depending on the part and workflow.
What information is needed for a medical device sample test?
Please share material, surface finish, code type, mark size, part drawings, production volume and readability requirement. Photos or physical samples help us recommend the right laser and fixture setup.