

2 Key Weld Toe Positions in Fillet and Groove Welds
A weld toe is the line where the visible weld face meets the adjacent base-metal surface. On a single fillet weld, one toe lies on each joined member. On the cap face of a groove weld, one toe lies at each side of the reinforcement.

The 60-second weld toe position rule
Count visible weld faces, then trace every place where each face blends into base metal. Toe count is based on actual surface geometry—not the number of weld passes or the groove preparation drawn before welding.
The weld face meets two base-metal surfaces. Inspect both junction lines, including the less accessible member.
The reinforced face meets the plate surface on the left and right sides of the completed joint.
A second reinforced face on the reverse side can create a second pair of visible weld toes.
The toe on the tension-loaded or bending-critical member may control fatigue, but inspection must not ignore the other toe.
Find both weld toes without guessing
These simplified cross-sections show the completed surface geometry. Orange markers identify the two weld-face-to-base-metal junctions that must be traced along the weld length.
Fillet weld: toe on Member A + toe on Member B
The triangular weld face bridges two members. Each end of the visible face creates a separate toe line.
Groove weld: left cap toe + right cap toe
On the visible cap face, the reinforcement blends into the plate surface at two edges—one on each side of the joint centerline.
What is a weld toe?
The current AWS terminology reference is AWS A3.0M/A3.0:2025. The practical inspection meaning is straightforward: identify the visible weld face, move outward until deposited weld metal transitions into the original base-metal surface, then trace that junction continuously. The transition may be sharp, gently blended, undercut or partly hidden by spatter, coating or access restrictions.
“Base metal” in the definition does not mean the material near the toe remained metallurgically unchanged. The heat-affected zone (HAZ) is base metal altered by the welding thermal cycle without melting. The toe commonly lies at the surface over or beside this HAZ, but the HAZ itself is a band rather than the toe line.
A toe is defined by finished surface geometry
The groove prepared before welding does not determine the final toe count. Neither does the number of passes. A multi-pass weld may still present only two toes on one completed cap face. Conversely, a double-sided joint can present another pair on the reverse face. If reinforcement is ground truly flush and blended into the base material, the original surface notch may be removed; inspection and fatigue assessment then address the finished blend and any grinding marks or remaining discontinuities.
Source: AWS A3.0M/A3.0:2025 — Standard Welding Terms and Definitions.
Where are the two weld toes on a fillet weld?
A single fillet weld has a face spanning two joined surfaces. Each end of that face forms one toe line.
The toe on the first base-metal surface
In a T-joint cross-section, this is often shown on the horizontal through-member. In a lap joint, it may appear on the lower plate face. Follow it along the entire weld length, including starts, stops and returns.
The toe on the second joined member
In a T-joint, this is the toe on the vertical attachment. It is frequently less convenient to gauge or illuminate, but it remains a separate weld-face-to-base-metal junction.
Which toe is more critical?
The answer depends on tension, bending direction, local stiffness, attachment geometry and residual stress. The toe on the primary tension member may govern a fatigue detail, but the other toe still requires the specified examination.
What changes the local notch?
Toe radius, transition angle, undercut, overlap, local ripples, stops and misalignment change the surface geometry. Leg size alone cannot describe the local stress concentration.
Where are weld toes on groove and butt welds?
On a reinforced groove-weld face, the visible crown normally meets the base-metal surface at a left toe and a right toe.

Diagram: Spangineer and Malyszkz, Wikimedia Commons, CC BY-SA 3.0.
The cap edges—not the groove walls—define the visible toes.
Before welding, the bevel faces form the groove. After welding, those prepared surfaces are buried within the joint. The surface toes are where the final weld reinforcement meets the plate faces.
A single-sided joint with one visible reinforced face normally presents two cap toes. A double-sided groove weld with reinforcement on both surfaces can present four surface toes in total: two on each face.
A permanent backing bar does not automatically create “two more weld toes.” Its edges are separate geometric details unless a visible weld face actually meets base metal there. Evaluate the as-built joint and the governing fatigue detail.
Typical visible toe counts by finished joint
This table is a surface-mapping guide, not a substitute for the drawing. Toe count changes when additional weld faces, returns, attachments or flush finishing change the geometry.
| Finished joint | Typical visible toes | Where they are | Important qualification |
|---|---|---|---|
| Single fillet weld | 2 | One junction on each of the two joined members | Toe criticality depends on the member load path and actual profile. |
| Double-fillet T-joint | 4 | Two toes on each side of the attachment | Inspect both sides; restricted access can hide the inner transitions. |
| One-sided reinforced groove weld | 2 on the cap face | Left and right edges of the visible reinforcement | Root geometry is a separate feature and may control performance. |
| Double-sided reinforced groove weld | Usually 4 | Two on the first face and two on the reverse face | Count actual finished faces, not passes or groove preparation steps. |
| Lap-joint fillet | 2 per fillet | One at the top-plate edge region and one on the lower plate face | The eccentric load path can make one toe or the root more critical. |
| Corner-joint fillet | Usually 2 | At the two ends of the visible fillet face | Edge preparation and melt-through can change the final surface features. |
| Flush-ground groove weld | No raised cap toes if fully blended | Finished transition regions replace the original cap edges | Grinding quality, remaining reinforcement, gouges and NDE requirements govern. |
Weld toe vs weld face, root, fusion boundary and HAZ
Most identification errors happen because a surface line is confused with an internal metallurgical boundary or with the deepest part of the joint.
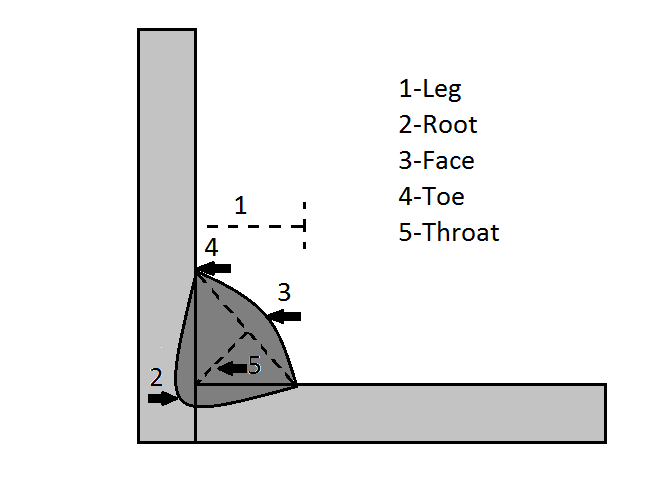
Diagram: Powerstroker, Wikimedia Commons, CC BY-SA 3.0.
The exposed surface of weld metal on the side from which the weld was made. Its two outer boundaries may form the toes.
The surface junction between the weld face and base metal. It is visible or traceable from the surface unless finishing or obstruction hides it.
The portion of the weld farthest from the face. Root geometry may control fatigue or fracture independently of the surface toes.
The boundary between fusion zone and base metal. Much of it is internal and normally requires a section, macroetch or volumetric method to evaluate.
Base metal whose microstructure or properties changed because of welding heat without melting. It is a zone, not a single surface line.
A groove melted into base metal adjacent to a weld toe and left unfilled by weld metal. Acceptance depends on the applicable code and loading category.
Why a weld toe can become a fatigue hot spot
The weld toe is frequently critical under cyclic loading because several effects can overlap at the same line. It is not correct to claim that every fatigue crack starts there; roots, internal flaws and other details can also govern.
Surface direction changes
A sharp transition from the weld face to the plate interrupts smooth stress flow. Smaller radii, unfavorable angles and undercut can increase the local notch effect.
Welding leaves locked-in stress
Heating and contraction can create tensile residual stress near the weld. Applied cyclic stress acts on top of this local condition.
Tiny discontinuities can initiate cracks
Cold laps, slag intrusions, overlap, arc strikes or grinding grooves near the toe can provide crack-like starting sites even when the weld passes basic visual review.
Orientation changes the critical toe
A toe transverse to primary tensile stress is not equivalent to one parallel to load or predominantly in compression. Detail category and structural stress must reflect the real geometry.
TWI explains that microscopic planar features at weld toes contribute to the relatively poor fatigue performance of welded joints, while peer-reviewed studies repeatedly observe toe initiation in specific tested geometries. These findings support treating the toe as a high-priority location—not publishing a universal “90% of all cracks” rule.
Sources: TWI fatigue guidance and open-access T-joint fatigue research.
How to locate and inspect both weld toe lines
The inspection method, coverage, delay time, surface condition and acceptance criteria must come from the approved inspection plan and governing code.
Start with access and visibility.
Before choosing advanced NDT, make sure the actual toe can be seen, reached and traced.
- Confirm joint type and all accessible weld faces.
- Remove loose scale, slag and obstructive contamination as permitted.
- Use suitable lighting, viewing angle and gauges.
- Mark both toe lines and any starts, stops or returns.
- Record inaccessible areas instead of assuming they are acceptable.
Visual testing (VT)
Trace the full line and evaluate cracks, undercut, overlap, excessive profile, local gouges, arc strikes and dimensional requirements. VT also identifies where another NDT method may be needed.
Liquid penetrant testing (PT)
Use a qualified PT procedure for surface-breaking discontinuities on suitable nonporous materials. Surface preparation and dwell/development conditions affect sensitivity.
Magnetic particle testing (MT)
For ferromagnetic materials, MT can reveal surface and some near-surface cracking. Field direction, magnetization, surface condition and demagnetization requirements belong in the procedure.
Ultrasonic methods
UT, PAUT or TOFD may be specified for subsurface or through-thickness crack characterization. Probe, angle, frequency, scan plan and calibration must be developed for the actual joint—not copied from a generic blog setting.
Evaluate against the correct criteria
Report exact location, orientation, length and depth where applicable. Acceptance depends on the construction code, service, material, thickness, stress direction and quality level.
Method references: ASNT Visual Testing, ASNT NDT method overview, and TWI Ultrasonic Examination.
Do not use one universal undercut or toe-radius limit
The acceptable condition can differ by code, joint category, material thickness, orientation to stress, static versus cyclic service and whether the toe is on the primary tension component.
Information the inspector needs
- Drawing, weld symbol and joint detail
- Applicable code and edition
- Static, cyclic, pressure or fracture-critical classification
- Primary stress direction and tension member
- Material, thickness and service environment
- Required NDT method, timing and coverage
Why copied limits fail
- Different codes permit different undercut depths.
- One toe of a fillet can have a different load role from the other.
- A fatigue-improved toe may need profile verification beyond basic workmanship criteria.
- Cracks are generally treated more severely than smooth profile variations.
- Repair grinding can create a new geometry that must also meet minimum-thickness rules.
Source: AWS — New Undercut Tolerances and Treatments in the 2025 D1.5 Bridge Welding Code.
What can improve a critical weld toe?
Toe treatment is an engineered process. It should be selected through the fatigue design method, qualified for the material and detail, and verified after treatment.
Improve the weld as deposited
Stable fit-up, torch position, travel, termination and heat input can reduce abrupt profile changes and prevent undercut or overlap before post-treatment is considered.
Toe grinding
Controlled burr grinding can remove small imperfections and create a smoother transition. Depth, radius, grinding direction, remaining thickness and final inspection must follow the approved method.
TIG dressing
Local remelting can reshape the transition and remove surface flaws, but it changes the thermal cycle and requires procedure control, suitable access and post-treatment examination.
HFMI or peening
High-frequency mechanical impact can reshape the toe and introduce beneficial compressive residual stress. Effectiveness depends on detail, material strength, loading and execution quality.
Research reference: TWI — Fatigue life prediction for toe-ground welded joints.
Validate the complete joint—not only the bead appearance.
Share the material, thickness, joint drawing, gap range, loading direction and required acceptance tests. Oceanplayer can help plan a representative laser-welding sample and inspection route around the real joint.
- Joint type and weld cross-section
- Material and thickness
- Static or cyclic service
- Required penetration and NDT
Weld toe position FAQ
Concise answers for welders, engineers, inspectors and trainees.
Where exactly is the weld toe?
The weld toe is the surface junction where the visible weld face meets the adjacent base metal. In three dimensions it is a line along the weld, although it appears as a point in a cross-section.
Does a fillet weld have one toe or two?
A standard single fillet weld has two toe lines: one on each of the two joined members. A double-fillet T-joint normally has four, two on each side of the attachment.
How many toes does a groove weld have?
One reinforced groove-weld face normally has two toes, one at each edge of the cap. If the joint is welded and reinforced on both sides, the reverse face may add another pair.
Is the weld toe the same as the fusion line?
No. The toe is a surface junction. The fusion boundary is the interface between the fusion zone and base metal and is largely internal, normally visible on a prepared cross-section rather than the unsectioned surface.
Is the weld toe inside the HAZ?
The toe lies on the base-metal surface at the end of the weld face, commonly over or adjacent to heat-affected material. The HAZ is a broader metallurgical zone, not the toe line itself.
Why do fatigue cracks often start at weld toes?
The toe can combine an abrupt geometric transition, tensile residual stress and small surface imperfections. Under cyclic loading these effects can elevate local stress and make the toe a likely initiation site, although roots and internal flaws can also govern.
Which fillet-weld toe is most critical?
It depends on the load path, bending direction, member stiffness, stress orientation and local geometry. The toe on a primary tension member can be critical, but both toes must receive the specified examination.
Does a backing bar create two additional weld toes?
Not automatically. A weld toe requires a visible junction between weld face and base metal. Backing-bar edges are separate geometric features unless the completed weld surface creates such junctions there.
Can a weld toe be hidden?
Yes. Spatter, slag, coating, poor lighting, access restrictions or a very smooth blend can obscure it. Surface preparation and viewing conditions must follow the inspection procedure.
What NDT method is best for weld toe cracks?
Start with visual testing. PT or MT may be selected for surface-breaking cracks depending on material, while UT, PAUT or TOFD may be specified for subsurface characterization. The qualified procedure and code determine the method and setup.
Does toe grinding remove the weld toe?
It can blend away the original sharp transition and create a new smooth profile. The treated region still needs dimensional control and inspection for remaining cracks, grinding grooves and minimum thickness.
What undercut depth is allowed at a weld toe?
There is no universal value. Permitted depth depends on the governing code and edition, joint, thickness, stress direction, loading category and component role. Use the project acceptance criteria.
References
- American Welding Society — AWS A3.0M/A3.0:2025 Standard Welding Terms and Definitions
- American Welding Society — What Is Weld Cracking, including toe cracks
- TWI — Fatigue failure and welded-joint stress concentrations
- ASNT — Visual Testing method for NDT inspections
- TWI — Detection of surface-breaking and internal hydrogen cracks
- AWS — 2025 D1.5 undercut tolerances and treatments
- FHWA — Bridge Welding Reference Manual