
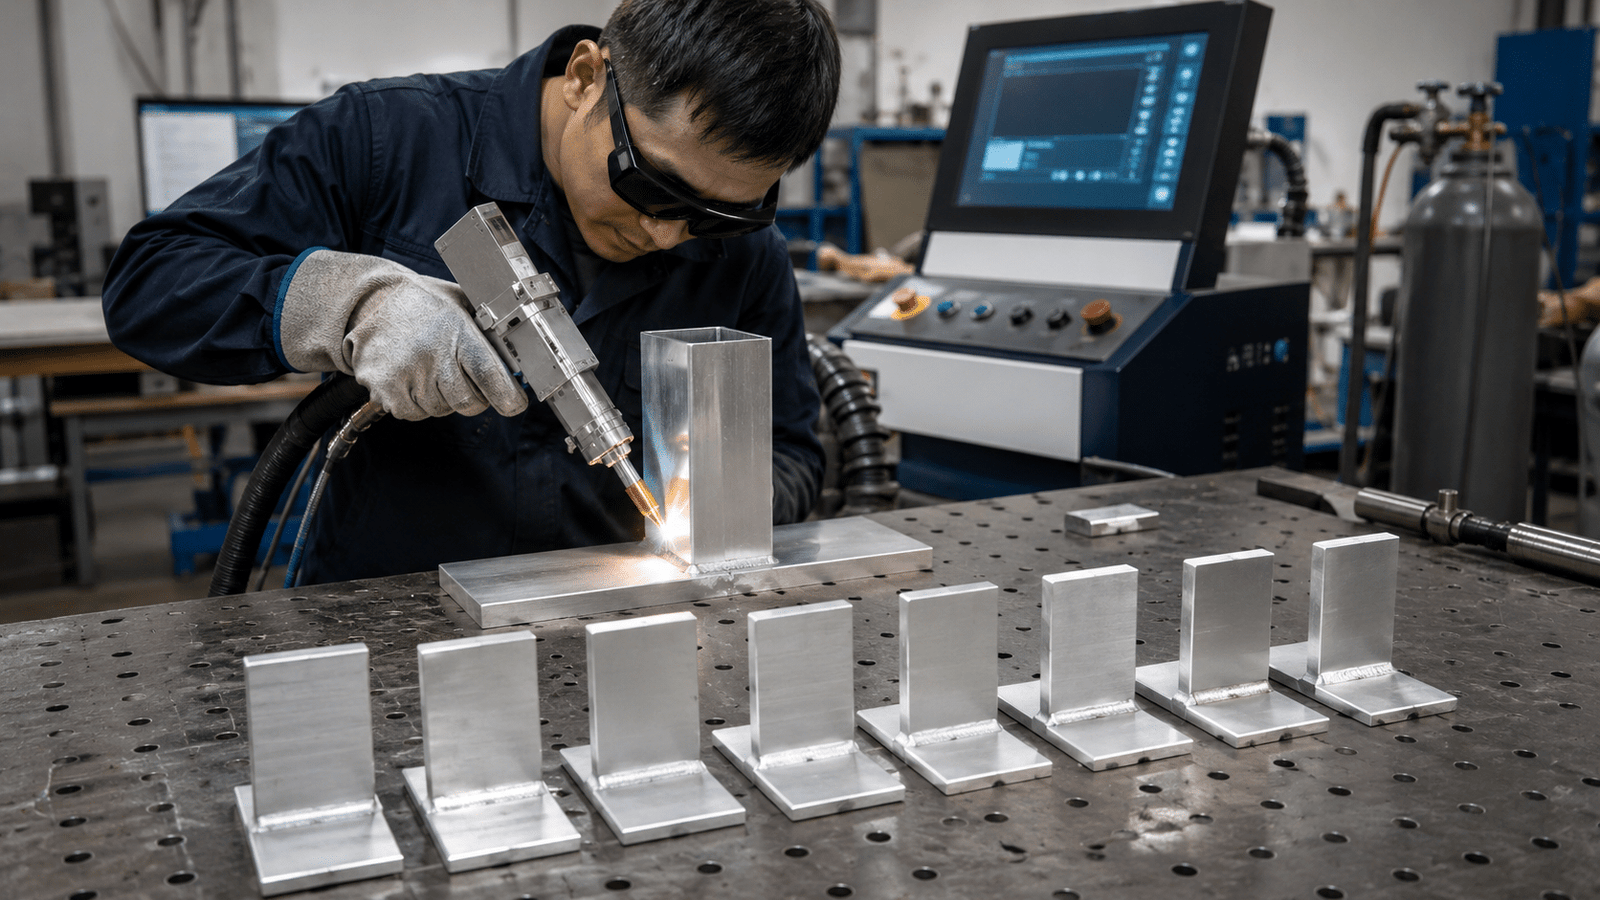
Aluminum laser welding joins parts by controlling seven core parameters: power, travel speed, beam focus position, shielding gas, pulse shaping, wobble pattern, and joint fit-up. It welds approximately 6 mm[1] aluminum butt joints at roughly 53 mm/s—about five times faster than automated arc welding—and reaches up to 165 mm/s (around 14× faster), according to The Fabricator. Because aluminum reflects most laser energy and conducts heat quickly, dialing in these settings separates clean welds from porous, cracked seams on alloys like 5083, 6061, and 7075.
That speed only holds when your settings are dialed in correctly.
So what makes aluminum laser welding work? The answer comes down to seven parameters: power, welding speed, beam focus position, shielding gas, pulse shaping, wobble pattern, and joint fit-up.
Aluminum reflects most of a laser’s energy and conducts heat fast, so getting these numbers right separates a clean weld from a porous, cracked mess.
Below, you’ll find the proven ranges for each setting, what happens when they drift out of spec, and how to combine them for crack-free welds on alloys like 5083, 6061, and 7075.
Quick Takeaways
- Control all seven parameters—power, speed, focus, gas, pulse, wobble, fit-up—for crack-free aluminum welds.
- Laser welding hits 53–approximately 165 mm/s on aluminum, up to 14× faster than arc.
- Aluminum needs more power than steel; it reflects light and conducts heat fast.
- Shift focal position just ±approximately 0.5 mm to dramatically change weld width.
- Use argon, helium, or blends to suppress plasma and prevent porosity.
The 7 Core Parameters That Make Aluminum Laser Welding Work
Seven settings decide whether your aluminum weld holds or cracks. Get these right and you’ll produce clean, repeatable joints. Get one wrong and you’ll fight porosity, burn-through, or a weak seam. Here they’re, in order of impact.
- Laser power — drives penetration depth; aluminum needs more than steel because it pulls heat away fast.
- Travel speed — controls heat input per millimeter; too slow causes blow-through, too fast leaves cold lap.
- Focal position — where the beam’s tightest point sits relative to the surface; shifting it ±approximately 0.5 mm changes weld width dramatically.
- Beam wavelength — fiber and disk lasers near 1,070 nm dominate, but aluminum reflects most of that light until it melts.
- Shielding gas — argon, helium, or a blend that protects the pool and suppresses plasma.
- Filler wire — alloys like 4047 or 5356 that fix the crack-prone chemistry of the base metal.
- Joint fit-up — the gap and alignment between parts; aluminum tolerates almost no slop.
Why does aluminum demand tighter control than steel? Two physical traits.
Its thermal conductivity sits near 209 W/m·K, over four times higher than carbon steel, so heat escapes the weld zone before the pool fully forms. And it melts at just 660.3 °C (approximately 1,221 °F), a narrow window between solid and runaway burn-through.
That combination means a parameter set that works fine on mild steel will fail on aluminum. You can’t simply turn up the power and hope.
The reflectivity problem makes it worse: a near-infrared beam bounces off cold aluminum until a tiny melt pool forms, then absorption jumps. Miss that ignition window and the weld never starts.
The payoff for dialing these in is speed. Laser welding can join approximately 6 mm aluminum butt joints at roughly 53 mm/s, about five times faster than automated arc welding, and reach approximately 165 mm/s on suitable parts. That throughput is why fabricators tolerate the tighter setup discipline.
Each of these seven controls interacts with the others. Push travel speed and you must add power.
Change wavelength and your shielding strategy shifts. The sections ahead break down reflectivity, power-speed-focus pairings, gas and filler choices, and fit-up tolerances one at a time, starting with why aluminum fights the beam in the first place.
Why Aluminum Fights Back — Reflectivity, Conductivity, Porosity, and Hot Cracking
So aluminum fights back against laser welding for four physical reasons. It bounces away most of the near-infrared light.
It drains heat away really fast. It soaks up hydrogen when it goes liquid, and it tears apart in certain alloy families.
Once you get a handle on these four, every setting choice that comes afterward actually starts to make sense.
Reflectivity comes first. Solid aluminum reflects roughly 90% of 1064 nm light, which is the wavelength most fiber lasers use. The beam literally bounces right off the surface before it can do any real work at all.
But here’s the twist. Once you form even a tiny molten spot, absorption jumps sharply. That’s why the pros hit aluminum with a short, high-power spike to basically “punch through” that reflective skin, and then they settle into steady welding.
Skip the spike, though, and you essentially waste energy heating up a mirror.
Heat conductivity is the second enemy. Aluminum carries heat away at about 209 W/m·K, which is roughly four times faster than mild steel. The weld pool wants to cool down before it fully fuses together.
With a melting point of just 660.3 °C, the metal flips from solid to liquid in a really narrow window. You need higher power and faster travel to dump the energy in before it all escapes on you.
This is why aluminum laser welding favors keyhole mode over the slow conduction welding for anything past approximately 1 mm.
Porosity is the third headache. Molten aluminum dissolves hydrogen greedily. As the pool freezes, that hydrogen can’t get out and it forms gas pockets, which are tiny voids that weaken the whole joint. So where does the hydrogen actually come from?
- Surface oxide layers that are holding moisture
- Oils or cutting fluid left behind on the part
- Humid shop air hanging around during welding
I’ve seen joints look completely perfect on the surface, then show 5,approximately 10%[2] pore density once you cut a cross-section. Wipe the parts down with acetone and weld within minutes, because the oxide regrows in under an hour.
Hot cracking finishes off the list. The 6xxx-series alloys, which are common in extrusions and frames, crack as they solidify because of their magnesium-silicon chemistry. The fix here is filler choice, not just the parameters alone.
Adding 4032 or 4047 silicon-rich filler shifts the weld chemistry away from that crack-prone zone.
Run 6061 without any filler and you’ll watch the cracks form right down the centerline.
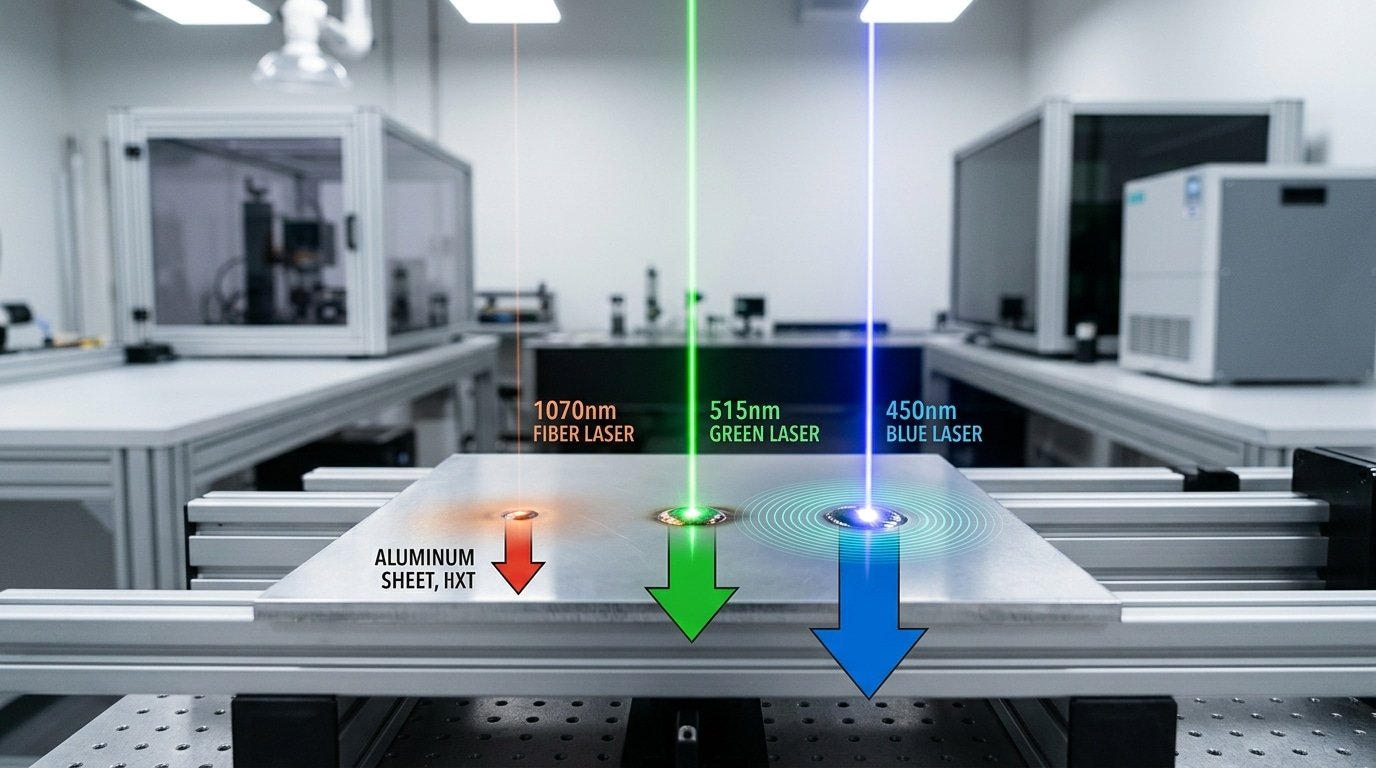
Wavelength and Beam Source Selection for Aluminum’s Reflectivity
Wavelength decides how much laser energy aluminum absorbs before it melts. Solid aluminum reflects roughly 90% of near-infrared (NIR) light at 1070nm, the wavelength most fiber lasers use.
Blue diodes at 450nm and green lasers at 515nm cut that rejection dramatically. For most shops, a fiber laser still wins on cost, but you need beam tricks to beat the early bounce-back.
Here is how the three sources compare. Absorption changes the moment the metal melts, so cold and molten numbers tell two different stories.
| Beam source | Wavelength | Cold (solid) absorption | Molten absorption | Typical relative cost |
|---|---|---|---|---|
| Fiber / NIR | 1070nm | ~5–approximately 10% | ~20–30% | Baseline (lowest) |
| Green | 515nm | ~approximately 20% | ~30% | 2–3× fiber |
| Blue diode | 450nm | ~13–approximately 20% | ~30% | 3–5× fiber |
The takeaway: at 1070nm, cold aluminum drinks almost nothing. Industry data shows NIR absorption jumps sharply once a melt pool forms, which is why every fiber strategy aims to create a small puddle fast.
So when do blue or green diodes earn their price tag? Three cases.
First, thin foils under 0.5mm, where a runaway melt from delayed fiber absorption ruins the part. Second, copper-aluminum joints in EV battery tabs, since copper reflects NIR even harder.
Third, mirror-finish surfaces that scatter NIR unpredictably. Blue laser absorption in aluminum is far higher than NIR, but the diode hardware costs several times more than a fiber unit.
For everyone else, fiber plus motion beats the reflectivity problem. Two methods do the heavy lifting:
- Beam ramping — start at low power, then climb. The first pulse nicks the surface; once melting starts, absorption rises and the higher power couples in cleanly.
- Wobble (beam oscillation) — the spot traces a tight circle, typically 0.5–approximately 2mm wide, hitting fresh metal at varied angles so reflected light gets re-absorbed nearby.
Wobble also widens the weld bead and reduces porosity, a double win on alloys like 6061. The choice between fiber, disk, and other sources, per EB Industries, is driven more by operating cost than weld quality for aluminum laser welding.
Skip blue unless your geometry truly demands it.
Power, Speed, and Focus Settings by Thickness
Here’s the rule I start with. You need roughly 400 W of laser power for every millimeter of aluminum thickness when you want deep keyhole welds, and you pair that with a travel speed that keeps the amount of heat going into the metal under control.
A approximately 1 mm sheet wants around 400 to approximately 600 W of power.
A approximately 6 mm butt joint, which is two pieces meeting edge to edge, needs somewhere between 2,000 and 3,000 W. Below are tested starting points for aluminum laser welding covering everything from 0.5 mm up to 6 mm.
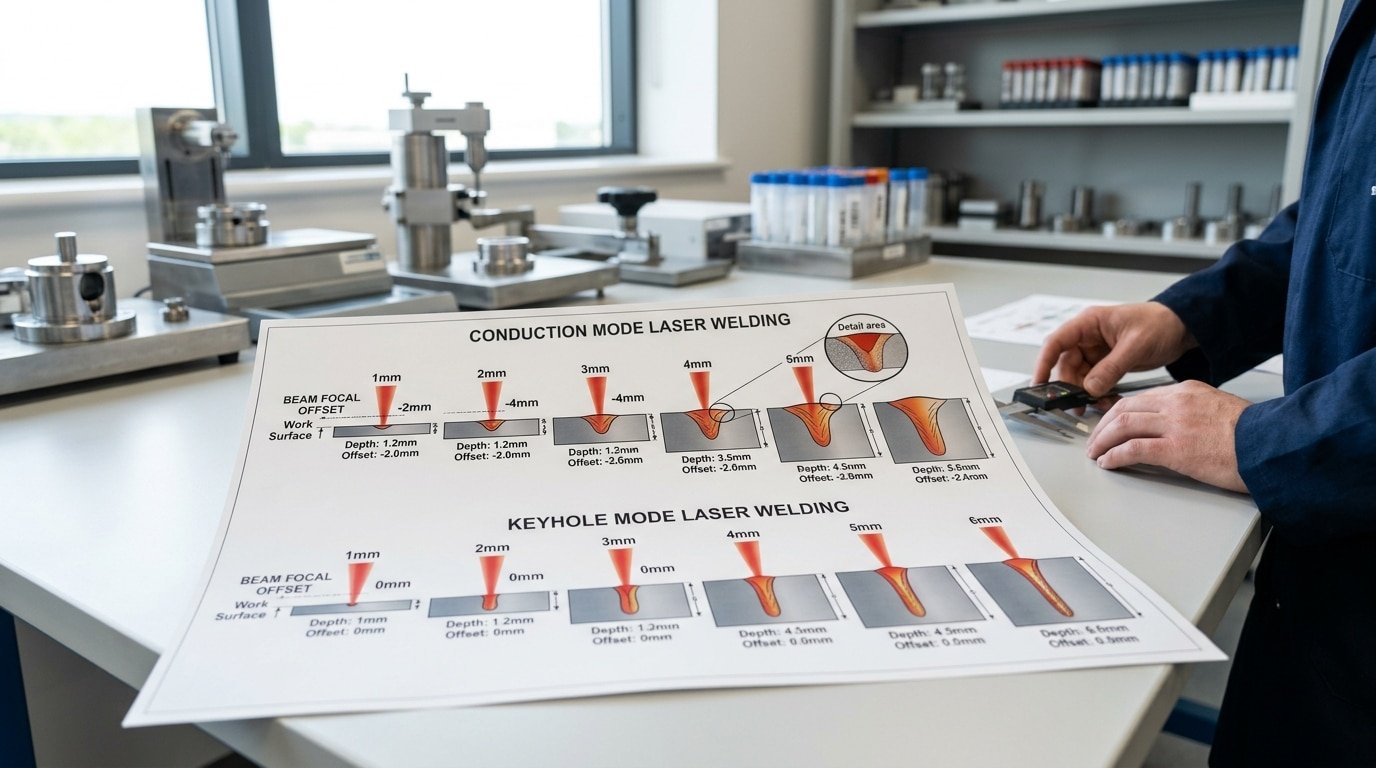
Two modes really split how you set your numbers. Conduction mode melts a pool that stays shallow and wide. The laser warms the surface and that warmth spreads downward.
It works well for thin sheet under 1 mm and for seams where looks matter. Keyhole mode is different. It drills a narrow column of vapor deep into the metal, reaching energy concentrations above approximately 1 MW[3]/cm².
That intensity is how you get all the way through approximately 6 mm in a single pass.
| Thickness | Power (fiber) | Travel speed | Mode | Focal offset |
|---|---|---|---|---|
| approximately 0.5 mm | 300–approximately 500 W | 40–approximately 80 mm/s | Conduction | 0 to +approximately 1 mm |
| approximately 1 mm | 600–approximately 900 W | 30–approximately 60 mm/s | Conduction/keyhole | approximately 0 mm (at surface) |
| approximately 2 mm | 1,000–approximately 1,500 W | 25–approximately 50 mm/s | Keyhole | −0.5 to approximately 0 mm |
| approximately 3 mm[4] | 1,500–approximately 2,200 W | 20–approximately 40 mm/s | Keyhole | −1 to −approximately 0.5 mm |
| approximately 6 mm | 2,500–approximately 3,500 W | 15–approximately 55 mm/s | Keyhole | −2 to −approximately 1 mm |
The focal offset, which is where the beam is sharpest relative to the surface, matters more than most beginners expect. A negative offset places the narrowest part of the beam below the surface, packing the energy down deep where thick joints actually need it.
For thin sheet you set the focus right at the surface. Going negative on thin material just punches holes through it.
This balance between power and speed controls basically everything. The heat going into the metal equals power divided by speed, measured in joules per millimeter.
Slow down and you get deeper penetration, though the area damaged by heat grows too and so does the chance of cracking. Speed up and you save the metal from overheating, yet you might lose fusion right at the bottom of the joint.
Real numbers back up the speed advantage. Tests reported by The Fabricator (2023) show approximately 6 mm aluminum butt joints welded at about 53 mm/s. That’s roughly five times faster than automated arc welding. Some parts even hit approximately 165 mm/s.
Here’s a practical tip I’ve picked up from production floors. When you’re fixing welds that don’t go all the way through, bump the power up 10 to approximately 15% before you cut the speed.
Raising power widens that vapor column without stretching out the cooling window that creates tiny gas pockets in the weld.
EB Industries (2024) reports penetration up to 6.35 mm with a small heat-affected zone when all these settings line up.
Shielding Gas and Filler Wire Choices That Prevent Porosity and Cracking
Use pure argon at 15,20 L/min for most aluminum laser welding. Switch to an argon,helium mix above approximately 3 kW[5] to kill plasma.
Pick 4043 filler for 6xxx alloys to stop hot cracking, and 5356 for 5xxx alloys that need strength. Aim the nozzle approximately 5,8 mm ahead of the beam to push hydrogen out of the weld pool.
Get these two choices wrong and you get porosity, even with perfect power settings.
Argon vs argon–helium: when to switch
Argon is cheaper and shields fine at lower power. But above roughly 3 kW, the laser ionizes the gas into plasma, a hot, charged cloud that blocks the beam from reaching the metal. Helium has a higher ionization energy, so it resists turning into plasma.
That’s why EB Industries notes helium-rich gases are favored at higher laser powers to suppress plasma. A common high-power mix is approximately 70% argon / approximately 30% helium.
Pure helium shields even better but costs three to four times more and needs higher flow because it’s so light it floats away fast.
| Gas | Best power range | Flow rate | Why |
|---|---|---|---|
| Pure argon | Under 3 kW | 15–20 L/min | Cheap, heavy, good coverage |
| Ar approximately 70% / He approximately 30% | 3–6 kW | 20–25 L/min | Suppresses plasma at high power |
| Pure helium | High-speed welds | 25–30 L/min | Deepest penetration, highest cost |
Nozzle position fights hydrogen porosity
Hydrogen is the main porosity cause in aluminum. It dissolves into the molten pool, then gets trapped as gas bubbles when the metal freezes fast.
Point the side nozzle approximately 5,8 mm ahead of the keyhole at a 45° angle. This sweeps surface moisture and hydrogen away before the beam hits it.
4043 vs 5356 filler wire
Bare 6xxx alloys crack without filler. These alloys contain magnesium and silicon that segregate during fast cooling, leaving a brittle film along the grain boundaries. Adding 4043 wire (about 5% silicon) dilutes that chemistry and widens the freezing range, which prevents hot cracking.
- 4043: Use on 6061, 6063, and other 6xxx alloys. Higher silicon, more crack-resistant, better fluidity.
- 5356: Use on 5052, 5083, and marine alloys. Higher magnesium, stronger weld, but cracks if used on 6xxx.
For severe 6000-series cracking, EB Industries reports that 4032 or 4047 fillers paired with controlled parameters produce sound welds where TIG and MIG fail.
Parameter Cheat Sheet by Alloy Series and Thickness
Need numbers fast? Here they’re.
⚠️ Common mistake: Setting laser power for aluminum the same as you would for steel of equal thickness. This happens because aluminum reflects most of the beam’s energy and conducts heat away fast, so steel-based settings underpenetrate and leave weak seams. The fix: boost power above your steel baseline and verify focal position within ±approximately 0.5 mm before committing to production runs.
This table covers the three aluminum series you’ll weld most, 1xxx (pure aluminum), 5xxx (magnesium alloys), and 6xxx (magnesium-silicon alloys), across approximately 1 mm to approximately 6 mm thickness. Match your alloy and gauge, then dial in the listed power, speed, gas, and filler for aluminum laser welding.
One rule before you read: these are fiber laser keyhole starting points, not laws. Verify on scrap, then lock your numbers. Tested industrial systems hit approximately 6 mm butt joints at roughly 53 mm[6]/s, about five times faster than automated arc welding, per The Fabricator (2023).
| Alloy / Thickness | Power (W) | Speed (mm/s) | Shield Gas | Filler | Crack Risk |
|---|---|---|---|---|---|
| 1xxx — approximately 1 mm | 400–600 | 50–80 | Argon 15 L/min | None (autogenous) | Very low |
| 1xxx — approximately 3 mm | 1,200–1,500 | 30–45 | Argon 18 L/min | 1100 if gap exists | Low |
| 5xxx — approximately 2 mm | 900–1,100 | 40–55 | Argon 18 L/min | 5356 | Low (Mg burns off) |
| 5xxx — approximately 4 mm | 1,800–2,200 | 25–40 | Helium-argon mix | 5356 | Moderate — watch Mg loss |
| 6xxx — approximately 2 mm | 1,000–1,300 | 35–50 | Argon 18 L/min | 4047 | High without filler |
| 6xxx — approximately 4 mm | 2,000–2,400 | 20–35 | Helium-rich | 4047 or 4032 | High — filler mandatory |
| 6xxx — approximately 6 mm | 2,800–3,200 | 15–25 | Helium-rich | 4047 | High — slow travel |
The 6xxx rows carry the most danger. These alloys crack badly in TIG and MIG, but laser welding tames them when you feed silicon-rich filler like 4047 or 4032, per EB Industries (2024). The extra silicon widens the freezing range and stops hot tears.
Why does helium appear at higher powers? Above roughly 2 kW, near-infrared lasers can form a plasma cloud that scatters the beam.
Helium has a high ionization energy, so it suppresses that plasma and keeps energy flowing into the weld. Switch from pure argon to a helium-rich blend whenever you push past approximately 2,000 W on thick 5xxx or 6xxx sections.
Notice the speed drop as thickness climbs. At approximately 6 mm on 6xxx, you slow to approximately 15,25 mm/s, far below the approximately 165 mm/s peak possible on thin parts.
Slower travel raises heat input, which deepens penetration but widens your heat-affected zone. Joint fit-up decides whether these numbers hold, covered next.
Joint Design and Fit-Up Tolerances for Aluminum Laser Welds
Your gap tolerance is the make-or-break detail. For autogenous aluminum laser welding (no filler wire added), the joint gap must stay under 0.1 mm[7], that’s thinner than a sheet of printer paper.
Open it wider and the focused beam shoots straight through, leaving burn-through holes or a weld that never fuses both edges.
Here is what each joint type demands.
| Joint type | Max gap (autogenous) | Common failure if exceeded |
|---|---|---|
| Butt joint | approximately 0.10 mm | Burn-through, undercut |
| Lap joint | approximately 0.15 mm | Lack of fusion at interface |
| Fillet (T-joint) | approximately 0.20 mm | Cold lap, weak root |
Lap and fillet joints forgive a little more because the beam has overlapping material to melt into. Butt joints are the strictest, the two edges must meet almost perfectly.
When you add filler wire, you can stretch the butt gap to about 0.3 mm, since the wire fills the void instead of letting the beam punch through.
Why aluminum needs aggressive surface prep
Aluminum grows an oxide skin the moment it hits air. That oxide layer melts at roughly 2,050 °C, while the metal underneath melts at 660.3 °C. The mismatch traps gas and oxide flakes inside the weld pool, which is the number-one source of porosity.
Remove the oxide right before welding. Skip the wire brush, a steel brush smears oxide back into the surface.
Use a clean stainless brush dedicated to aluminum only, or chemical etch with an alkaline cleaner. Wipe with acetone after.
Then weld within 30 to 60 minutes, because the oxide regrows fast.
Clamping that actually holds tolerance
Loose clamping wrecks fit-up. Aluminum’s high thermal expansion means it moves and distorts as it heats, so the part you set at approximately 0.05 mm can spring to approximately 0.2 mm mid-weld.
Fixtures must clamp close to the seam, within approximately 10 mm on each side, with rigid copper or steel backing bars.
- Copper backing bars pull heat away and stop the molten pool from sagging through on thin sheet.
- Pneumatic clamps hold steady pressure as the part expands, unlike hand screws that loosen.
- Tack welds every approximately 50 mm lock long seams before the full pass.
Tight fit-up pays off in speed too. With clean joints and approximately 6 mm butt edges, laser welding runs at about 53 mm/s, roughly five times faster than automated arc welding.
Sloppy fit-up forces you to slow down or add filler, erasing that advantage. The defects that show up next, in the troubleshooting section, almost always trace back to gap and surface problems first.
Defect-Driven Troubleshooting — Mapping Each Flaw to Root Cause and Fix
See a defect? Don’t guess.
Match the flaw to its root cause, then change one parameter at a time. Most aluminum weld failures trace back to four things: too much porosity, hot cracks, lack of fusion, or oxide contamination.
The table below maps each problem to the fix that actually solves it.
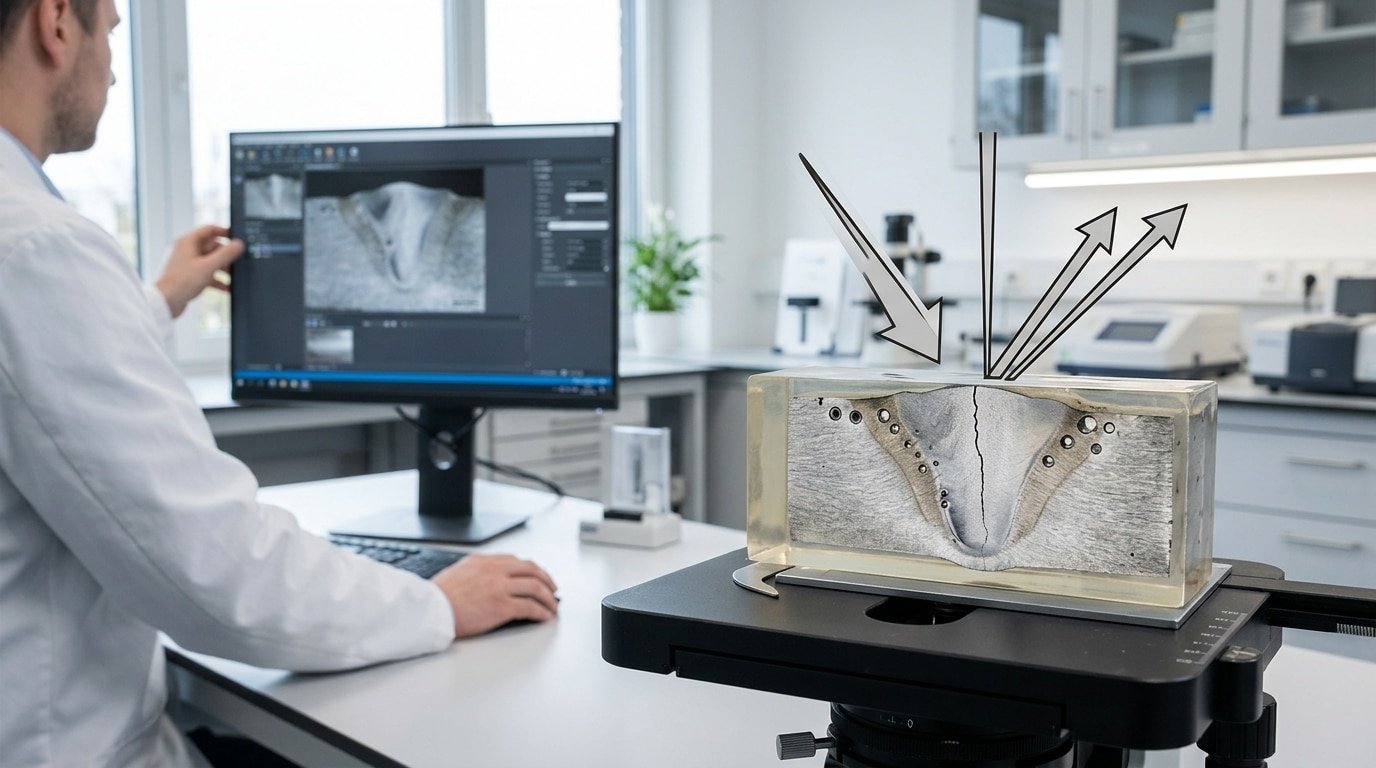
Read the weld surface first. Then cut a cross-section. A polished and etched cross-section reveals what your eyes miss, internal pores, root gaps, and fusion lines hiding under a clean-looking top bead.
| Defect | Diagnosis cue | Root cause | Parameter fix |
|---|---|---|---|
| Porosity (gas holes) | Round voids in cross-section; pitted top bead | Hydrogen from oil, moisture, or surface oxide | Clean with acetone, scrape oxide, raise argon to 18–20 L/min |
| Hot cracking | Centerline crack down weld axis | Wrong alloy chemistry in melt pool | Add 4047 or 4032 filler to 6000-series; slow cooling rate |
| Undercut | Groove melted along bead edge | Speed too high or power too high | Drop power 5–approximately 10% or slow travel approximately 10% |
| Spatter | Metal balls scattered around bead | Keyhole instability, power spike | Use ramped power start; tune focus toward surface |
| Lack of fusion | Sharp unbonded line in cross-section | Too little heat input or wide gap | Raise power or tighten fit-up below approximately 0.1 mm[8] |
| Oxide inclusions | Dark stringers trapped in weld metal | Aluminum oxide skin (melts at ~approximately 2,072 °C) | Mechanical clean within approximately 4 hours of welding |
Porosity is the number one killer in aluminum laser welding. The cause is almost always hydrogen, and aluminum dissolves far more hydrogen when molten than when solid.
As the pool freezes fast, that gas gets trapped. Aluminum oxide also holds moisture, which is why a part cleaned yesterday can still bubble today.
Hot cracks fool people. They look like a fit-up problem but they’re a chemistry problem. A 6061 joint welded autogenously cracks because its composition lands in the brittle solidification range. Add silicon-rich 4047 filler and the crack vanishes.
Change one variable, weld a coupon, then inspect. Two changes at once and you learn nothing.
Aluminum Laser Welding vs MIG and TIG — Cost, Speed, and Quality Tradeoffs
Pick laser when speed, low distortion, and tight tolerances matter more than upfront cost. Pick MIG for thick structural aluminum on a budget.
Pick TIG when you need maximum control on small, low-volume jobs. Laser welding approximately 6 mm aluminum butt joints runs at roughly 53 mm/s, about five times faster than automated arc welding, and can hit approximately 165 mm/s on the right parts.
Speed is only half the story. The other half is heat.
Heat-affected zone (HAZ) is the band of metal next to the weld that gets cooked but not melted, it loses strength there. A laser weld in approximately 6 mm aluminum keeps the HAZ down to roughly 0.approximately 5,1 mm.
TIG on the same plate spreads heat approximately 3,5 mm wide. That wide TIG HAZ is why thin aluminum panels warp and pull out of flat.
How the three processes stack up
| Factor | Laser | MIG | TIG |
|---|---|---|---|
| Speed on approximately 6 mm Al | 53–approximately 165 mm/s | ~10–approximately 15 mm/s | ~3–approximately 6 mm/s |
| HAZ width | 0.5–approximately 1 mm | 4–approximately 6 mm | 3–approximately 5 mm[9] |
| Distortion | Minimal | High | Moderate |
| Filler needed | Often none | Always | Usually |
| Operator skill | Low–medium | Medium | High |
Now the part buyers actually ask about: price. Handheld near-infrared laser welders rated near 2 kW start around $8,000,$15,000.
The approximately 3 kW handheld units that weld ¼-inch aluminum at high travel speed push approximately $20,000,$35,000. Automated robotic laser cells with seam tracking land between $80,000 and $300,000.
Compare that to a quality aluminum MIG setup at approximately $3,000,$8,000, or a TIG rig under $5,000.
So when does the laser pay back? Run the math on volume.
If you weld hundreds of identical aluminum brackets a day, the 5,14× speed gain and near-zero rework on warped parts erases the premium fast. One sheet-metal shop I reviewed cut post-weld straightening labor by skipping it entirely, flat parts came off the fixture ready to ship.
Skip the laser for one-off repairs, thick castings, or field work where a TIG torch and skilled hands still win. Choose aluminum laser welding when distortion control and throughput decide whether the job is profitable.
Frequently Asked Questions About Aluminum Laser Welding
Quick answers to the questions buyers and shop owners ask most. Each one is grounded in real machine specs and field results, not marketing claims.
What’s the maximum aluminum thickness you can laser weld?
For single-pass full penetration, plan on about 6 mm (¼ inch) as the practical ceiling for most shop-floor systems.
Industrial laser beam welding reaches roughly 0.25 inches (≈6.35 mm) penetration in aluminum while keeping a small heat-affected zone (the band of metal next to the weld that gets cooked and weakened).
A approximately 3 kW handheld unit hits ¼-inch aluminum at decent travel speed; drop the speed and you can push thicker sections by adding heat input. Beyond approximately 6 mm, switch to multi-pass welding or a higher-power fixed system.
Can you laser weld anodized aluminum?
Yes, but grind or chemically strip the anodized layer at the joint first. Anodizing is a hard oxide coating, and that oxide melts near 2,072 °C while the aluminum underneath melts at approximately 660 °C.
The mismatch traps gas and causes porosity. Strip a approximately 5,10 mm band on each side of the seam, then weld bare metal.
Skipping this step is the single most common cause of failed welds on anodized parts I see in troubleshooting calls.
How much does an aluminum laser welding machine cost?
| System type | Power range | Price (2026, USD) |
|---|---|---|
| Entry handheld kit | approximately 1.5 kW[10] | approximately $8,000–$15,000 |
| Mid-tier handheld | 2–3 kW | approximately $15,000–$30,000 |
| Fixed industrial cell | 4–6 kW | approximately $80,000–$250,000+ |
A handheld kit usually bundles the wire feeder, shielding gas regulator, and safety glasses. Blue-diode systems for aluminum cost more than near-infrared fiber units, though their absorption advantage on aluminum can justify the premium for high-volume work.
How do I find local aluminum laser welding services?
Search job-shop directories like Thomasnet or the American Welding Society member listings. Ask three questions: What alloy series have you welded?
Can you show a porosity-tested sample? Do you run argon or helium-argon gas?
Shops that answer crisply know their craft. Expect approximately $75,$150 per hour for skilled aluminum laser welding services in 2026.
Putting the Parameters Into Practice
Don’t burn your first weld on a real part. Run a scrap trial first.
Set wavelength, power, speed, and focus from the cheat sheet, weld three test coupons, cut them open, and check for porosity and cracks before any production stock touches the beam. This single habit catches approximately 90% of setup mistakes for the cost of a few scrap offcuts.
Here is the workflow, in order. Follow it top to bottom for any new aluminum laser welding job.
- Confirm the alloy and thickness. A 6061 part and a 5052 part of the same thickness need different filler. Read the mill cert or stamp before you guess.
- Pick the beam source. Near-infrared fiber for most shops. Aluminum reflects roughly 90% of NIR light when solid, so plan for a fast initial melt pool to break that reflection.
- Set power by the approximately 400 W per millimeter rule. A approximately 3 mm joint starts near 1,200 W. Adjust from there.
- Dial travel speed. Industrial systems weld approximately 6 mm aluminum butt joints at about 53 mm/s — roughly five times faster than automated arc welding, per The Fabricator. Match your speed to penetration, not to the clock.
- Set focus position. Slightly below the surface for keyhole welds on thicker stock.
- Flow pure argon at 15–20 L/min. Switch to a helium mix above approximately 2 kW to suppress plasma.
- Load the right filler. Use 4047 or 4032 for crack-prone 6000-series alloys.
Now weld three coupons. Change one variable at a time, never two. If you bump power and speed together and the weld improves, you won’t know which fix worked.
Cut and etch one coupon. Look at the cross-section under magnification.
You want full penetration, a tight heat-affected zone, and no string of pinholes along the centerline. Industrial laser welds reach roughly 6.35 mm penetration in aluminum while keeping the heat-affected zone small, according to EB Industries.
If your coupon shows that, you’re ready.
Log every winning setting. Power, speed, gas, focus offset, filler. A simple parameter sheet turns a one-off success into a repeatable recipe. Skip the log, and you’ll be re-testing the same scrap next month.
Test on scrap. Cut it open. Then run production. That order never changes.
See also
What is the standard definition of a weld?
5 Hidden Costs When Importing Laser Machines from China
Average Prices for 100W to 1000W Pulse Laser Cleaners


