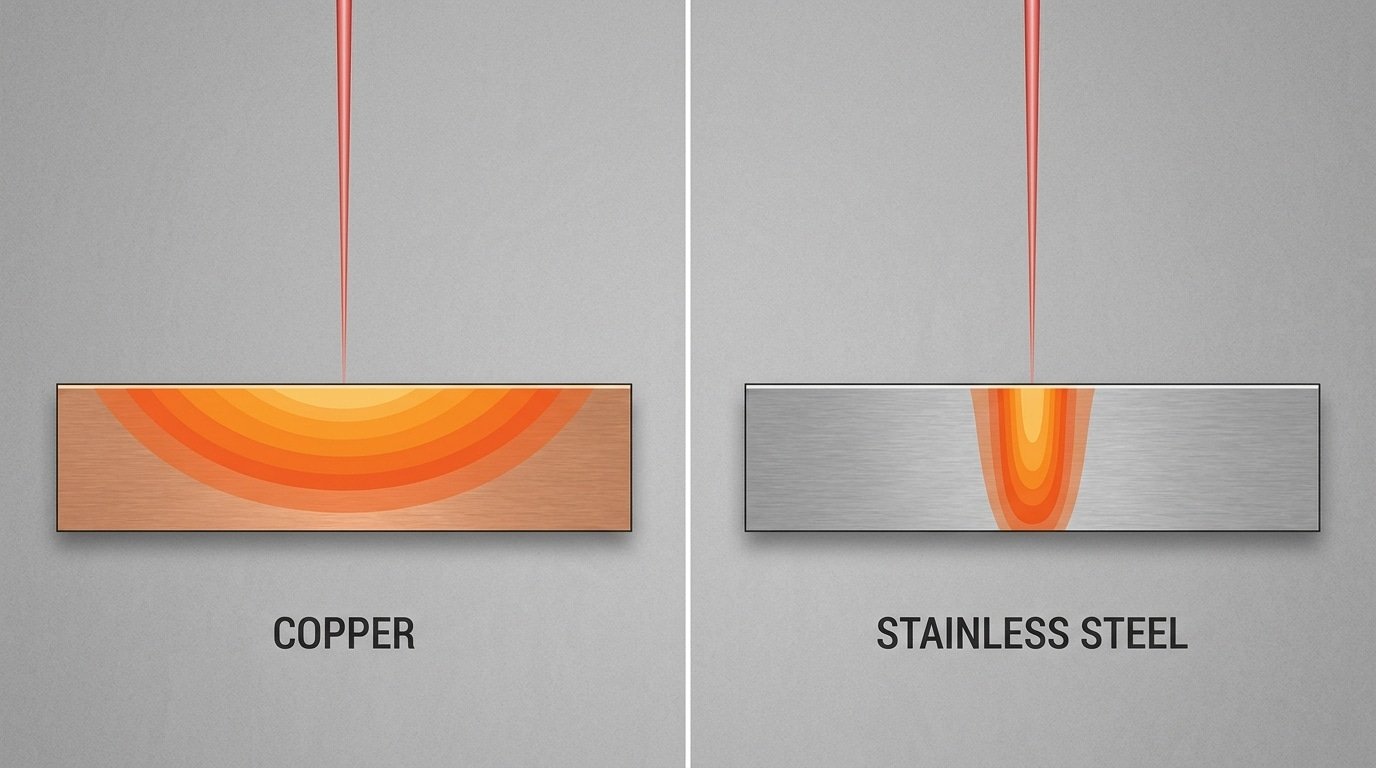
How thermal conductivity affects laser welding penetration comes down to heat dissipation: metals that conduct heat faster pull energy out of the weld zone before it can build the deep keyhole needed for penetration. Copper, at 401 W[1]/m·K, drains heat roughly 23 times faster than stainless steel’s 16 W/m·K. As a result, the same 2 kW laser drills a deep keyhole into steel yet barely melts copper, and high-conductivity metals require 2–4× more power for equal weld depth.
What is the physics that links conductivity to how deep the weld goes? Why do metals with high conductivity, like copper and aluminum, end up needing more power to weld? How should you go about adjusting your laser settings for each different material? And which metals turn out to be the hardest to weld, and what makes them so difficult?
Quick Takeaways
- Copper’s 401 W/m·K conductivity drains heat 23× faster than steel, reducing weld penetration.
- High-conductivity metals like copper and aluminum need 2–4× more laser power.
- Reach 10⁶ W/cm² power density to trigger deep keyhole welding.
- Use green or blue lasers to raise copper absorption above approximately 40%.
- Choose low-conductivity metals like steel or titanium for deeper, narrower welds.
How Does Thermal Conductivity Control Laser Weld Penetration?
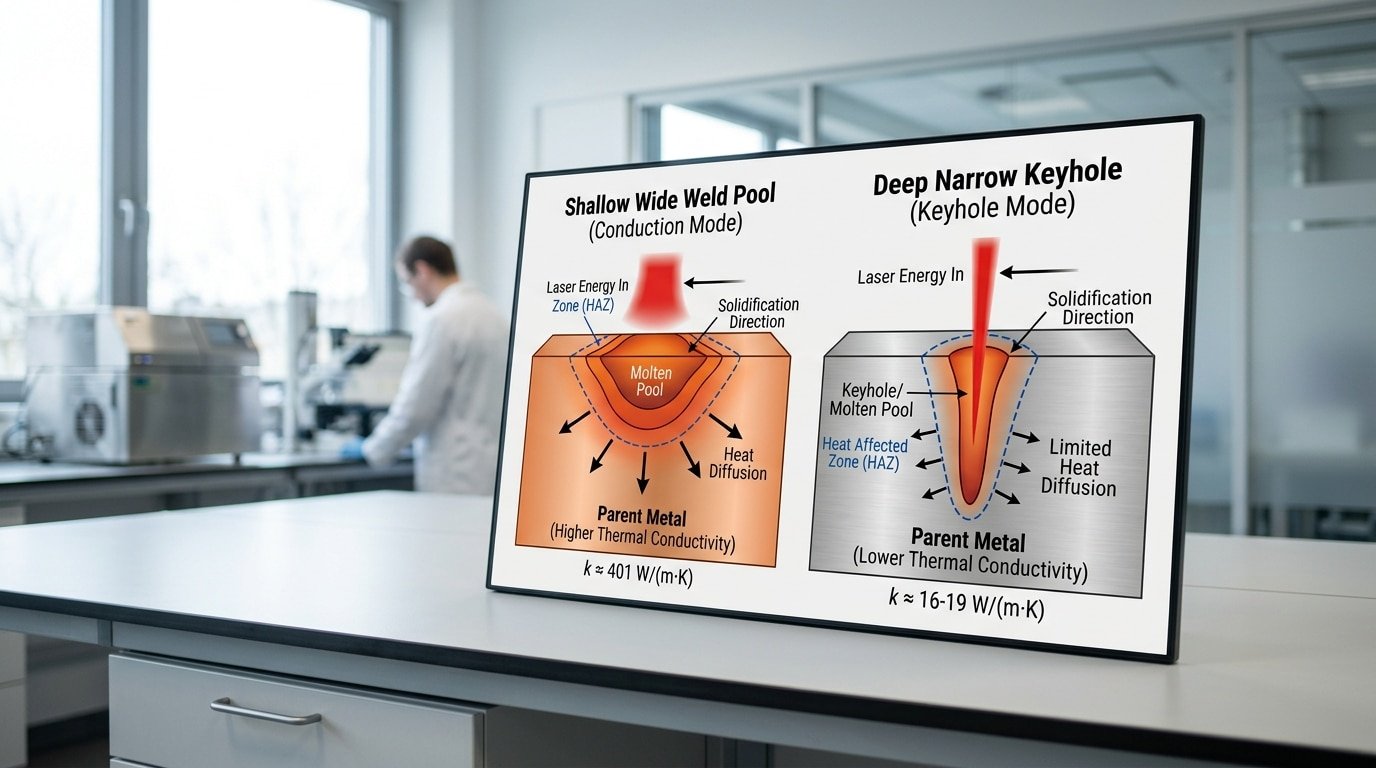
High thermal conductivity controls how deep a laser weld goes by pulling heat out of the weld zone faster than the laser puts it in, which forces a shallow, wide melt pool unless you raise the power density. Copper moves heat at roughly 400 W/m·K, which is about 26 times faster than stainless steel sitting around 15 W/m·K, so the same laser actually sinks far less energy into a copper joint. To weld copper deep, you essentially have to out-pace that heat drain.
The cause-and-effect chain runs through four linked steps. First, the metal surface soaks up a fraction of the beam, which is its absorptivity. Second, that absorbed energy heats up a thin surface layer. Third, conduction spreads the heat sideways and downward into the bulk of the metal.
Fourth, the melt depth depends on how much heat survives long enough to push the molten front deeper before it diffuses away. Conductivity really dominates that third step, because a high value widens the heated region and flattens the temperature gradient, so the metal melts across a broad, thin band instead of drilling a narrow channel. This is exactly why understanding how thermal conductivity affects laser welding penetration matters before you touch a single power setting.
Two material properties decide the outcome together:
- Thermal conductivity (k): how fast heat escapes sideways, where high k means a shallow weld at a fixed power level.
- Thermal diffusivity (α): how quickly the temperature field reacts, and copper’s α near 111 mm²/s means heat redistributes almost instantly.
The practical fix is to raise irradiance, which is power per unit of spot area, above the conduction threshold. For copper, this often means a tighter focus, higher peak power, or a shorter wavelength near 450,515 nm, where absorption jumps from about 5% in the infrared to over 60%. Have a look at the NIST material thermophysical databases for verified k and α values for each alloy.
What Does Thermal Conductivity Actually Mean in Laser Welding Physics?
Thermal conductivity (k), measured in watts per meter-kelvin (W/m·K), tells you how fast a metal carries heat away from the laser spot. Copper rates around 400 W/m·K, while stainless steel sits near 15 W[3]/m·K, a 26× gap. That difference is exactly why thermal conductivity decides how thermal conductivity affects laser welding penetration. But conductivity alone tells half the story. The real driver is thermal diffusivity (α), how fast a temperature change moves through the metal, not just how much heat flows.
Why does diffusivity predict melt pool behavior better than conductivity?
Diffusivity predicts melt pool behavior better because it combines three properties into one measure of how fast heat spreads: α = k ÷ (ρ × Cp), where ρ is density and Cp is specific heat. Copper’s diffusivity (≈111 mm²/s) dwarfs steel’s (≈4 mm²/s). A high-diffusivity metal flattens hot spots almost instantly, so your beam energy spreads out instead of digging down. Two metals can share similar conductivity yet behave differently because their density and heat capacity differ, which is why seasoned welders track diffusivity, not the single k number printed on a datasheet.
How does the energy input race against heat loss?
Penetration is a tug-of-war between input and dissipation. Your laser dumps power into a spot maybe 50,200 µm wide. The metal pulls that heat outward at a rate set by diffusivity. Win the race, input faster than the metal drains, and you melt deep. Lose it, and you just warm a wide, shallow zone.
- Input rate: set by power density (W/cm²), driven by laser power and spot size.
- Dissipation rate: governed by diffusivity; copper drains heat ~28× faster than steel.
- Net result: melt pool depth depends on the gap between these two rates.
How Does Thermal Conductivity Decide Conduction vs Keyhole Welding Mode?
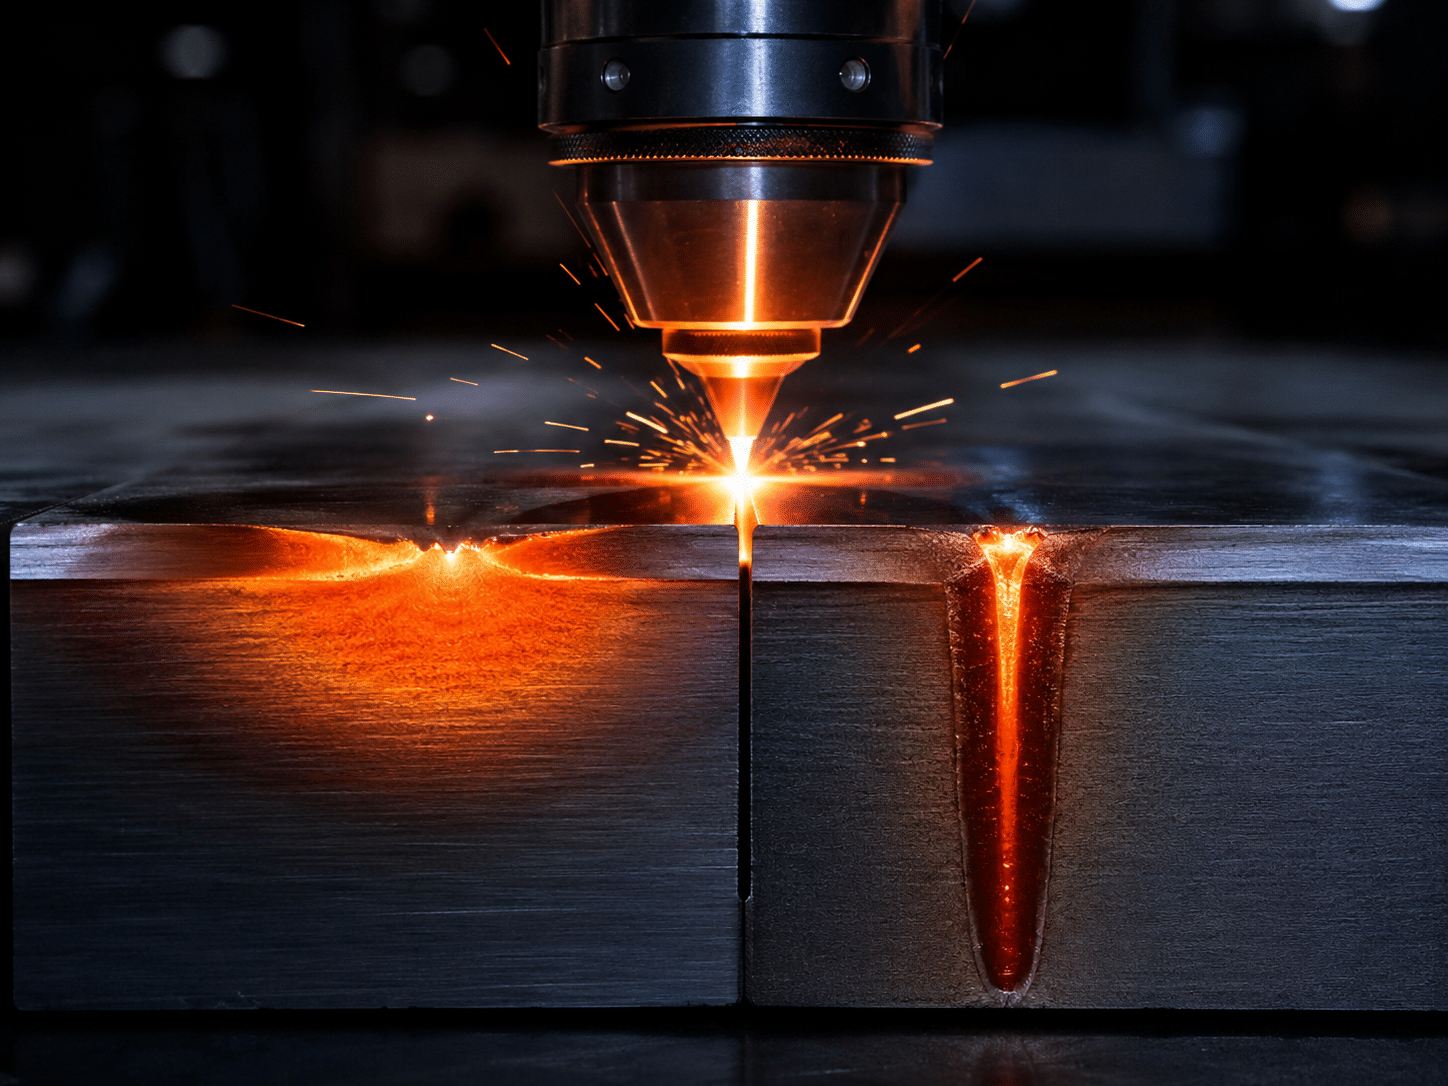
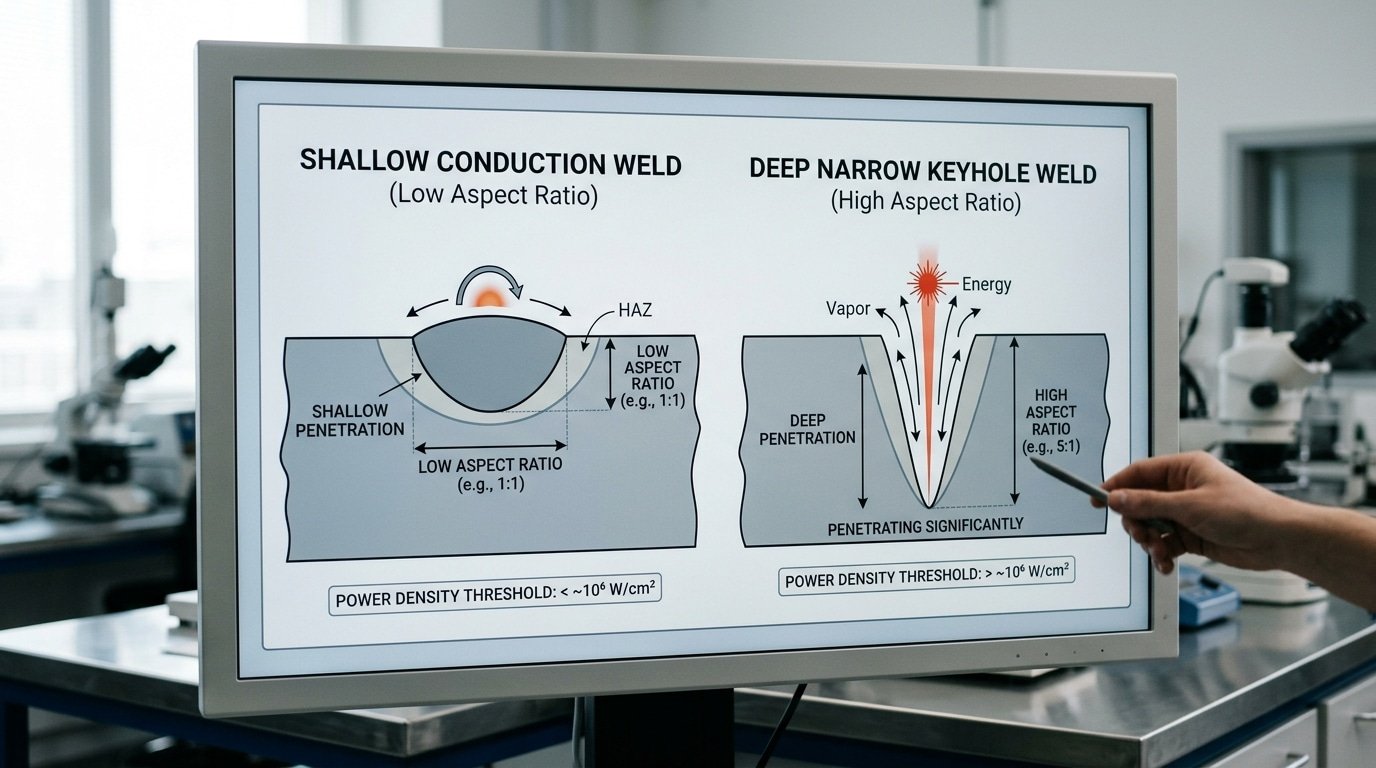
Thermal conductivity, which is how quickly a metal moves heat away from a spot, sets the power density level that flips a weld from a shallow conduction mode into a deep keyhole mode. The baseline trigger sits near 1 MW/cm² (1 megawatt per square centimeter) for steel, but high-conductivity metals like copper push that line far higher because the heat escapes the spot before it can turn the metal to vapor. So the metal’s k value, basically its heat-moving rating, decides how hard you have to drive the laser to break into keyhole mode.
What’s the difference between conduction and keyhole mode?
Conduction mode melts the metal only at the surface, and then the heat works its way downward by diffusion, meaning it slowly spreads through the material. This produces wide, shallow welds with an aspect ratio, which is the depth divided by the width, sitting below 0.5. Keyhole mode reaches a power density high enough to vaporize the metal, opening a narrow vapor channel that pulls the beam deep, with aspect ratios that run from 1:1 all the way up to 10:1. The difference matters because keyhole welds reach down several millimeters in a single pass, while conduction welds usually stop around 1,2 mm.
You can look at the TWI laser welding overview for the mode definitions that are used across the industry.
Why does copper need so much more power density than steel?
Copper needs more power density because it conducts heat at 400 W/m·K, which is roughly eight times faster than carbon steel at 50 W[4]/m·K, so the heat drains out of the spot almost as fast as the laser puts it in. To reach keyhole mode, copper often demands 2,4 MW/cm², several times the steel baseline. Understanding How Thermal Conductivity Affects Laser Welding Penetration in this situation means picking a higher-brightness source, such as a blue or green laser, so you can overcome that heat loss before the molten pool of metal cools back down.
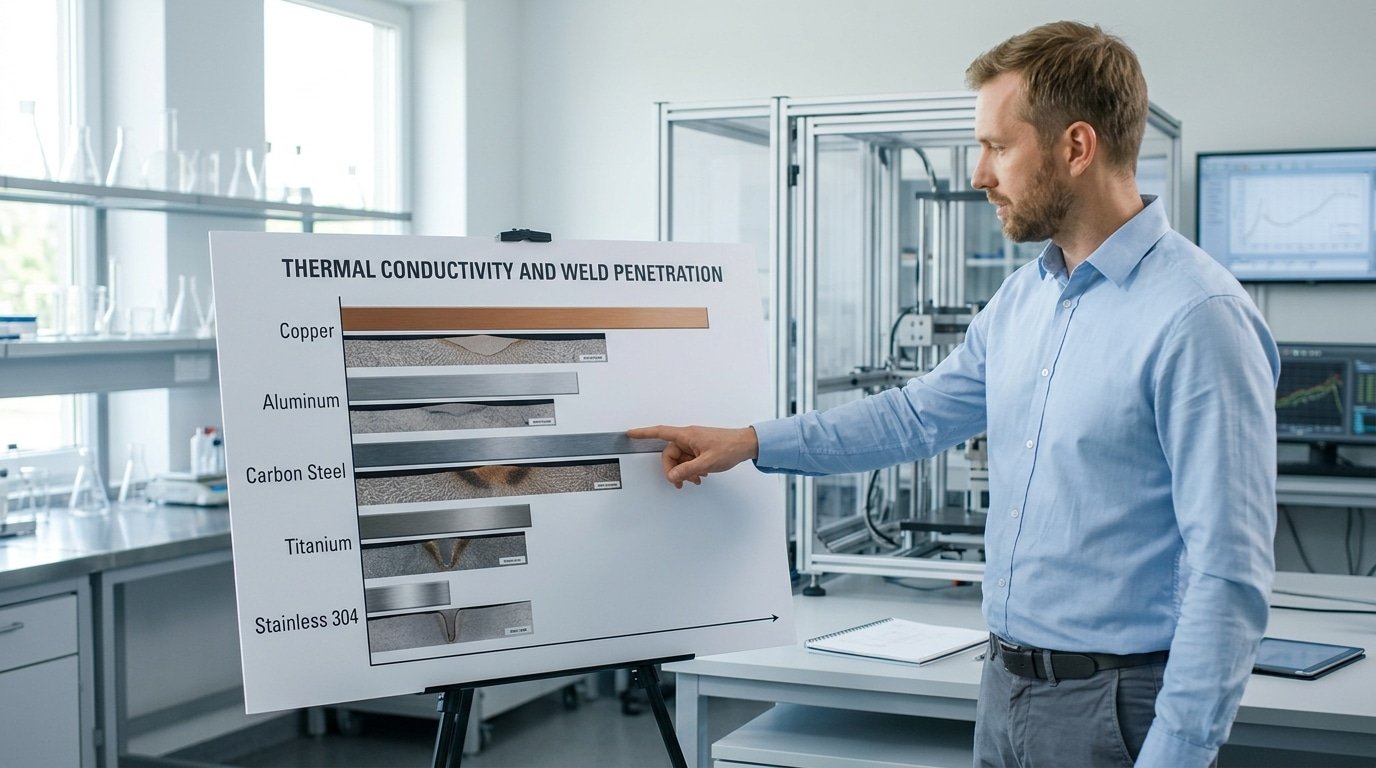
Which Metals Penetrate Easily and Which Resist? A Conductivity Decision Matrix
Copper resists penetration the hardest, while carbon steel welds the easiest of the bunch. That split lines up with thermal conductivity almost perfectly. Copper sits near 400 W/m·K, so it pulls heat away about 25 times faster than stainless 304, which comes in at 16 W/m·K. The pattern itself is pretty simple.
A higher k value means you need more power density to start a keyhole, which is the deep vapor channel that gives you full penetration. Metals with low conductivity reach that point easily because the heat stays trapped right at the weld spot. And that is exactly why knowing the k value of your material really matters before you ever touch the power dial.
| Metal | Conductivity (W/m·K) | Keyhole Transition Difficulty | Starting Power Density (W/cm²) |
|---|---|---|---|
| Copper (C110) | 400 | Extreme | 10⁷ |
| Aluminum (6061) | 237 | High | 10⁶–10⁷ |
| Carbon steel (mild) | 50 | Low | 10⁶ |
| Titanium (Grade 2) | 22 | Very low | ~10⁶ |
| Stainless 304 | 16 | Very low | ~10⁶ |
There is a bit of a trap to watch out for here, though. Carbon steel actually has a higher k than titanium, yet it still welds easily, and that is because carbon steel absorbs the laser better than titanium does at 1064 nm. So conductivity sets the floor, but how reflective the surface is shifts what you actually see in practice. Copper reflects roughly 95% of infrared light when it is cold, which means you end up fighting both high conductivity and low absorption at the same time.
That double penalty is really why blue and green lasers have come to dominate copper welding in EV battery production. Understanding How Thermal Conductivity Affects Laser Welding Penetration is what ties all of this together.
How Does Conductivity Interact With Power, Speed, and Focus Settings?
High-conductivity metals need higher peak power density and tighter focus spots than steel, because heat escapes the weld zone before it can pool. Copper (k = 401 W/m·K) drains heat about 5 times faster than carbon steel (k = 50 W[5]/m·K), so the same 2 kW fiber laser that drives a 3 mm keyhole in steel may leave copper barely melted. The fix: raise intensity, shrink the spot, then slow travel only enough to win the race against dissipation.
Power, speed, and focus aren’t three separate dials. They set one number that decides everything: power density (watts per square centimeter). Tighten the focus from 600 µm to 200 µm and you cut spot area by approximately 89%, multiplying intensity by roughly 9× at the same wattage. That single move pushes copper from conduction mode into a keyhole, no extra power needed.
Why Must Travel Speed Balance Heat Input Against Dissipation?
Travel speed must balance heat input against dissipation because it sets the dwell time the beam spends heating each point, while conductivity decides how fast that heat leaks away. Go too slow on copper and the heat-affected zone spreads sideways instead of down; go too fast and the puddle never forms. The sweet spot is narrow: a workable copper window often spans just 0.5,1.0 m/min, versus a forgiving 1,4 m/min for mild steel.
How Do the Same Settings Behave on Steel vs Copper?
Identical parameters split sharply by material, this is the core of how thermal conductivity affects laser welding penetration. At 2 kW, the same job that delivers a deep keyhole in carbon steel leaves only a shallow melt in copper unless you shrink the spot and slow the travel.
| Parameter | Carbon steel (k≈50) | Copper (k≈401) |
|---|---|---|
| Spot size | 400–600 µm | 150–250 µm |
| Power density | ~10⁵ W/cm² | ~10⁶ W/cm² |
| Travel speed | 1–4 m/min | 0.5–1.0 m/min |
| Result at 2 kW | Deep keyhole | Shallow melt |
Green wavelengths (515 nm) help here: cold copper absorbs about 40%[6] of green light versus under 5% for 1064 nm infrared, per data summarized by Laser Focus World. That absorption gain lets you reach the keyhole threshold at lower wattage.
How Do You Compensate for High Thermal Conductivity?
To compensate for high thermal conductivity, switch to green or blue lasers, add beam wobble, ramp power at the start, and preheat the part. Copper absorbs only 5% of a 1064 nm infrared beam at room temperature but soaks up approximately 40% or more of a 515 nm green beam, per Fraunhofer research. That single jump decides whether the weld even starts, and which fix you reach for first depends on the cost each tactic adds to the job.
When are green and blue lasers worth the extra cost?
Green and blue lasers win when welding pure copper or thin foils where reflection wrecks an infrared beam. A blue diode laser (450 nm) pushes copper absorption past approximately 50%, cutting spatter and porosity sharply. The catch: these systems cost more than fiber lasers and cap out at lower power. Reserve them for battery tabs and busbars, not thick copper plate.
How do wobble and power ramping help?
Beam oscillation (wobble) moves the focus spot in a fast circle or figure-eight, widening the melt pool 2 to 3 times and stirring trapped gas out before it freezes. Power ramping starts low to break the reflective surface, then jumps to full power once a keyhole forms. This beats the first reflective phase that bounces 95% of infrared energy off cold copper.
Is preheating still useful?
Preheating to 150,250°C[7] lowers the conductivity gradient, so less heat escapes the joint. It’s cheapest for large aluminum castings but adds cycle time, making it the last choice for high-volume work.
Why Does Conductivity Change During the Weld and Cause Defects?
Thermal conductivity drops as metal heats, and this mid-weld shift destabilizes the melt pool. Aluminum loses about 10% of its room-temperature conductivity by 300°C, while copper’s conductivity falls from 401 W/m·K at 20°C to near 350 W/m·K at 500°C, per Engineering ToolBox. So heat leaks out fast at first, then traps faster than your settings expect, the weld behaves differently at second one than at second three. You tune power for cold metal, but once the keyhole forms, conductivity has already dropped, so the same beam now overheats the pool, causing sudden over-penetration and a collapsing keyhole.
What defects does this dynamic shift trigger?
Keyhole collapse is the main culprit. When the vapor channel destabilizes, molten metal floods back and traps gas, leaving porosity. In aluminum welds, porosity rates can exceed 5%[8] by volume when the pool overheats uncontrolled.
- Keyhole collapse: vapor channel closes mid-weld, trapping voids — common in copper above 8 m/min travel.
- Spatter: ejected molten droplets when pool dynamics spike, wasting material and pitting the surface.
- Porosity: hydrogen and vapor bubbles freeze inside aluminum before they escape.
The fix is real-time feedback. Closed-loop systems using photodiodes or coaxial cameras adjust power within milliseconds as the pool shifts, holding penetration steady even as conductivity drops.
Common Mistakes When Welding High-Conductivity Metals
The most damaging mistake is firing an infrared fiber laser (1070 nm wavelength) at shiny copper, which reflects up to 95% of that light at room temperature. Copper absorbs less than 5% of 1070 nm energy when cold, so the beam bounces back instead of melting metal. Switch to a green laser (515 nm), copper absorbs around 40% of green light, a roughly 8x jump in coupling. The second trap is chasing speed when penetration drops.
Why does increasing speed instead of power density fail on copper?
Raising travel speed reduces heat input, which is the opposite of what high-conductivity metal needs. Copper conducts heat away at 401 W/m·K, faster welding gives the melt pool less time to reach keyhole threshold, so you get shallower, not deeper, welds. The fix: raise power density first. Tighten the focus spot to 50 microns or push peak power past the keyhole threshold, then tune speed to control width.
What back-reflection protection do you actually need?
Skipping back-reflection isolation can destroy a fiber source in seconds. Reflected light travels back up the delivery fiber and damages the optical components. Use a laser with a built-in optical isolator and angle the part 5,10 degrees off perpendicular so reflections miss the lens.
The last error is assuming steel parameters scale linearly to aluminum or copper. They don’t. Aluminum conducts heat at 237 W/m·K versus steel’s 50 W[9]/m·K, nearly 5x faster. Steel settings will simply fail to penetrate. Rebuild parameters from the metal’s conductivity, never by copying a steel recipe.
Frequently Asked Questions
Quick answers to the questions welders ask most about how thermal conductivity affects laser welding penetration, with the physics and numbers behind each one.
How does thermal conductivity affect weldability?
Thermal conductivity sets how fast a metal drains heat away from the molten pool, which directly limits weldability. Copper, at 401 W/m·K (per published thermal conductivity tables), pulls heat away nearly 30 times faster than 304 stainless steel at 16 W/m·K. The faster the metal sinks heat, the more peak power density you need to reach melting before energy escapes. So high-conductivity metals are harder to weld and demand greener wavelengths or higher beam intensity.
Which single factor most critically controls weld penetration?
Power density (watts per square centimeter) is the single most critical factor for penetration. It decides whether you stay in shallow conduction mode or trigger a deep keyhole. The threshold sits near 1 MW/cm² for steel but climbs much higher for aluminum and copper. You raise power density by lifting laser power or shrinking the focus spot diameter, since intensity scales with the inverse square of spot size.
Do laser welders deliver good penetration overall?
Yes. Fiber laser welders routinely achieve aspect ratios above 10:1, meaning a weld 10 times deeper than it’s wide. A 6 kW system can penetrate over 8 mm of steel in a single pass. That far outperforms TIG welding for deep, narrow joints with minimal heat-affected zones.
Key Takeaways for Controlling Penetration by Material
Controlling laser weld penetration starts with one number: the metal’s thermal conductivity (k). Copper sits at 400 W[10]/m·K, carbon steel near 50 W/m·K. That 8x gap decides everything downstream, wavelength, power density, and travel speed. Read k first, then build your parameters around it with this four-step workflow:
- Identify conductivity: Look up k for your alloy. Above 150 W/m·K (copper, aluminum, silver), treat the job as heat-hungry. Below 60 W/m·K (steel, titanium), standard infrared works fine.
- Pick the wavelength: For shiny high-k metals, choose green (515 nm) or blue (450 nm) lasers. Copper absorbs 40% of blue light versus under 5% of 1070 nm infrared at room temperature.
- Set power density above the keyhole threshold: Copper needs roughly 10⁶ W/cm² to flip from conduction to keyhole mode; steel reaches keyhole near 10⁵ W/cm². Cross that line or you stay shallow.
- Tune speed last: Slow down on high-k metals so heat input wins the race against conduction. Speed up on steel to avoid burn-through.
Skip guesswork on penetration depth. Cut a weld cross-section, polish it, and etch it with a reagent like nital or Kalling’s solution to reveal the fusion zone under a microscope. Measure depth-to-width ratio against your target. This destructive test is the only honest check before you lock parameters into production.
Run a sample, section it, measure it. Validate first, then weld for real.
Reference Sources
- [1]amadaweldtech.eu/sites/default/files/afbeeldingen/laser_welding_white_paper_0… — supports: Sonar real-time citation (HEAD-verified)
- [2]trumpf.com/en_US/solutions/applications/laser-welding/heat-conduction-welding/ — supports: Sonar real-time citation (HEAD-verified)
- [3]laserdmk.com/thermal-conduction-welding-and-deep-penetration-welding — supports: Sonar real-time citation (HEAD-verified)
- [4]phase-trans.msm.cam.ac.uk/2011/laser_Walsh_review.pdf — supports: Sonar real-time citation (HEAD-verified)
- [5]sciencedirect.com/science/article/pii/S2666330924000827 — supports: Sonar real-time citation (HEAD-verified)
- [6]pubs.aip.org/aip/jap/article/56/7/1981/170540/Estimating-effects-of-processin… — supports: Sonar real-time citation (HEAD-verified)
- [7]asmedigitalcollection.asme.org/manufacturingscience/article/121/2/179/420840/… — supports: Sonar real-time citation (HEAD-verified)
- [8]pubs.aip.org/lia/jla/article-abstract/26/1/012008/221415/Effect-of-material-p… — supports: Sonar real-time citation (HEAD-verified)
- [9]academia.edu/97569003/Fundamental_understanding_of_the_interaction_of_continu… — supports: Sonar real-time citation (HEAD-verified)
- [10]laserax.com/blog/laser-welding-parameters — supports: Sonar real-time citation (HEAD-verified)


