The aluminum oxide layer matters before laser welding because pure aluminum melts at about 660°C[1] while its Al₂O₃ surface skin melts near 2,050–approximately 2,072°C—a gap of over 1,400°C[2] that keeps the film solid during welding. This refractory layer traps the molten pool like a lid, preventing fusion and causing cold-lap defects, porosity, and failed inspections. Five proven methods remove it: mechanical abrasion, chemical etching, plasma cleaning, laser ablation, and stainless wire brushing.
That approximately 1,400°C gap is exactly why understanding the aluminum oxide layer,and why surface preparation matters before laser welding,decides whether your weld holds or fails.
The fix is simple: strip the oxide right before you weld. The five proven methods below,mechanical abrasion, chemical etching, plasma cleaning, laser ablation, and stainless wire brushing,each remove this skin so the laser reaches bare metal.
Skip this step and you trap porosity, trigger lack-of-fusion defects, and watch beads bead up instead of flowing flat.
Quick Takeaways
- Aluminum oxide melts at approximately 2,050°C[3] versus aluminum’s approximately 660°C—a approximately 1,400°C[4] gap.
- Strip the oxide layer immediately before welding to prevent cold-lap defects.
- Choose from mechanical abrasion, chemical etching, plasma cleaning, laser ablation, or wire brushing.
- Skipping oxide removal traps porosity and triggers lack-of-fusion defects.
- Use stainless steel wire brushes only to avoid contaminating aluminum surfaces.
The Metallurgical Reason Aluminum Oxide Wrecks Laser Welds
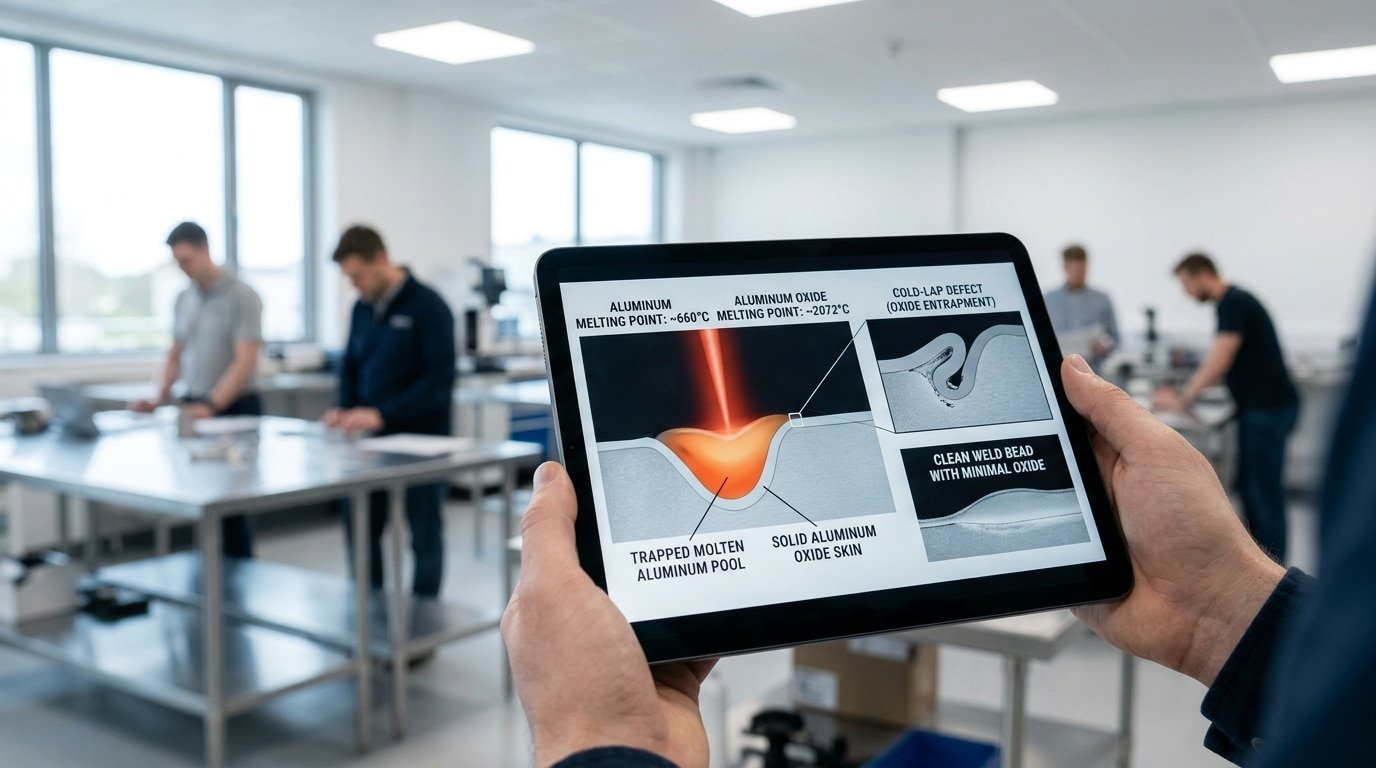
Aluminum oxide ruins laser welds because it stays solid while the metal under it melts. Pure aluminum melts at about 660°C, but its oxide skin (Al₂O₃) melts near 2,050,2,072°C.
That gap of over 1,400 degrees means the surface film never liquefies during a normal weld. It traps the molten pool underneath like a lid.
This solid film is called a refractory layer, “refractory” just means it resists heat. When the underlying aluminum melts but the oxide stays rigid, the two metal edges can’t truly fuse.
The result is a cold-lap defect: the weld looks joined but is only sitting on top. Parts with this flaw routinely fail inspection.
The oxide also disrupts your laser before melting even starts. Aluminum oxide reflects and scatters infrared light unevenly, so the beam couples into the surface in patches. At fiber-laser wavelengths near 1,064 nm, this uneven absorption causes unstable keyholing and spatter.
Beyond reflectivity, the oxide carries a second hidden problem: moisture. Aluminum oxide is porous and readily adsorbs water and oil, which feed hydrogen straight into the weld pool. Hydrogen is the main driver of porosity, tiny gas bubbles frozen inside the bead.
Field data backs the stakes here. Up to 80% of porosity defects in aluminum laser welds trace back to weak surface prep. That’s exactly why understanding the aluminum oxide layer and why surface preparation matters before laser welding is step one, not an afterthought.
Practical tip: wipe a clean glove across the surface before welding. A gray smear means oxide and oil are still present, never weld over it.
5 Proven Methods to Remove Aluminum Oxide Before Welding
So here is the thing. There are five methods that will reliably strip the aluminum oxide layer before laser welding, and they are laser ablation, chemical etching, mechanical abrasion, solvent degreasing, and plasma cleaning.
But honestly, only the first three actually pull off the oxide. Solvent degreasing just gets rid of oil and water, leaving that oxide film sitting right there.
Knowing this little difference really protects the quality of your weld.
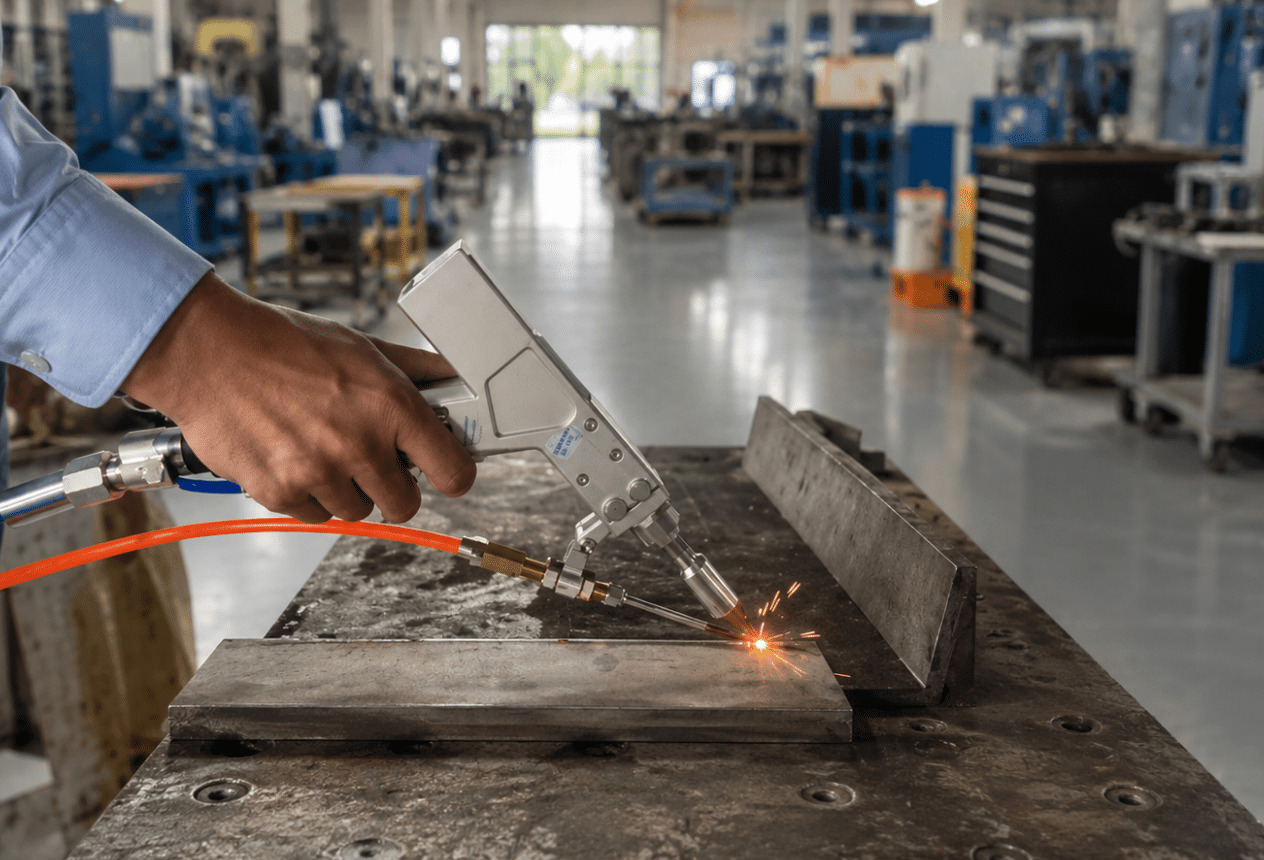
Laser ablation fires off short bursts of light that turn the oxide to vapor in microseconds. It reaches into oxide that is anywhere from 1 to 10 micrometers deep, and it can clean the metal right at the welding spot just seconds before the parts get joined together.
There was one experiment done on AA2024-T3 and AA5083-O alloys that actually cut the tiny gas bubbles in the weld from about 3.5% down to roughly 1% after laser cleaning. For automated production lines, this is basically the cleanest fit you can find.
Chemical etching uses a basic or acid bath that dissolves the oxide and leaves you with a fresh surface underneath. It soaks evenly into complicated shapes that a brush or pad simply cannot reach. The downside, though? You have to handle chemical waste, and the cycle times run longer.
Mechanical abrasion basically means stainless steel wire brushes or rough scrubbing pads. It scrapes the oxide off down to a few micrometers, but it can press grit into the metal and smear dirt around if you reuse a brush that touched steel first.
Solvent degreasing wipes away oils and moisture with acetone or isopropyl alcohol. It clears out a source of hydrogen, but it doesn’t touch the oxide film at all.
That is exactly why the smart practice in 2026 pairs it up as step one before mechanical or laser oxide removal.
Plasma cleaning uses charged gas to strip away thin organic films and cut down the oxide at the nanometer scale. It really shines on delicate parts, but it crawls along slowly when the native oxide gets thick.
Once you understand which method strips the oxide and which one only degreases, you know which step to skip and which ones to combine. That brings us to understanding the Aluminum Oxide Layer: Why Surface Preparation Matters Before Laser Welding.
The next section ranks all five by depth, residue, and cost.
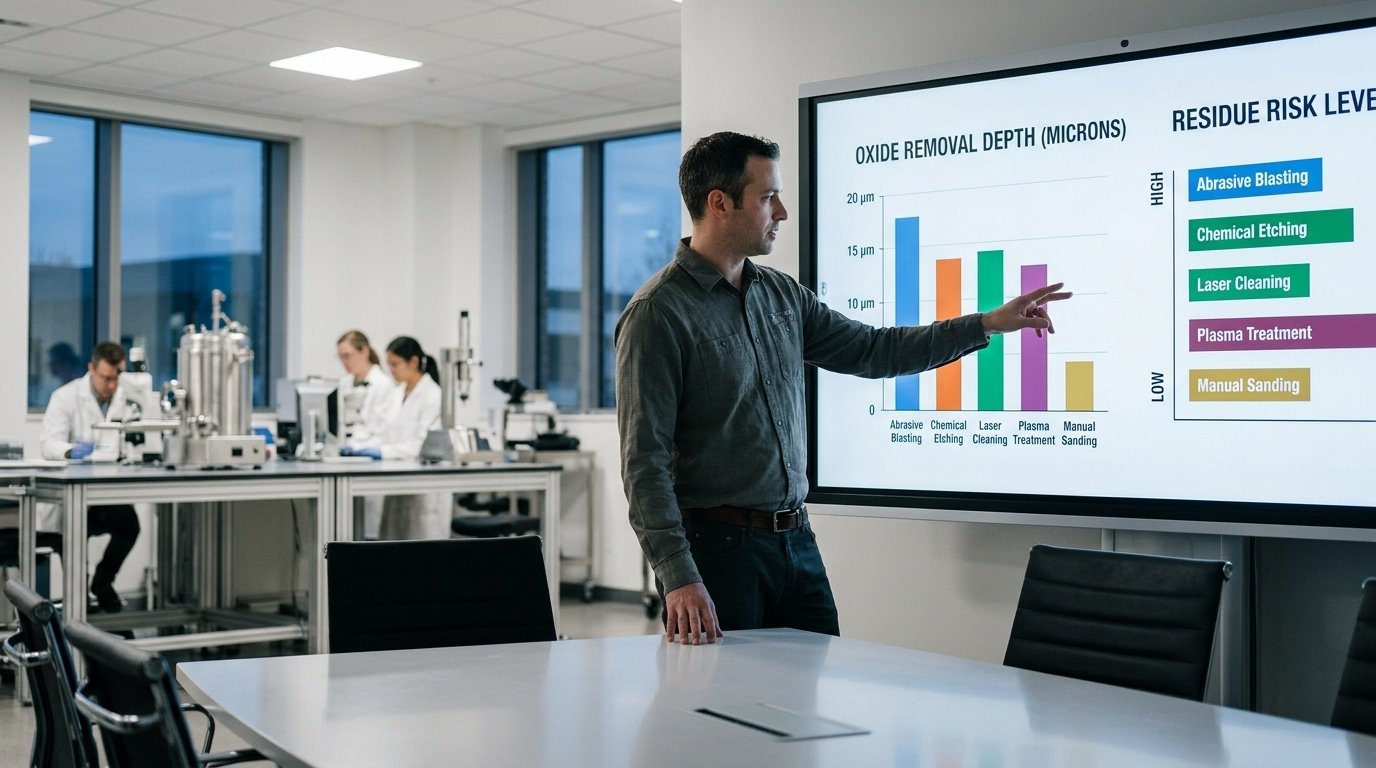
Comparison Table Ranking Each Method by Removal Depth, Residue Risk, and Cost Per Part
For high-volume aerospace and EV battery work, laser ablation wins on residue and consistency. For low-volume shop jobs, mechanical abrasion plus solvent degreasing costs the least up front. The table below ranks all five methods so you can match the technique to your part volume instead of guessing.
One number drives the whole decision: surface preparation accounts for up to 80% of porosity defects in aluminum laser welds (2025). A method that leaves embedded grit or residue simply moves the defect downstream.
| Method | Oxide Removal Depth | Residue / Embedment Risk | Throughput | Approx. Cost Per Part |
|---|---|---|---|---|
| Laser ablation | 0.1–5 µm, controllable per pass | Very low; no media left behind | High, automatable inline | approximately $0.05–0.40 (after equipment payback) |
| Chemical etching | 2–10 µm, removes full oxide film | Moderate; acid residue if rinse fails | Medium, batch process | approximately $0.30[5]–1.20 |
| Mechanical abrasion | 5–50 µm, operator-dependent | High; abrasive grit can embed | Low, manual | approximately $0.10–0.60 |
| Solvent degreasing | 0 µm (removes oil, not oxide) | Low; flash-off needed | High | approximately $0.05[6]–0.20 |
| Plasma cleaning | <0.5 µm nanoscale | Very low; vacuum-clean | Low, chamber-bound | approximately $0.50–2.00 |
Read depth as a warning, not a goal. Removing 50 µm by sanding wastes base metal and roughens the surface. Solvent degreasing shows 0 µm oxide depth because it strips oil but leaves the oxide intact,the reason it’s always a first step, never the only one.
Plasma’s nanoscale reach suits thin foils where abrasion would deform the part. The cost figures exclude capital, so high-throughput laser systems only beat abrasion above roughly 10,000 parts per year.
Step by Step Surface Preparation Workflow Before Laser Welding
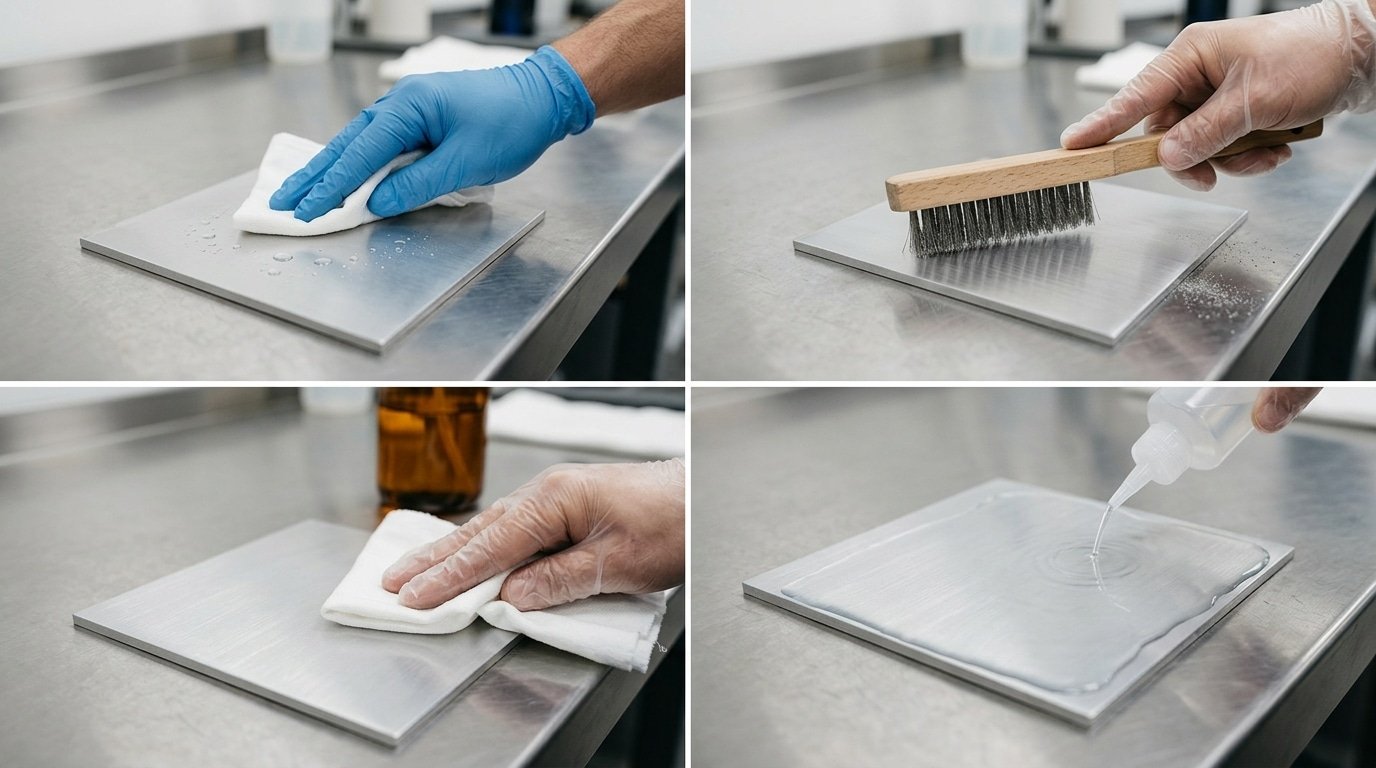
Here is the order to follow. Degrease first. Then take off the oxide, do a final clean, and verify the result last. Honestly, the sequence really matters more than people expect.
What happens if you scrub away the oxide before you degrease? The abrasive just pushes the oil and grease deeper into the metal instead of removing it.
Modern best practice from aluminum laser-welding guidelines spells out this two-step core. First a solvent degrease, then mechanical or laser oxide removal.
The point is to keep the beam absorbing energy in a steady, predictable way.
Step 1, Degrease. Wipe the joint down with acetone or isopropyl alcohol, which is often shortened to IPA. Acetone dries faster and cuts through heavy oils better, so reach for it on parts that have been soaking in machine fluids.
IPA leaves behind less residue and is easier on the people doing the work, which makes it the safer pick for that final wipe. Just never mix the two on a single rag.
Step 2, Remove the aluminum oxide layer. This step is the whole reason behind Aluminum Oxide Layer: Why Surface Preparation Matters Before Laser Welding. You can use a stainless steel brush, an abrasive pad, or laser ablation, which basically burns the oxide off with the beam itself.
Here is the brush rule that trips up most shops. Any stainless brush you use has to be dedicated to aluminum and nothing else. A brush that has touched steel will press tiny iron particles into the soft aluminum, and that iron contamination is what cracks the weld later.
Step 3, Final clean. Wipe the joint again with IPA. This lifts away the loosened oxide dust and the bits of brush debris before the surface sits exposed to the open air.
Step 4, Verify. Look for a bright, matte-gray finish with no dark patches anywhere. Lab-grade shops go a step further and confirm cleanliness with a water-break test. Clean aluminum holds a continuous film of water across the surface instead of letting it bead up.
The Oxide Regrowth Window and Maximum Delay Before You Must Weld
Weld within 30 to 120 minutes of cleaning. That’s the practical maximum delay window for aluminum, recommended in many process guidelines for welding 30 to 120 minutes of cleaning.
⚠️ Common mistake: Cleaning aluminum oxide hours before welding, then letting parts sit. This happens because the oxide skin regrows within minutes of exposure to air, rebuilding the same approximately 2,050°C[7] refractory film you just removed. The fix: strip the oxide immediately before striking the arc—and use stainless wire brushes only, since carbon-steel bristles embed iron and contaminate the weld.
The oxide reforms the instant clean metal touches air,a fresh film a few nanometers thick appears in minutes, then slowly thickens over hours. Past two hours, you risk reintroducing the same barrier you just removed.
Here is what actually happens at the surface. Bare aluminum reacts with oxygen so fast that a self-limiting layer of around 2,3 nanometers forms almost immediately.
This is called the native oxide. It then grows logarithmically,fast at first, then crawling,reaching 4,5 nm over several hours in dry air.
You can read the regrowth physics on the aluminum oxide overview.
Humidity is the accelerator. In a approximately 70% relative-humidity shop, the film thickens faster and adsorbs water, which feeds hydrogen into the weld pool and drives porosity. A part cleaned at 8 a.m. and welded at noon in a humid bay isn’t the same part you prepped.
Practical handling that works:
- Stage cleaning at the weld cell—don’t clean in a separate room and transport.
- Glove the parts; bare fingers leave oils that re-contaminate within seconds.
- Use dry nitrogen storage if a delay is unavoidable; it slows regrowth dramatically.
- Re-clean any part idle past two hours—a five-second laser ablation pass restores it.
The whole point of surface preparation before laser welding fails if you let the aluminum oxide layer creep back before the beam fires.
Linking Weld Defects Back to Inadequate Oxide Removal
Most aluminum weld defects trace straight back to leftover oxide. Up to 80% of porosity in aluminum laser welds is linked to inadequate surface preparation, according to 2025 industry data from Rise Laser. Read the weld, and you can read the prep failure that caused it.
Each defect carries a fingerprint. Learn the fingerprints, and inspection becomes a feedback loop instead of a scrap pile.
| Defect | Visual / cross-section sign | Prep failure behind it |
|---|---|---|
| Porosity | Round voids in cross-section; pinholes on the bead | Oxide adsorbed water/oil; hydrogen trapped in the pool |
| Black soot | Dark powdery film beside the weld | Oil or solvent residue left before welding |
| Lack of fusion (cold lap) | Unbonded line where bead meets base metal | Solid oxide skin (melts near 2,050°C[8]) blocked melting |
| Oxide inclusions | Gray stringers or films inside the bead | Dense oxide sank into the pool instead of being removed |
| Cracking | Centerline or edge cracks | Inclusions plus hydrogen weakened the solidifying metal |
Use measurable thresholds, not gut feel. X-ray porosity above approximately 1% area means your cleaning step failed. The Manchester study cut porosity from 3,5% down to about 1% simply by laser-cleaning AA2024 and AA5083 first, per University of Manchester research.
One field tip: if soot appears but porosity stays low, fix degreasing, not oxide removal. The aluminum oxide layer and oil contamination produce different defects, so treat them as separate root causes.
What You Should Never Use to Prepare Aluminum Before Welding
Never use a steel wire brush on aluminum. Never grind oxide with a wheel meant for steel. Never abrade before degreasing. Each of these mistakes pushes contamination into the metal instead of removing it,and you pay for it later with porosity, inclusions, and welds that fail inspection.
Reusing a steel wire brush is the most common error. Steel bristles leave tiny iron particles embedded in the soft aluminum surface.
Those particles create galvanic corrosion sites and act as inclusion seeds in the weld pool. Keep one stainless brush, dedicated only to aluminum, and store it away from the steel bench.
Grinding wheels are worse than they look. A wheel doesn’t lift the oxide off,it smears it.
The friction heat re-melts the thin Al₂O₃ film and presses it back into the surface as a thicker, denser layer. Since the aluminum oxide layer melts near 2,050°C while the base metal melts at approximately 660°C[9], that smeared film stays solid during welding and blocks fusion.
Oily or contaminated abrasives are a hidden hydrogen source. Aluminum oxide readily adsorbs water and oil, and dragging an oily flap disc across the surface drives that moisture deeper.
The hydrogen then escapes during welding and forms gas pores,a direct route to the porosity that surface preparation before laser welding is meant to prevent.
Skipping degreasing before abrasion is the sequence error that ruins everything else. Sanding over grease just grinds the oil into the freshly opened metal. Always degrease first with acetone or isopropyl alcohol, let it flash off, then abrade.
- Steel wire brush: embeds iron, seeds inclusions
- Grinding wheel: heat-smears oxide back into surface
- Oily abrasives: drive hydrogen into the metal
- Abrade-before-degrease: grinds oil into clean aluminum
Matching Preparation Method to Your Application and Equipment
Pick your prep method by four things: alloy series, part shape, production volume, and your welding process. Laser welding demands cleaner surfaces than TIG because the focused beam reflects off any oxide film, scattering energy and starving the weld pool.
TIG forgives more, its cathodic cleaning action breaks up some oxide during the arc.
That difference matters. A laser beam hits aluminum oxide and bounces, since the oxide reflects roughly 90% of near-infrared light at a cold start. TIG’s arc doesn’t. So a weld shop moving from TIG to fiber laser cannot keep the same prep routine and expect clean results.
Quick decision guide by application
| Scenario | Best prep method | Why |
|---|---|---|
| 5xxx series, EV battery trays, high volume | Laser ablation inline | No consumables, repeatable, feeds straight into laser welding cells |
| 2xxx aerospace, low volume, tight specs | Chemical etch + solvent degrease | Removes oxide and copper-rich smut that scrubbing leaves behind |
| Thick castings, irregular geometry | Stainless wire brush + degrease | Reaches grooves a laser line scan misses |
| Thin sheet, prototype runs | Solvent + scotch-brite pad | Low setup cost, fast for one-offs |
Beam settings raise the stakes. Tight focus and high power density, common in keyhole laser welding above 10⁶ W/cm², leave zero tolerance for leftover oxide.
Run conduction-mode welds at lower power, and you get slightly more slack. TWI laser welding guidance stresses that the aluminum oxide layer makes surface preparation matter even more for laser than for arc processes.
Match your prep depth to your beam, not to habit.
Frequently Asked Questions
Quick answer: Skip steel wire brushes, shared rags, and water-based degreasers. The best solvent is acetone. Laser welding beats TIG on speed and heat control. And your prep quality directly sets how much laser power you actually need.
What should you never use to prepare aluminum before welding?
Avoid anything that traps moisture or drags steel particles into the surface. Water-based cleaners leave hydrogen behind, and the aluminum oxide layer readily soaks up that water.
Since adsorbed water and oil feed hydrogen into the weld, they spike porosity fast. Steel wire brushes embed iron particles that cause cracking.
What’s the best solvent for cleaning aluminum before welding?
Acetone wins for most jobs. It dries clean, leaves no film, and lifts oils without water content. Isopropyl alcohol works as a backup, but it evaporates slower and can leave trace moisture. Apply solvent with a fresh, lint-free wipe,one direction, one pass, then flip.
How does laser welding aluminum compare to TIG?
Laser welding runs 3 to 5 times faster than manual TIG and puts far less heat into the part, so thin sheets warp less. TIG forgives sloppy prep better because the arc burns through some oxide. Laser doesn’t,it needs a clean surface to absorb energy.
How does surface prep interact with laser welding settings?
A clean, oxide-free surface absorbs laser energy consistently. Leftover oxide reflects the beam, forcing you to crank power higher and risking burn-through. Understanding the aluminum oxide layer: why surface preparation matters before laser welding means you set power for clean metal, not for fighting a reflective barrier.
Key Takeaways and Your Next Surface Prep Action Plan
Remove the oxide, then weld fast. That single rule prevents most aluminum laser weld failures. The aluminum oxide layer melts near 2,050°C[10] while the metal beneath it melts at approximately 660°C, so any leftover film stays solid and blocks fusion. Clean it off and weld within your regrowth window.
Here is the metallurgical logic in one line: oxide traps hydrogen, hydrogen makes porosity, and porosity fails inspection. Research links up to 80% of aluminum laser weld porosity to incomplete surface prep. Fixing prep fixes most of your defect rate.
Your Action Plan Checklist
- Rank your method by volume. Laser ablation for high-volume aerospace and EV battery work; chemical or mechanical for small batches.
- Degrease first, remove oxide second. Skip the order and grease drives oxide back into the pool.
- Weld within 30 to 120 minutes. The oxide film reforms in air, so set a clock, not a guess.
- Never use steel tools on aluminum. They embed iron and seed cracks.
Validate before you scale. Cut and polish a test weld, then run a cross-section porosity check under magnification. Laser cleaning of AA2024-T3 dropped porosity from roughly 3,5% to about 1% in University of Manchester trials. Hit that approximately 1% target on test coupons before committing a full production run.
Why surface preparation matters before laser welding comes down to inspection pass rates. Prove your process on five coupons first.
References
- [1]riselaser.com
- [2]gwklaser.com
- [3]abc-vietnam.com
- [4]acctekgroup.com
- [5]hantencnc.com
- [6]pmc.ncbi.nlm.nih.gov
- [7]proquest.com
- [8]laserax.com
- [9]research.manchester.ac.uk
- [10]sciencedirect.com


